CAMERAS
When you first walk into a television studio, you are confronted by an array of gadgets and wires and jumbles that seem complex and unmanageable. You know, of course, that's not true but until you know where to start, the equipment remains useless to you. So let's take one thing at a time and go over all of its aspects. Probably the camera is the most obvious place to start.
You know what it does (take pictures) so all you now need to know is what the parts are and what to do with them.
Let's start at the front of a camera and see what it's composed of. That round part sticking out the front is a zoom lens, and it has a cap over the front of it. The cap prevents dust from accumulating on the glass inside but, most importantly of all, it protects the pick-up tubes inside the camera from being hit by light strong enough to cause damage. Next, somewhere near the lens tube is a light, generally red, which goes on when that camera goes on the air. This is the tally light, and it lets the talent know which camera is active.
The tally light is on the body of the camera, which looks like a big box. It is. But inside are all the electronic gadgets, gremlins, and gizmos which produce the picture. Leave that stuff to a qualified engineer to play with because if you don't know what you're doing, you'll either damage the camera, yourself, or may be both. Now, this box is mounted on a head of some sort. A head is a support device that allows you to move the box around in different directions-left, right, up, down, and so on.
But you don't want the whole thing moving around all the time.
When you walk away from it, you want it to stay steady instead of suddenly swinging around and hitting something. So the head has locks on it. They will be on one side or the other, and there are two of them.
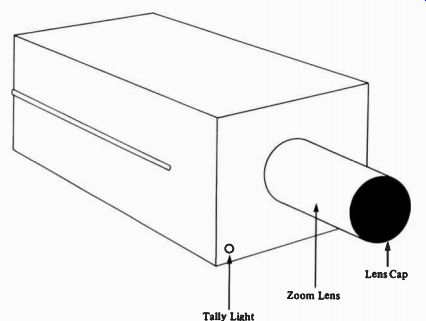
Fig. 1 Front of a camera
One, when it is tightened down, will stop movement right and left. The other, obviously, stops up-and-down movement.
Generally, on the other side of the head are tension knobs, al though these may be integrated with the locks. Their function is to exert a bit of drag on the left-and-right or up-and-down movement. The locks will prevent any movement, but these controls just make the movements easy or hard to make. You'll want a bit of resistance to free movement or you'll find the camera swings farther than you intend and responds so readily the picture you get won't be steady. With a bit of drag, you can get a steady, non-bouncing picture yet can move smoothly to an other picture. So set these tension knobs to the drag that suits you best.
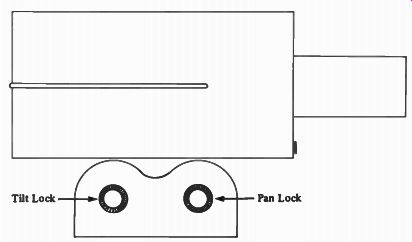
Fig. 2 Side of a camera
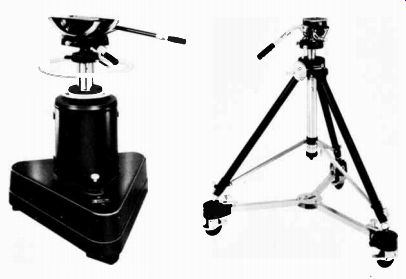
Fig. 3 A pedestal mount and a tripod mount
This head, with its locks and tension knobs, rests on some thing tall enough to keep it up off the floor, and that's referred to as the mount. It will be either a tripod mount or a pedestal mount.
On most tripod mounts, there is a crank to turn to raise and lower the camera. But this movement is jerky and generally to be avoided on the air. Most tripod mounts have locks for the three wheels too, so before you run a camera, be sure the wheels are unlocked.
Now, on the pedestal mount, you can raise and lower the camera just by pulling or pushing on the steering ring. The movement is smooth and even and looks good on the air, so you may want to do that for a special result sometimes. Take a good look at that steering ring. Notice it has an arrow or dot or some such indicator on two on the four spokes.
The mount will only go in the direction those two spokes point; you cannot pull it off to the side. To change the direction the mount will move, you have to move the steering ring around.
And you easily can just by turning it. So when you work with a pedestal mount, keep one hand on the ring just beside the marked spoke so you can quickly turn the ring and go in the proper direction.
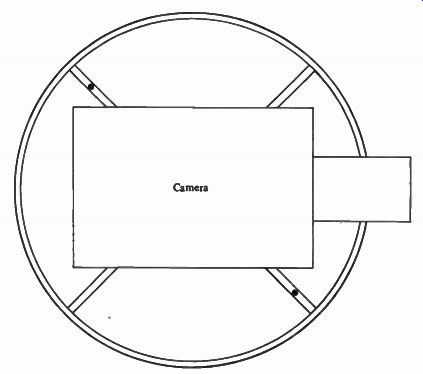
Fig. 4 Looking down on the steering ring

Fig. 5 Rear of a color camera
Now, let's go back to the camera. The next part we en counter is the viewfinder on the back of the camera. It shows what the camera sees and is just like the television sets you are used to watching. It has controls beside it for brightness, contrast, maybe even vertical and horizontal hold, and buttons to activate a particular gun inside, or maybe all three guns. If you push the button for the green gun, the viewfinder will show you the scene as the green pick-up tube by itself sees it. This, by the way, gives you the best view of what a black-and-white receiver will show of your picture. Any other buttons or knobs around the viewfinder should generally be left alone, as they belong to the engineering staff. But while you are a camera-person, your view of the world should be confined to that view finder only. Somewhere near that viewfinder will be a tally light so you, just like the talent, will know when your camera is on the air.
Fastened to the camera somewhere near the viewfinder will be a long cord, and at the end of that will be the headset. This has an earpiece (maybe two) with which you can hear the conversation of the other crew members, and a mouthpiece with which you can join in on the conversation. You have to communicate with the rest of the crew, and that's the method you use.
Your eyes, ears, and mouth now can be connected to the camera, but how about your hands? That's the function of the pan handle, that long rod coming out the back of the camera.
Hold on to it and move it, and the camera moves also. You can, therefore, move the camera in the direction you want.
But we have overlooked a couple things. One is fastened to the end of the pan handle and one is on the camera box at the rear side and on the side opposite to the pan handle. These are extensions of the zoom lens. The one on the camera itself is a crank that changes the picture you see by magnifying or reducing portions of the scene. Cranked as far as it goes one way, the picture in the viewfinder will show everything in the scene.
Cranked the other way, a portion of the scene will fill the view finder. This crank moves pieces of glass in the lens to achieve these changes. Sometimes this crank is replaced by a button which electrically moves the glass; this button can be put al most anywhere the cameraperson can reach. Sometimes it's at the back of the camera, sometimes it's on a separate pan handle, and sometimes it's on the single pan handle. But still, the glass in the lens moves and provides a continuously changing size of shot. But what does that other extension do? It's a focus control. Sometimes the picture will look blurred.
That's when you turn the knob or press the button (it too comes both ways) until the picture comes into focus. Later on I'll tell you about the only proper time to set your focus.
The last part of our front-to-back movement over the camera and mount is the cable which connects the camera to the rest of the television system. This cable comes out of the camera at the rear and from underneath. It's long enough to let you move all over the studio, and it carries your picture back to various monitors, control devices, and so on. Your major problem with this cable will be to keep it out of your way. You don't want to run over it when you move the camera, and you don't want to be too restricted by it. So you'll probably end up kicking it around with your feet. Just try to do it quietly.
These are the elements of the camera. Now, how do you deal with them? The first thing you do when you walk up to that camera is to put on the headset. Then you unlock it, and finally you uncap it. That's the process, but what, exactly, does it mean? The headset, first of all, is a way for you to hear and talk to the other members of the production who are working be hind the scenes. Through the earpiece, you will hear- the director's orders and the comments of the various other crew members. Through the mouthpiece, you will be able to talk to the director and the other crew members. You don't want to say anything that isn't absolutely essential because it makes noise in the studio which the microphones might pick up, and besides, the director needs to say so much and think about so much that s/he needs as few distractions on the headset as possible. But when you first put on the headset, you have to let people know you are there and can now be communicated with.
Hence you tell them with a phrase like "Camera 2 on headsets." Use your own good judgment here; if no one else is on the headsets and you know it, there's no point in saying anything.
Later, however, if you hear the director just announce "Director on headsets," you'll want to respond with "Camera 2 on head sets" just so s/he knows who else is on.
Remember those locks on the side of the head that I mentioned earlier? They get your attention next. Loosen them and you can now move the camera up and down and from side to side. Always unlock the camera before you make the next move, which is to uncap. There's a good reason for this. When you re move the lens cap from the camera's one sensitive spot-the lens-you must instantly become careful of the camera's in sides. The single most damaging thing which can happen to a camera is to have a light shine into the lens and onto the pick-up tubes inside. It's very similar to shining a very bright light in someone's eyes. If the light is sufficiently bright, the eyes can be injured. The pick-up tubes too can be injured by a light, and by one not bright enough to injure your eyes much at all. So if you should remove the lens cap while the camera is still locked tight, and a light happens to be shining in the lens, you can't easily and rapidly move the camera out of the beam.
But if the locks are loosened before you uncap, and a light is shining in, you can easily swing the camera away. It's smart to check where the lights are before you uncap, but play it doubly safe and unlock before you uncap.
Then find a safe place on the camera or mount on which to put the lens cap. Don't put it in your pocket, as you might walk off with it. Don't put it in a place where a sudden move of the camera will throw it off on the floor, as the mikes will pick up that clatter very clearly. Some spot near the base of the mount is generally good as there is less chance of its falling off.
When you leave a camera, the process is just the reverse.
First cap the camera, then tighten the locks with the camera level, then announce something like "Camera 2 leaving head sets," and finally take the headsets off. Of course you'll put the camera back in the spot where it belongs, generally at the back of a studio or out of the way in a corner, and you'll arrange its cable in whatever pattern your engineering staff prefers but that's a matter of striking the studio rather than running the camera. All that is the cameraperson's responsibility, but it is supplementary to the major duty of running the camera.
The major duty is everything done between the first un capping and the final recapping of the camera. That's when the cameraperson can give the director what s/he needs. And everything the cameraperson does is a composite of some basic, simple moves.

Fig. 6 Camera movements
First, the cameraperson holds on to the pan handle. By moving it, remember, s/he moves the camera but not the mount.
There are two moves s/he can make with the camera alone-a pan and a tilt. A pan is a movement from side to side. So you can pan left or pan right. If you need to see more to the left, you pan left. If part of the scene if off to the right, you need to pan right. Now let me introduce a confusing note, but hope fully one I can straighten out for you. When you pan right, you move the pan handle left. Look at Fig. 6 and I think you'll see why. It's because the camera is fastened down in the middle. To be safe then, go strictly by your viewfinder. If you can't see enough of what's happening to the right, move the camera so you see more to the right. That's a pan right, even though you move the pan handle to the left.
The next movement is a tilt and you can guess that's a movement up or down. If you need to see more below the scene, you tilt down and if the action is above where you are, you tilt up. Also, the movements of the pan handle are reversed for these moves, just like they are for a pan. Check Fig. 6 again to see why. As before, play it safe and look in your view finder. If you need more space up above, tilt up and don't worry about the fact that you push down on the pan handle.
Now, there are a couple moves you can make with the mount and the camera together. If the camera is mounted on a tripod, you grab one of the legs and push to get everything moving.
Then you can generally keep it moving, or stop it, by pushing or pulling on the pan handle. If you are running a pedestal mount, you grab the steering ring at the marked spot and push, steering it in the direction you want to go. Obviously, with either mount you can go right or left, and you can go in or out. The right or left movement is called a truck, and the in or out movement is called a dolly. So you can move the whole mount and camera left when the director says "Truck left," and you can move everything in when s/he says "Dolly in." Generally, these moves must be made rapidly while another camera is on the air. So you will be grabbing for the tripod leg or the steering ring in a hurry. If you are wearing any rings, they will hit the metal and the resounding click will be picked up by the mikes.
So before you start to run camera, be sure to take your rings off and put them in a pocket. If you have a ring you can't or won't remove, then bring in some adhesive tape and put several layers over it as it's impossible to be careful enough not to hit anything at least once during a production.
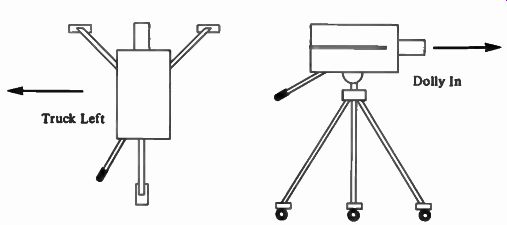
Fig. 7 Camera movements
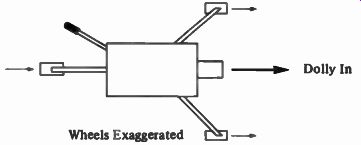
Fig. 8 Dollying in-wheels exaggerated
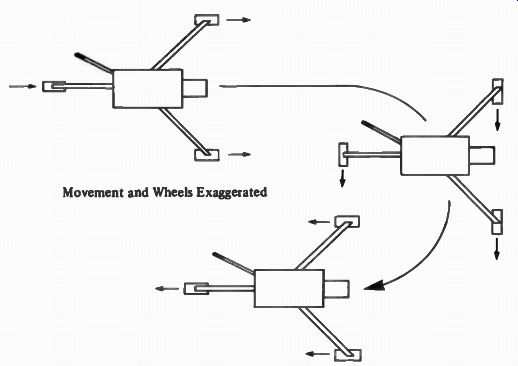
Fig. 9 A fishhook movement
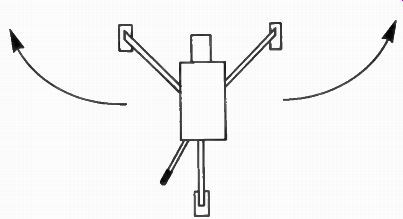
Fig. 10 An arc
There are a couple of tricky moves that involve the mount and the camera, one tricky by virtue of the type of mount, and the other because the move is just hard to do. First, a dolly on a tripod has to be finished off in a certain way because the wheels on a tripod turn so freely. If you dolly in, the wheels are pointed in, as shown in Fig. 8. If you have to dolly out while you're still on the air, you might think the wheels would stay in position and just let you go back. That's very rarely the case. The wheels will turn around, making a little circle, and settle into pointing outward. The result is a wobble as you start back. That bounces your picture. To avoid that, when you come to the end of your dolly in, move slightly to one side or the other and start back out. It's a "fishhook" movement, as Fig. 9 shows. Make it a brief movement, as brief as possible, and it's unnoticeable on the air. But it sets your wheels in the correct direction, and you can then start back smoothly when the time comes for you to do so.
The other movement is generally done with someone else's help. It's really a combination of trucking and dollying, so what you get is a curved movement usually called an arc. The problem is in not letting your picture bounce as you go. If you have to prevent the bounce and move the mount at the same time and without help, you simply have to practice a lot. It's easier, but still not easy, to have someone else pulling the mount in the arc pattern while you concentrate on keeping a smooth, flowing picture. The effect on the screen can be very impressive, especially if you are circling a solo performer or two people in an embrace or some similar single point of interest.
There's one other thing you can do with a camera that can almost be called a movement, but that really only involves the lens. That's a zoom. Remember I said the zoom lens magnifies a portion of the picture as you turn the zoom crank or press the zoom button. On the viewfinder, it looks like you are moving in toward the object. If the director calls for a tighter shot, you can either dolly in or zoom in. Generally you will zoom in be cause it's so much faster and doesn't upset your focus. That's the critical problem with a zoom lens. To set your focus, you zoom in to the tightest picture you can get. Then you turn the focus control till you have the sharpest picture possible. Then zoom out to the sort of picture your director calls for. Now you are in focus for the widest down to the narrowest shot. If, however, either you or your subject moves, you'll need to get another focus setting. Setting the focus is only good for one distance-that between you and the object. But once your focus is set, you can zoom in to give your director the tighter shot s/he calls for, and do it generally faster than with a dolly. It will, however, look different from a dolly so you may some times want to dolly instead. A zoom will merely magnify a portion of the picture, but a dolly changes the perspective on various objects in the shot and gives a much greater sensation of going past an obstacle or person or portion of the scene.
Twice now we have talked about the quality of the picture you get and not just how you get it. The dolly-zoom difference is one, and the arc around a single point of interest is the second. The mark of a really good cameraperson is not in how well s/he makes the mechanical moves but in how good-looking the shots are. Of course s/he must be able to get those shots through a mastery of the techniques, so being a good cameraperson does depend on being able to dolly smoothly while adjusting focus, while panning diagonally upward, while...
.... But if s/he has no eye for composition of if s/he isn't alive to the aesthetic difference between a dolly and a zoom, s/he'll be only a competent technician.
I'm assuming you want to be good, not just competent.
Running camera smoothly and well is a personal satisfaction which can make you feel just plain good inside. So what are some of the basic elements to be aware of for good composition?
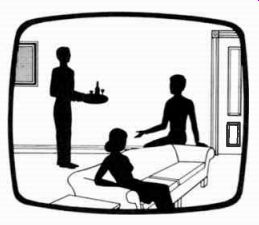
Fig. 11 A wide shot
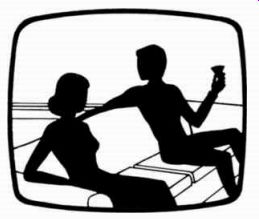
Fig. 12 Portion of a scene
Let's start with the widest shot you can get. This will show everything relevant within the scene. As you move in, either by zooming or dollying, you come to a medium shot, and that shows a portion of the scene which you want to emphasize.
Here is your first opportunity to compose the picture. On the wide shot, you must simply show everything and about your only possible worry is whether or not the elements are balanced left and right and up and down. But with a medium shot, you show only a portion of the scene. Do you want the elements you're showing to be balanced as before? Or do you want them off to the right of the shot? That sort of unbalancing tends to draw attention to the left of the picture, and can lead the viewer to see something over there s/he would not have noticed otherwise. Then as you move closer in, you concentrate attention on one object. If it's an object, it may be the major clue to the murder that every one else is overlooking. If it's a person, you may be moving in on the interior thoughts or the real motives. Move in on the butler's eyes, and he becomes the murderer.
Suppose you do want to draw attention to the butler, while showing the other people as well. Think of a pyramid. It's a balanced, stable figure, but it still emphasizes the topmost point. Shoot your scene like a pyramid and you'll have good composition plus attention to the butler because he's up there at the top. Turn the pyramid over and you'll have an un stable picture that's going to break up into action. The cops enter behind the butler and, as the pyramid must fall over, the butler must run. Later, at headquarters, the detective will question the butler and try to trap him with words. We want to see only the faces as they fight it out, so we use close-ups and cut back and forth between them.
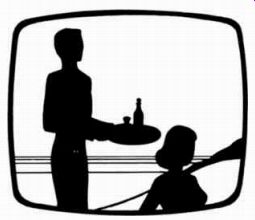
Fig. 13 Directing attention
Fig. 14 The guilty party
Fig. 15 Dominant point

Fig. 16 An unbalanced picture
Fig. 17 Leading faces
The space above the heads is called headspace. That's logical. Don't leave much space, but don't have their heads bouncing into the top of the picture. Be balanced. But notice we leave more room in front of the faces than behind them.
That subconsciously establishes where the other person is in relation to the face we see. If we go in for a full-face close-up on the butler as he realizes he's doomed, we lose some of the top of his head in order to get in the features of his face. This should always be your approach-mouth and jaw and chin are more important than hair, so cut off the top of a head rather than the bottom.
One further point in showing faces. Imagine a line running through a person's ears and inside the head. The longer the line appears, the better your shot. As the line gets shorter and shorter (as the person's head turns so the side is toward you), you finally see nothing but a dot (a full profile), and the worse your shot is.
As the show ends and the butler is led away to death row, you will probably have to get a shot of a card with printing on it.
This will be the title of the show, the director's name, "The End," or some other such graphic. If you aren't directly in front of the card, the printing will look big at one end and small at the other.
This is called keystoning. The remedy is to move over directly in front of the card or to have the card turned till it faces you squarely. Most often, the titling won't look as obvious as in Fig. 19. It will merely look like it isn't level, like it runs downhill. The remedy is the same-move the camera or move the card. Generally, the camera needs to move in an "uphill" direction to level the titling.

Fig. 18 A tight face shot

Fig. 19 Keystoning
Obviously, this covers only a small portion of the shots you can get or will be faced with. But it gives you some idea of what to look for and what to avoid. Something else must be added, though, before the camera is of any use at all to you- that's light. With no light at all, your eyes see nothing. A television camera is the same way, but in general, it needs more light by which to "see" than you do. So we'll have to arrange those lights hanging all over the studio ceiling.
LIGHTS
Look at a person standing in the sunshine. There's a shadow on the ground, a shadow on the face from the nose, shadows from the eyebrow ridges, a bit of shadow from the lips, and so on. That's one of the ways we detect roundness and three dimensions. Without shadows, the world would begin to look as flat as a comic strip. So one of the purposes of lighting is to give shadows. What a viewer at home sees is flat-as flat as the face of the television screen. So it's up to you to fool viewers into seeing three dimensions, and one of the ways you will do that is by lighting to create shadows.
Let's go back outside in the sun. That light comes from one direction. The shadows all flow away from it. Back inside, in the studio, we want to recreate that one-sided effect. So we put a light at one side of the person we are lighting. That be comes our "sun" in the studio and is the key point of light on which all our other lighting will depend. So that light gets called the key light. Put it out in front of the person you're lighting, about 45 degrees off to one side and about 45 degrees up from the face.
Now look at the subject and you will see those same shadows beneath the eyebrows, out from the nose, and so on.
But the television cameras won't respond well to that lighting.
There's too much contrast between the black shadows and the light skin. The pick-up tubes aren't as sensitive as your eyes, so those shadows can end up looking almost like holes. So we have to fill those shadows with light-not enough to get rid of them altogether but enough to soften them and make them less dark. Since we are filling them up with light, we call the light that does it a fill light. It goes on the opposite side from the key light, but also 45 degrees off to one side and 45 degrees up from the face. There's another difference between these two lights, and that has to do with the kind of instruments they are, but I'll talk about that later.
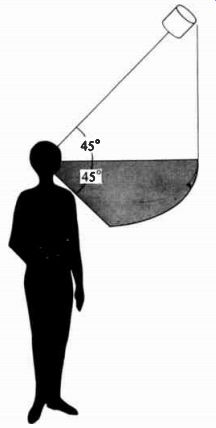
Fig. 20 Angles of lights
Now we have to put in one more light that's totally artificial, and doesn't occur anywhere outdoors. Directly be-hind the person and shining down at about 60 degrees or so, we put a light to shine on his back. So it's called a back light. Aim it so it hits the part of the head where a man often starts going bald-that round spot at the back. When you look at him from the front now, you'll see a rim of light on his shoulders and on his hair. Speaking of baldness, if he is bald, lower the light so it hits the back of his neck or you'll get some wild glare off the top of his head. The purpose of this rim of light is again three-dimensional. Without a backlight, people tend to look smashed up against the background. Turn on the backlight and they suddenly seem separated from what's behind them.
Look at the anchor newspeople on the network news and you'll notice a halo of light around them. It's not their saintliness, it's their backlights.
That's the basic three-point lighting set-up. It makes a person look three-dimensional and separates him from the background. There are other ways to light which give certain effects which are not three-dimensional but you will find these ways useful at certain times. We'll come back to those times later.
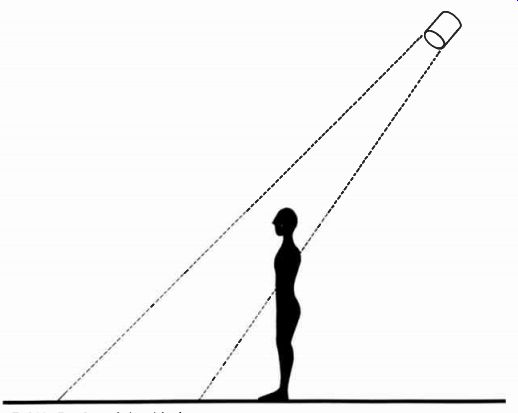
Fig. 21 A backlight
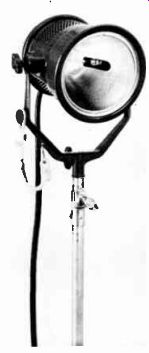
Fig. 22 A spotlight
Right now, though, let's take a look at the instruments you have used to get this three-point lighting. The back and key lights should be spotlights. That is, they are generally round and rather like a tube. Their beam of light can be concentrated in a large or a small spot by turning a knob on the back of the instrument. As the spot gets larger, the intensity of the light hitting a subject will go down. As it gets smaller, the intensity obviously will go up. Spotlights give hard light, causing sharp-edged shadows. They are directional lights, going exactly where you aim them.
The fill light, on the other hand, is a soft light causing no hard-edged shadows and generally spilling out all over the area in which you point it. You can't adjust its beam at all. It looks significantly different from the spotlights. Most generally, these fill lights are called broads and are shaped like rectangles rather than circles. The container itself is more like a box than a tube. It's a very open sort of light.
These instruments are all quartz-halogen lights. The name comes from the type of bulb inside that gives the light. It's a long tube bulb, nothing like the round bulbs you use at home.
It burns very hot and very bright and should never be touched.
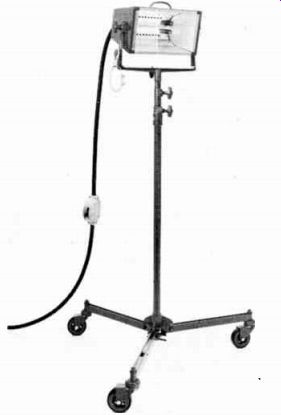
Fig. 23 A broad
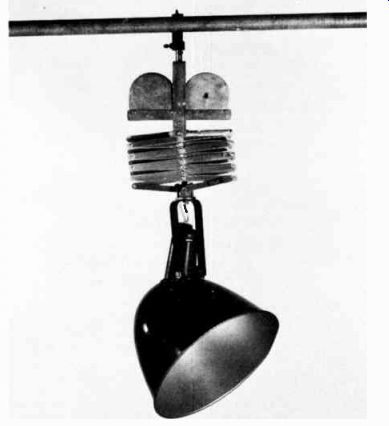
Fig. 24 A scoop cm a pantograph
First of all, you might burn yourself, and second, the oil from your fingers messes up the quartz and causes the bulb to burn out faster. The great advantage of these bulbs is they don't get dimmer as they get older. They keep on giving out the same kind of white light till they quit altogether. The bulbs like the ones you have at home are incandescent tungsten, and they get dimmer and dimmer as they age. So their light gets yellower and yellower. In color television, that's bad news. So most stations have gone to the quartz-halogen lights. But the tungsten lights still have some uses, so you can still find them around. They are good lights, but you can't let them get old.
If you are working with tungsten lights, you'll still have spots. But the broads will be called scoops because they are housed in a big conical shell as shown in Fig. 24. A scoop can be quartz halogen as well as tungsten, but you never find broads that are tungsten.
You'll also have a specific spot called a Fresnel (pronounced freh-NEL) as it is named after the Frenchman who designed the lens in it. That glass with concentric rings cut in it concentrates the light into the spot pattern and does it very accurately. Then there's the ellipsoidal spot which has sliding panels to cover part of the beam to make any shape you want. You can get a triangular beam of light, or a tilted rectangle, or almost any thing. These two types of lights can be either tungsten or quartz halogen.
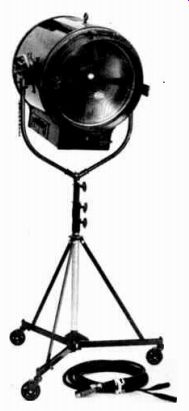
Fig. 25 A fresnel spotlight
If you work with first one type, then the other, you will notice you need far more tungsten lights to get the same light level as you need of the quartz type. The tungsten lights just don't give out as much light as the quartz. That's another reason why most places have quartz lights.
Suppose, though, you have too much light on your subject.
How can you reduce it? The easiest way is to turn the knobs on the back of the key lights so the beam spreads out and the intensity drops. Another way is to move the light back farther away from the subject. A third is to put something of neutral color in front of the light. This could be a thin piece of asbestos cloth, which won't catch on fire and will still cut down the amount of light hitting the subject. One thing you should not do is put the light on a dimmer to bring down the intensity.
This is why. A dimmer is a way to reduce the amount of electricity reaching an instrument. It's generally a lever swinging through an arc-something you can stop at any point be tween full on and full off and thus get exact control of the flow of electricity. You can use a dimmer for a lot of things in television. You can start out with all the light on the background and none on the subject. That gives you a silhouette. Then you can bring up the dimmers on the subject and take down the ones on the background. That gives you a nice lighting effect. You can dim the light down to nothing on one object and bring it up full on another, and thus shift your viewer's point of interest.
That's all legitimate. But if you use a dimmer to lower intensity, you make the bulb burn with a yellowish light instead of a white one, and the colors won't come out true on the screen.
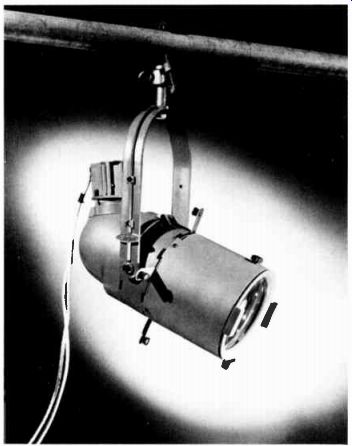
Fig. 26 An ellipsoidal spotlight
The cameras will sometimes react before your eye will, so don't take the chance of sending out an unbalanced picture.
Keep the lights on full except for special effects.
Those are the instruments you work with. Now let's go back to the subject you're using them on.
Generally, your subject is reasonably close to the back ground, and some light from the key and fill lights spills onto that background. That way you can see what's there. But sup pose you pull your subject away from the background. Replace the broad you are using for fill with a spot and move the key light and the new fill light farther around toward the sides of your subject.
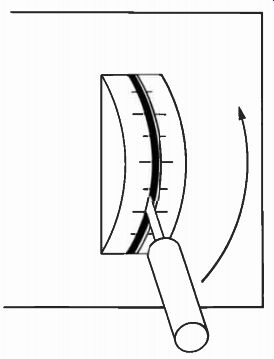
Fig. 27 A dimmer switch
Now you will have the subject lit up in a pool of light and all around will be darkness. To further this set-up, there are devices called barn doors, which fit on the spotlights. They are just pieces of metal which can be swung in front of the light so as to block off part or all of the beam. Bring the barn doors in till the beam hits nothing but the subject. Now you don't have any extra light hitting the floor or the background. This is called cameo lighting, and it is very dramatic. It's also rough on the engineers who are trying to adjust the cameras to give a good picture because there is such a contrast between the black background and the light foreground. So sometimes you need just a bit of light on the background to ease the contrast. Try to work it out with the engineers so all of you are reasonably satisfied.
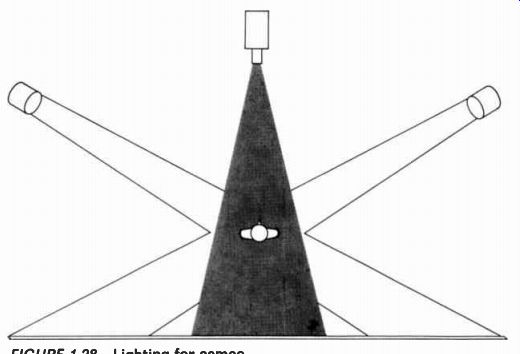
Fig. 28 Lighting for cameo.
Do the exact reverse (put light on the background and none on the subject) and you have silhouette lighting. This tends to look like black-and-white TV and so is of limited use in color television, but it can be effective for an opening and closing when you have credits or titling up on the screen.
There are a million different things you can do with lighting, but these three types are enough to get started on. Master the normal, three-point lighting first, then start playing around and experimenting and see what you can come up with.
If you have to light for more than one subject or one location, you still use that three-point set-up, but you have to include more sets of three in order to cover more areas. Make sure the areas overlap slightly so you don't get disastrous drop-offs of light from one location to another. Your goal should be an even amount of light over the entire area you have to cover. Remember simple things like high lights cause long shadows going down. Pull the lights down lower and you'll have less problem with shadows from noses reaching down below chins. Remember that anything in front of a light will cause a shadow on the set. If, for example, you have a mike on a boom, and you position it in front of a light, you'll get its shadow in what are usually inconvenient places. It seems as if a boom shadow always falls across the star's face. Either move the light up and thus lower the shadow or move the boom so the shadow falls somewhere else. Remember that if you put a light on a floor stand (to illuminate a flip stand, for example), cameras may hit it. So make sure it's as much out of the way as possible. By the way, a title card with white letters on a black background needs less light than the rest of your set.
Allow about two-thirds as much but spread it out evenly. If one side is brighter than the other, you'll have trouble. Re member to keep your backlights up high so they don't shine into the cameras. Use a light meter to check levels, but use your eye as well to make sure the lighting looks natural as well as technically acceptable.
Now comes the matter of what you will be able to see with all this light. People, of course, but where are they? Do you see the wires and light board and props? Generally not. You have some lightweight, movable panels to hide all the piles of junk, and the fronts of these panels look like anything from a flat wall to an ornately carved Gothic church. That's your set, the next area of our concern.
SETS
Every shot you take is in a certain setting. That setting may be an ornate representation of a Victorian living room or it may be just a plain curtain stretched tight, but it has to be there. It has to hide the stuff you don't want seen behind the performers, and it has to help convey the impression you are trying to build.
The setting may be as insubstantial as a total lack of light creating a black background, or it may be as solid as a grand piano showing behind a singer. Whatever form it takes, the setting has to be an important concern to you.
Generally, you'll want something fast and easy to set up.
You'll have to think in terms of pools of light and representations of objects and flat surfaces. For example, that large curtain that's stretched smooth across a couple walls of the studio is called a cyclorama, or cyc for short. You can use it for a back ground by throwing some light patterns on it. Shakespeare, after all, got away with just asking his audience to imagine immense battlefields and armies. But you will want some particular sets in particular styles upon some occasions. So what will you do about those? First of all, you have to decide what you want the scene to look like. If you are doing a drama, you may need a very realistic set of a lawyer's office. For an opera of the 1700s, a stylized candlestick, an ornately framed picture, and a Queen Anne chair can be enough. Your background could be just a blank curtain. But in getting the pieces and the flats for various settings, you need to decide on your approach. In the first example, for instance, the books on the lawyer's shelves would have to look very real. In the second example, however, the candlestick could be very ornate and very two-dimensional, even down to the flame on the candle. The designs are deter mined by the decision to be realistic in one case and representational in the other.
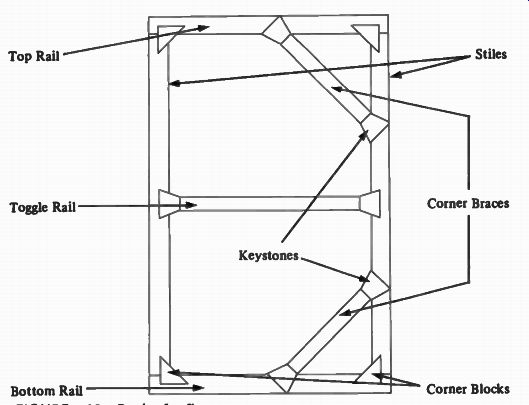
Fig. 29 Back of a flat
Your major problem, though, will not come from the little items you put into the setting, but from the flats that make up the walls of the setting. They are the biggest part of the scene you are creating and usually take the longest time to prepare.
So how do you go about building them? First of all, remember you want them to be easy to handle.
Then remember they have to stand up, so you must have a way to keep them upright. And last, you may want to use them later in another set, so make them in a standardized way.
To make a flat which is easy to handle means you have to keep it lightweight. Build a frame out of one-by-three lumber.
You can nail it together or you can use one of the super-strong glues available. Fig. 29 shows how the frame goes together.
Notice it is reinforced at various key points. Anything light weight and moved around a lot takes a lot of wear and tear, so it needs extra protection in some areas. Hence the reinforcement. Once you have the framework, you cover it with un-bleached muslin. That's cheap and useful. This too can be glued on with one of the white, water-soluble plastic glues.
Let it dry. Then thin out some of the glue with a lot of water and paint the muslin. It shrinks and stretches tight. Now you're ready to paint whatever you want on it-a few columns and a scene in the Roman Forum or the wood-paneled wall of the lawyer's office. Generally, flats like this are ten-feet tall, al though you may find eight feet to be more convenient for a studio with low ceilings. Just remember to stay away from long shots if your flats are only eight-feet tall, as you will probably shoot right over the top of them.
There's another sort of flat that's heavier and more solid than this style. The covering, instead of being muslin, is a fiberboard like Masonite. You build a different frame for this and use less bracing.

Fig. 30 A rigid flat frame
You can also nail wood paneling to frames like this and have that wood-paneled office for real. Remember, though, that dark paneling will absorb a lot of light and give you a very dark setting or a very hot one if you throw enough light on it to make it bright.
Now, how do you get either sort of flat to stand up? You can build a triangular leg as shown in Fig. 31. If you put a couple of hinges on it and put the other halves on the flats, you can attach the leg to any flat just by dropping the pins into the hinges. Just be sure you put the hinge pieces at the same height on everything you build. Then put a sandbag over the bottom part of the leg, and the flat will stand by itself. If you fasten two flats together, you can move them into an angle, and they will support each other. The problem is to fasten them together.
Those pieces sticking out from the stiles are called lash cleats. If you fasten a cord to the top of a flat, run it behind the lash cleat of another flat, then tie the cord to the bottom of the first flat, you will have fastened the two flats together. This works fine for the muslin-covered flats, but a better way to attach the more solid flats is to have holes through the stiles and put bolts through there. You can quickly tighten a nut and bolt sufficiently to hold the flats together, or you can use C clamps to hold them together.
You may want to cover up the seam between flats once they are up. First be sure they are securely fastened together in back, then run a strip of masking tape down the seam in front. Next paint it with the same paint you used on the flats.
You will still be able to see exactly where the seam is, but the television camera is not so sensitive as your eye. It won't see the seam at all.
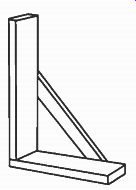
Fig. 31 A flat leg brace
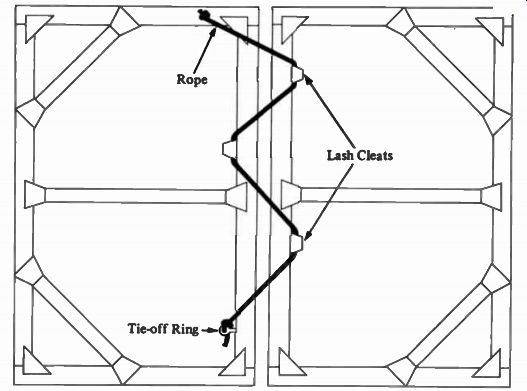
Fig. 32 Tying flats together
After you go to the trouble of making a flat, you will want to have a place to store it where it won't get accidentally destroyed. This may vary from a storeroom with areas marked out on the floor to a regular scene dock. If you just have a marked floor area, at least put the flats face to face so they don't get scarred. Also, try not to lean too many together. A better way is to have what looks like a file drawer turned on its side. At the top and bottom (on the ceiling and floor) there are strips of wood, generally 1" x 1", to separate the various flats and to help hold them upright. Between any two strips of wood is generally enough space to slide in four or six flats.
Again, put them face to face to protect them. A scene dock offers a lot of protection and doesn't take up much more space than the flats themselves. Just be sure you don't build it too short.
Flats, of course, are full-sized to give you the entire scene you need. But some of the shots you need to take involve only a small area-only what you can see on a piece of cardboard about eight inches high by twelve inches long. That can be a title or the director's name or information like "Meanwhile ...." These cards are referred to as graphics, or title cards, or art cards, or flip cards, but under whatever name, you'll have some to use for every show.
Fig. 33 A scene dock
GRAPHICS
Take a look at a television monitor (or set) that's turned off.
What is it? A rectangle, longer than it is high, and with rounded corners. That's simple enough, but many, many people forget that when they start to make up a title card to be shown on the air. Now turn the monitor on. Look for the smallest detail in the picture. Are there a lot of small details? Are those details very small in comparison to the major object in the picture? Chances are the picture is fairly simple with few detailed objects, and the small details are not all that small. Television doesn't very well show small stuff that is intricately decorated.
Lots of people forget that too in making title cards.
So when you start thinking of making title cards, think of a rectangle without much on it and not very decorated. Now, let's get a bit more specific.
Any title card or written, printed, or painted sign or any static piece of art work that's only two-dimensional is referred to by the catch-all term graphic. Usually these graphics are on pieces of cardboard and hence get the supplementary name of title card. The two terms are pretty interchangeable. Notice I said "two-dimensional." A small piece of statuary which you would have to show would not be called a graphic. Graphics and graphic art refer to flat works. That doesn't mean the scene presented on a piece of cardboard can't look three-dimensional.
You may, indeed, be trying to create that effect, but you are, nonetheless, dealing in only two dimensions.
The pieces of cardboard that graphic work goes on are roughly in the same proportions as the television screen. Those proportions are three units high by four units wide. Those used to be the proportions of movie screens back around the time television started, so the new business just took over the old form. So anything you put on a card should fall inside a box that's three by four. That box can be three inches by four inches or three feet by four feet or three miles by four miles, as long as it's still three by four. Remember too, this is a proportion, so the box can be six inches by eight inches, or nine inches by twelve inches, and so on. The important thing is the three by four relationship rather than the actual numbers.
Immediately, this excludes those tall pictures of sky scrapers, or a view up a mountain or a picture of someone standing. Now, I know you have seen all these things on the air. So have I, and sometimes they look fine. But you can't put them on just as they are. You have to fill in those sides with something so the overall picture comes out three by four, and that's not hard to do. Sometimes you even get added emphasis to the height of a building by showing the lower buildings at its sides. Or in a picture of a model, the price of the outfit and the name of the store can go in the space at the side and so make the whole thing three by four. But somehow you have to maintain the television screen's proportions.
You also don't want to fill up the card. What the studio camera shows in its viewfinder is more than you see on a control-room monitor, which is more than the transmitter sends out, which is more than the home receiver shows. So after all these losses, you are minus about 10 percent of what you can see when you look at the graphic. So to be sure the viewer sees everything you want seen, confine your material to a center area referred to as the safe area.
Obviously, you can have parts of your graphic running out of the picture. As long as what is lost isn't essential to the sense of what you show, that's fine. Material can run all the way to the edge of the card, but it won't be seen by the home viewer. Normally, you want to leave some borders on the card though, and not have anything on them at all. That way your camerapeople won't shoot the whole card. They will move in to a tighter shot and just show the center part. That way, if anything happens while you're on the air and the camera gets moved, it won't suddenly be shooting part of the stand the card is on and part of the studio floor and the floor manager's foot. Also, if the card isn't done quite right or quite to your satisfaction, you have some room to have the camera move around and frame up to a better shot, one you find a bit better composed. Or you may find you have to super a name or a price over part of the card. If the margins are there, you can un• balance the shot of the graphic, super the price (or whatever)
and get an overall balanced picture. Without margins, you can't unbalance the shot at all. So leave blank borders, and put all the essential information in the safe area.
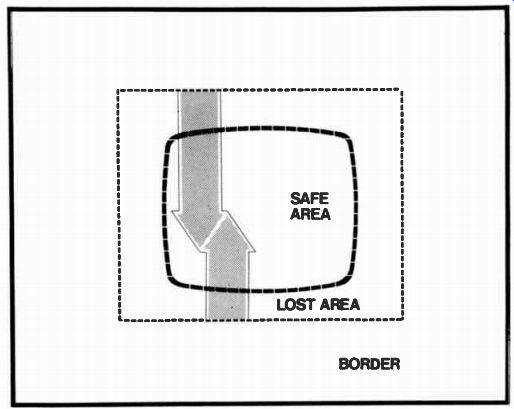
Fig. 34 Safe area of a graphic
Your next concern is to keep the graphic from looking cluttered. Don't use eleven different typefaces, and a border of little pink flowers and a draped curtain on a graphic announcing your afternoon movie. That might look lovely on a poster (I doubt it), but it certainly won't on the television screen.
Keep it simple. A single rose on a long stem with a couple leaves and one typeface for the title can be just as effective and much less distracting.

Fig. 35 Bad and good graphics
This point of keeping it simple is good to remember if you have to show a group of stills of countryside, cityscapes, or the like. Generally, these pictures have a great deal of material in them. The view down the valley shows the river, the houses of the village, the road going up the mountain side, the peak which was climbed. . . . Put that on the screen and only a jeweler with his eyepiece will be able to pick out anything. . . . Pick simpler shots and use more of them. One shot of the river followed by a few close-ups of houses in the village and the town square, then the start of the road, etc., will make a more understandable presentation, and certainly one a lot easier to see. That's not to say all outdoor shots are bad. A view of the rocky coast with waves breaking into foam can show a lot of area and still be understandable. That's because there are only two sorts of things in the picture-the ocean and the rocks.
Even if all the detail is lost, the impact of the picture remains because people can see what's happening. Again we have come back to the point of keeping the picture simple.
If you are dealing with pictures not done on a piece of cardboard, as will often be true for outdoor scenes, be sure you fasten these pictures to a piece of cardboard. If you don't, the heat from the lights will make the picture curl over and fall off the stand just as you put it on the air. But don't put another picture on the back of that card if you can avoid it. Sure as you do, the floor manager will confuse a command and turn around the wrong card or have the wrong side up to begin with. In order to avoid as much confusion as possible, put a number in the upper corner of each card you're using so you can say "Change to card 3" and everyone will know what you mean. Also, if the cards get dropped, they can quickly be put back in order.
There's a special sort of graphic you will deal with a good deal. That's a super card. These are the black cards with white letters on them, and you generally use them to matt or key a name or title over another shot. Just like all graphics, the letters should go in the safe area. If you want the letters to come out centered on the screen, place them in the center of the safe area. If you want them on the lower third of the screen, as is true with many names, then put them in the lower third of the safe area.

Fig. 36 Printing positioned on graphics
Of course you can adjust the framing by moving the camera, but prepare the card the way you intend to show it and you will have greater flexibility in adjusting. That is, don't put a name in the center of the card figuring you can always have the camera tilt up and put it in the lower third of the shot. The cameraperson may have to tilt up so far s/he shoots over the card, and then you can't use the card at all. There's one other thing to re member in preparing super cards. Use a plain, solid typeface.
Fancy letters lose their fine lines and points and decoration when you try to matt or key them. Thick, heavy lettering runs together in matts and keys and becomes unreadable. Leave good space between words and letters, and use an open, simple typeface. The point is to be readable, not ornate.
Someone in the studio has to be in charge of all these cards. Further, someone has to cue the actors so they know when to start talking. Someone has to get props out of the way. Camerapeople aren't free to do all this, neither are the actors.
So we have a special person charged with all these jobs. That person is the floor manager.
FLOOR MANAGING
The floor manager is the director's mobile link to the studio.
The director can and does talk to the camerapeople, but they are tied to their cameras. For getting things done, often at the last minute, s/he has to depend on the floor manager. When s/he has advice to give the talent, or questions to ask them, s/he has to go through the floor manager. S/he gets cues relayed by the floor manager. S/he finds out if there are problems because the floor manager is often the only one free enough to talk. Further, the floor manager makes sure nothing gets in the way of a moving camera. The cameraperson looks only at the viewfinder, not at the surroundings, and so may be headed right for a light stand or a prop. The floor manager is responsible for moving them. The floor manager makes sure the talent knows how much time remains till the commercial or the end of the show, so they will be able to come out on time. The floor manager, in short, makes sure the studio runs smoothly during the production. And yet, because the job seems easy, many floor managers will not give it their complete attention. However, the job is only easy if you know enough about all the production jobs to be able to remove the obstacles to a good performance. If you don't know that much, then you become one of the obstacles to a good performance.
Let's suppose a talk show is about to begin and you are the floor manager. The director is making last minute preparations, so you take that time to look critically at the set and the talent.
Is everything where it should be? Are the flats firm and not in a position where they might fall over? Is the talent's make-up right? Are they sweating from the heat of the lights? Are they nervous? It's up to you to correct any of these situations. Some are easy-a flat can be braced, the air conditioning can be in creased. But it takes a diplomat to calm down excited guests.
You need to put them at ease by making them feel everyone is there to help them. Don't spend your time talking over the headset to the audio person just to pass the time. One-sided
conversations, especially if you're joking and laughing, can really upset the talent. They can be paranoid enough without thinking you are laughing at them. Check to see the mikes are all in place, and tell the talent which camera the director will be starting on. Once the director has the tape rolling, or has said something like "thirty seconds to air time," pass this on to the talent. Just a simple phrase like "Tape is rolling, coming out on camera one," is very consoling to them, as they then know the program is about to begin. Then, about ten seconds before the show starts, announce, in a loud voice, "Stand by." This lets everyone in the studio know it's time to shut up. The mikes will be opened soon and no extra noise should be made.
Also, stand next to the camera the director is starting on and raise your arm. The talent who will begin talking will watch you, and when the director says "Cue," bring your arm down and point at the talent. S/he should start talking, unless s/he's suddenly scared, and you can't do much about that. If the director is about to switch from one camera to another, stand between the two and point at the one that's now active. As the director goes to the other camera, swing your arm around and point at the other camera, the one that's now been put on the air. Make the gestures, both cueing and changing cameras, big and obvious because you are in the dark and the talent is facing bright lights. If you don't make an obvious movement, the talent may never see it. While the program goes on, you may have to move obstacles out of the camera's way, pull the cable around so the camerapeople don't get their feet tangled in it, change the lighting at the right instant, take a mike as a singer goes off the set, change the title cards on the stand, or any number of other things. It's these details that you and the director have discussed during the rehearsal, so you should expect whatever comes up. You should even expect an emergency. There's always one per show, generally of a totally disastrous nature. You're the only one free enough to prevent it from ruining the production. When a mike suddenly dies, you have to scurry around and plug in an extra and get it on the set.
When a costume splits, you have to find the safety pin.
If you get through the show without major problems, your next, and final, concern is to get the talent out on time. The director will be giving time cues like "Five minutes." You relay this to the talent by holding up five fingers right under the lens of the on-air camera. Then get in the line of sight of those not on the air just then and show them the five-minute cue too.
Then comes four, three, two, one, and thirty. How do you show thirty seconds? That's half a minute, so you show half a finger.
When the director says "Wrap them up," make a fist and rotate it back and forth. The talent should stop almost immediately, but gracefully. If they don't, the director will end up saying "Cut," and you run a finger over your throat like a knife to indicate STOP. The talent ought to stop immediately without another word.
Fig. 37 A half minute
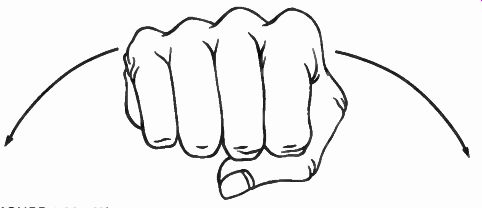
Fig. 38 Wrap up
If you are out on time, you might think the show is finished.
But stay on the headsets because if you were videotaping, the director will quickly spot-check the tape to see if everything is all right. If it isn't, you'll have to call everyone back into places so the show can begin again. But if everything is fine, you can announce "Let's strike the studio." That's the signal for everyone to put away the sets, turn off the lights, get out of costumes, and generally get the studio cleaned up. It's your responsibility to see the studio gets struck properly and completely before anyone is allowed to leave. But once that's done, and you have returned graphic material to the director and props to the props person or the storage area, you are through.
Simple job, yes, but only if you know enough about all the other jobs to handle them as well. It's only by knowing the other people's jobs so well that you can help them from your position as floor manager.
That takes care of the jobs and materials in the studio.
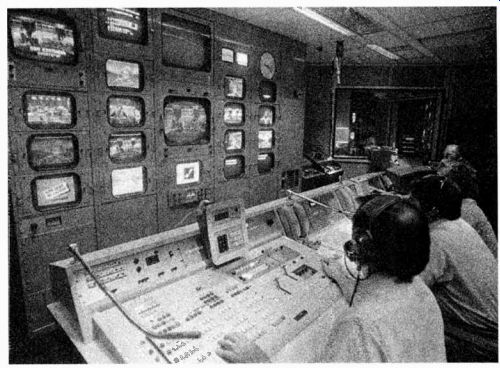
What of the control room? Everything is run from there, so you might consider the control room to be the brains of the outfit.
So let's talk about what goes on in there.