Give your turntable a new lease on life with these tonearm re-wiring tips.
Back in the mid-1980s, I published three articles describing a belt-driven turntable based on the old AR-XA drive system. The first part described a new base for the turntable, and modifications to the original AR-XA sub-chassis to reduce resonance problems and accommodate the Mayware Formula 4 and Grace 747 tonearms The second installment described an electronic speed control designed to provide a low-distortion sine wave to the turntable motor. A variable-frequency oscillator allowed pitch adjustment on synchronous motor turntables, and 45 rpm speed without moving the belt to the larger pulley
The third part involved replacement of the modified AR sub-chassis with Merrill Audio’s acrylic sub-chassis, and the installation of Joseph Grado’s now legendary Signature ToneArm Other enhancements included a high-torque Merrill synchronous motor, the Merrill replacement spindle, Merrill lead coating for the outer platter, Merrill platter balancing, heavier springs for the sub- chassis, and hum shielding necessary in order to use the turntable with the un shielded Grado Signature 10MR phono cartridge. This excellent cartridge was subsequently upgraded to the outstanding Grado Signature XTZII. The third article included a sidebar by George Merrill on sub-chassis design and hum shielding. All three articles have been reprinted in The LP is Back
Although I own over 6000 CDs, I continue to buy and play LPs, and am still actively interested in analog play back (including a large collection of 78 rpm records). The Galo/Merrill/Grado turntable has served me well for about 20 years, but it was time to either re place the stylus in my Grado XTZII or buy a new cartridge. After John Grado informed me that the XTZII stylus was still available, I decided to obtain a re placement rather than purchase a new cartridge (John is the nephew of Joseph Grado and the President of Grado Laboratories).
The XTZII, like the other Grado cartridges, is a moving iron design, and its low coil inductance and resistance (9mH; 70 ohm), plus an ultra-efficient generator system, provides many of the ad vantages of moving coil designs with out some of the liabilities. The Grado Signature ToneArm remains a stellar performer, and an ideal match for the Grado cartridges. ‘We fortunate few were able to purchase one in the mid 1980s— during the short time it was available— for the bargain price of $485. If you’re looking for a new cartridge, Grado has a full line covering all price ranges. You can order Grado cartridges and replacement stylii from Audio Advisor, Needle Doctor, and LP Gear.
SUSPENSION ISSUES
One problem with belt-driven turntables using three-spring suspensions concerns the tonearm interconnect cable. It’s difficult to dress the tonearm cable in a way that doesn’t interfere with the turntable suspension. In “The Belt-Driven Turn table Revisited,” I suggested fastening the Grado cable to the underside of the turntable, on the end opposite the tonearm.
I also provided plans for constructing a rectangular “sub-base,” which raised the turntable to allow the cable to droop without pulling on the turntable suspension or touching the surface below. Though this system worked adequately, it has always been rather cumbersome. But, the Grado tonearm cable was heavy enough that I really didn’t have much choice (Grado used a Mogami Neglex 2 balanced quad cable, but Joe Grado told me that the copper was slow-drawn to his, specifications).
Grado’s tonearm cable was a fine performer in 1985, but there are many superior cables available today. My favorite interconnect is D.H. Labs’ Air Matrix cable fitted with their RCA-HC Ultimate RCA Plugs. Like many high-performance interconnects, this cable is much too heavy to be connected directly to a tonearm, so I decided on a two- stage approach to the problem.
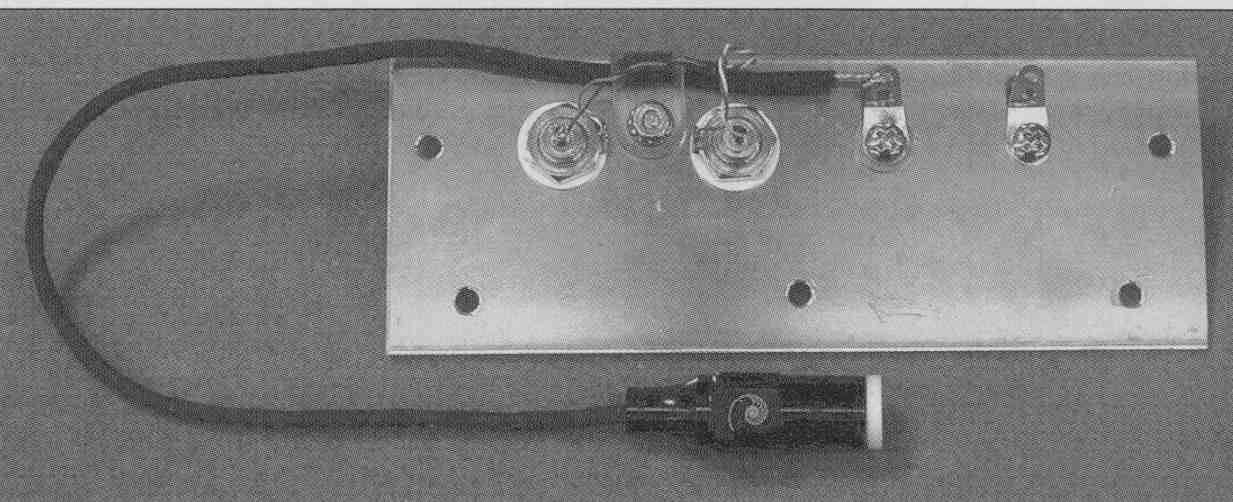
PHOTO 1: The assembled connector plate. New RCA jacks and ground posts are
mounted on a piece of 2” brass stock. The ground post closest to the RCA jacks
is insulated from the brass plate.
Cardas makes a 5-pin DIN-style tonearm base connector and a 4-conduc tor, 33 AWG shielded tonearm interconnect that is thin and extremely flexible. I use the Cardas interconnect to link the 5-pin tonearm connector to a pair of D.H. Labs CM-R1 RCA jacks mounted on the rear of the turntable base. The Cardas wire has no effect on the turntable suspension. You can then use the interconnect of your choice—no matter how stiff or heavy—between the RCA jacks and your preamp’s phono input. Although my instructions are tailored to the Galo/Merrill/Grado turntable, this approach is suitable for many other turntable designs, with and without a spring-suspended sub-chassis.
CONNECTOR PLATE
I mounted the new RCA jacks and ground posts on a brass plate, cut from a piece of 2” wide brass stock, which I purchased in the hobby section of my local hardware store (Photo 1). Cut the brass stock 5 3/8” long and drill the plate for the two RCA jacks (a 3/8” hole is just right for the insulating washers supplied with the D.H. Labs jacks), two ground posts, plus a hole for a 4-40 machine screw, which will hold a nylon cable clamp between the two RCA jacks. You should also drill five mounting holes 5/16” from the edge of the plate.
Mount the connectors and ground posts as shown in Photos 1 and 2. The ground posts are made with 6-32 x 5/8” machine screws, #6 ground lugs, lock washers, hex nuts, and knurled thumb- nuts. One ground post should be insulated from the brass with a nylon shoulder washer and nylon flat washer and mounted closest to the RCA jacks. The remaining ground post should make electrical contact with the brass plate.
Prepare a 12” length of the Cardas tonearm cable by stripping about 1½” of the outer insulation from one end and about ¾” from the other. Carefully unravel the braided shield on each end, twist the strands together, and tin the ends. The Cardas center conductors are grouped into two twisted pairs. Carefully strip 14” of the Teflon insulation from the end of each conductor, twist the fine strands together, and tin them. Make the white/blue pair left signal and ground, and red/green pair right signal and ground.
Figure 1 is the wiring diagram. Solder the end of the Cardas cable—with ¾” of insulation removed—to the Cardas DIN Phono Connector (the view in Fig. 1 is facing the solder terminals on the Cardas connector). Solder the other end of the Cardas cable to the connector plate assembly. The shield should be soldered to the ground post that is insulated from the brass plate. Use a short length of heat-shrink tubing over the shield, and another short piece over the entire cable. Make sure that the cable clamp holds the cable firmly in place, and that there is no strain on the thin center conductors. After you’ve finished, use an ohmmeter to verify that the signal and ground connections match those of the original Grado tonearm cable.

PHOTO 2: The connector plate mounted on the rear of the turntable base. Nearly
any inter connect cable, no matter how heavy, can be used to connect the turntable
to the preamp.
DISASSEMBLY
You must disassemble the turntable in order to install the new tonearm wiring. Remove the outer platter, the belt, the counterweights, and head shell from the Grado tonearm. Then, remove the arm from its base, using the Grado instruction booklet as a guide (you don’t need to remove the Grado arm base; it can remain fastened to the Merrill sub-chassis).
Remove the inner platter and wipe any oil remaining on the spindle with a soft, lint-free cloth. Store in a safe place. Disconnect the Merrill sub-chassis ground wire from the motor mounting bolt and remove the sub-chassis. Keep the sub-chassis upright so you don’t spill any oil from the spindle well, and store the sub-chassis in a safe place, covering the spindle hole to keep out dirt.
As you face the rear of the turntable, the left edge of the brass plate will be 1 7/8” from the edge of the oak turntable base (Photo 2). Remove the rear piece of aluminum angle stock that supports the top plate assembly (Photo 3). Make a rectangular cutout—about 1 3/8” x 4 1/8”—in the back of the turntable base (Photo 4). Cut the aluminum angle piece so it doesn’t extend beyond the rectangular cutout, and re-install. Include a 1/8” cable clamp as shown in Photo 3.
Drill pilot holes for mounting the assembled brass plate, and mount with five #6 x 5/8” brass wood screws. Mount another 1/8” nylon cable clamp for cable support, as shown in Photo 3. The cable should be able to slide in this clamp, al lowing you to adjust the position of the cable as needed.
Temporarily secure the Cardas DIN connector to the sub-chassis suspension bolt with a nylon cable tie, to prevent strain on the cable and connector. Connect an 18 AWG ground wire from the motor mounting bolt to the ground post closest to the edge of the brass plate. Route this ground wire through the first cable clamp. Use a #6 ground lug on the end connected to the motor mounting bolt.
= = = =
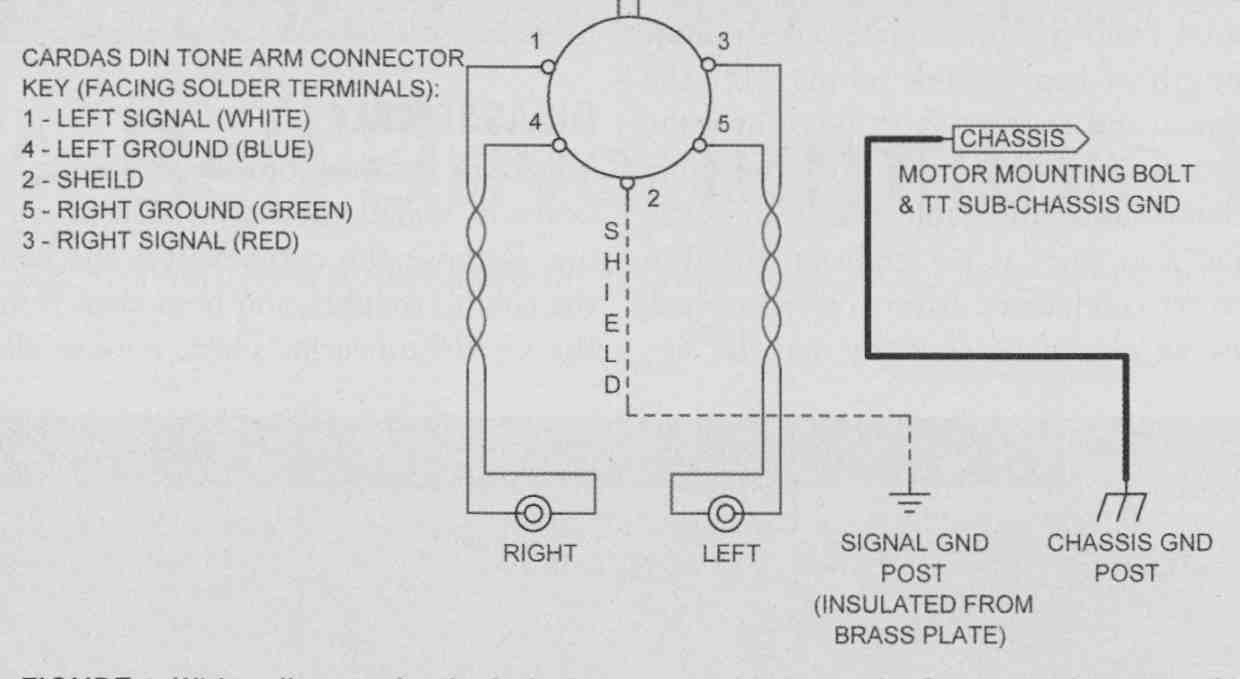
FIGURE 1: Wiring diagram for the belt-driven turntable upgrade. Separate chassis
and signal ground posts accommodate a variety of installation requirements.
CARDAS DIN TONEARM
KEY (FACING SOLDER TERMINALS):
1 - LEFT SIGNAL (WHITE)
4-LEFT GROUND (BLUE)
2-SHEILD
5-RIGHT GROUND (GREEN)
3-RIGHT SIGNAL (RED)
SIGNAL GND POST (INSULATED FROM BRASS PLATE)
CHASSIS GND POST
= = =
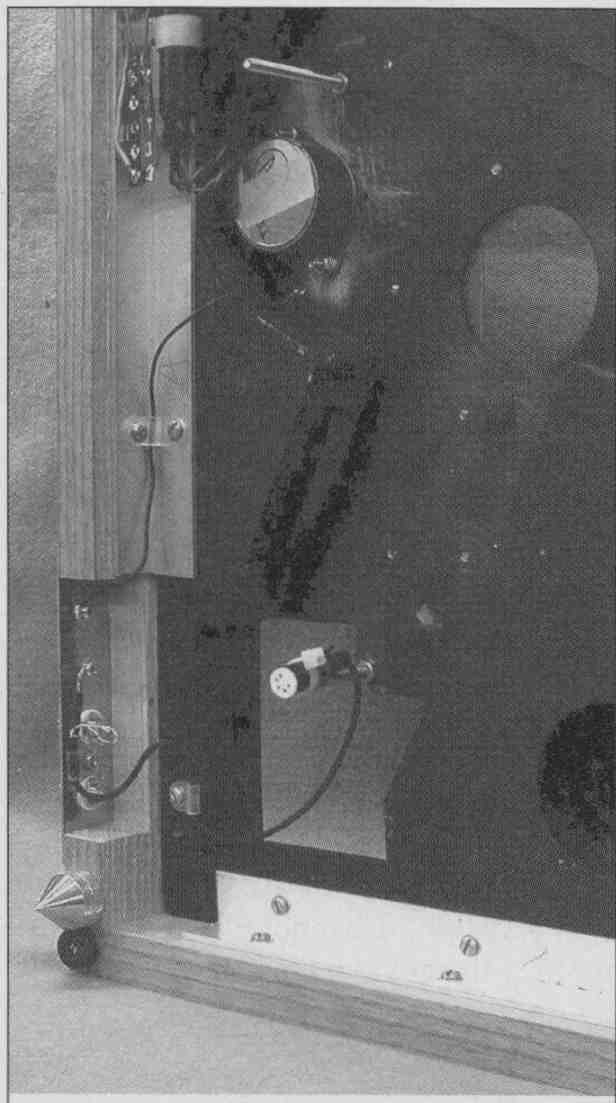
PHOTO 3: Bottom view of the turntable base with the new connector plate installed.
The rear aluminum angle bracket is shortened to make room for the connector
plate cutout.
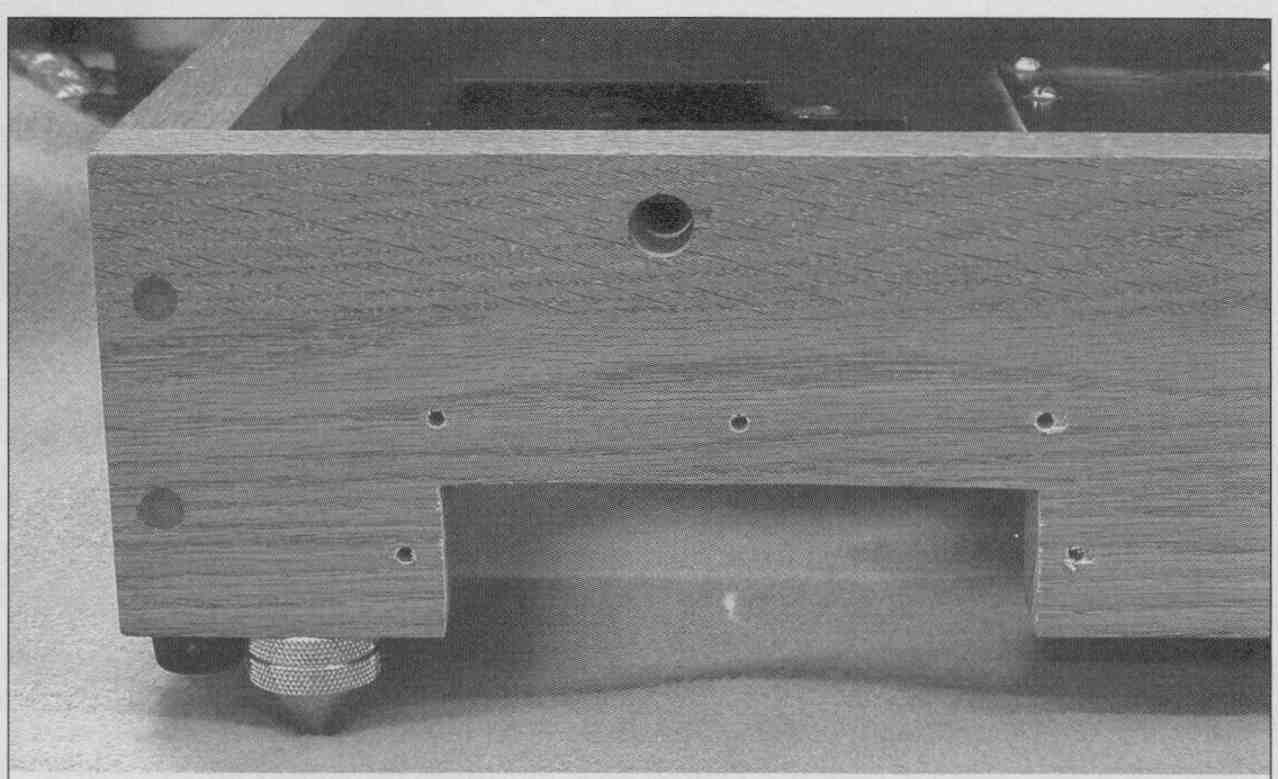
PHOTO 4: Rear view of the turntable base, showing the cutout and pilot holes
for mounting the connector plate.
BRASS CONES
With the new tonearm wiring arrangement, the turntable no longer needs the old sub base. You can re-use the old rubber feet of the main turntable base, but I prefer to replace them with something more effective at dissipating energy away from the turntable. A variety of suitable metal cones are available, including some that are rather exotic and expensive.
Parts Express carries its own Dayton brand of isolation cones that work very well, and a package of four Costs only $25. The cone itself is a two-piece, threaded arrangement that is height-adjustable, which is handy for turntable leveling. The cones come with flat receptacles, which prevent the sharp points from damaging the surface below, and are available in either gold or chrome (gold is a better match for my oak turn table base).
The cones are also supplied with eight adhesive foam cushions, but I prefer to secure them with a very thin drop of silicone glue. I mounted the cones just inside the old rubber feet, as shown in the photos, because this was the best position for the top shelf on my equipment rack (I left the old rubber feet in place). If your turntable shelf is large enough, you can remove the rubber feet and in stall the cones in the four corners.
Long-time readers will note that I no longer use the turntable isolation shelf that I described in a previous article. We moved to a new house in Sept. 2014, and my downstairs listening room has a concrete floor, so I have no need for it. If you have an unstable floor, I still recommend using some type of wall-mounted shelf.
After the brass cones are in position, let the weight of the turntable base hold them in place for 24 hours to allow the silicone glue to frilly cure. Use the leveling feature of the cones to ensure that equal pressure is applied to all four. I also glued the receptacles to the shelf on my equipment rack. Use as little silicone glue as possible (the tiniest dab will be enough to hold the cones firmly in place), to avoid having a reactive coupling of the turntable to the cones and the shelf below.
REASSEMBLY
Remove the cable tie temporarily holding the Cardas connector to the sub-chassis mounting bolt. During reassembly, take care not to strain the cable and connector. Reassemble the turntable following the directions in “The Belt-Driven Turntable Revisited.” Be sure to reconnect the ground wire from the Merrill sub-chassis to the motor mounting bolt.
You may need to add a small amount of Merrill Ultra High-Film Strength Turntable Oil to the spindle well (this is the oil originally supplied with the Merrill sub-chassis). Fortunately, George Merrill still has this oil in stock, if you need more. Contact him at George Merrill’s Analog Emporium, or try Merrill Scillia Research.
AR-XA drive belts stretch out over time and eventually need replacement. The best source is A-B Tech Services, a company supplying parts for old AR loudspeakers and turntables. The company is run by Alex Barsotti, a long-time employee of Acoustic Research. A-B Tech’s parts are manufactured to original specifications, and are often less expensive than the substitutes sold by other dealers.
Replacement belts normally have a powdery white coating of talc already applied. If yours doesn’t, be sure to talc the belt before re-installing, using pure talc, not talcum powder.
After you reinstall the Grado tonearm, plug the Cardas connector into the base of the arm. It will be a tight fit. The Cardas cable will form a small loop under the tonearm. Adjust the position of the Cardas cable in the cable clamp as needed. Follow the original Grado Signature ToneArm setup instructions to the letter.
Once you have re-assembled the turntable, connect it to your preamp with your choice of interconnect cables. As mentioned, I am extremely pleased with the performance of D.H. Labs’ Air Matrix Interconnect Cables fitted with their RCA-HC Ultimate RCA Plugs, which you can buy from Audio Concepts, the well-known loudspeaker manufacturer. The Air Matrix cables are not sold in bulk form—only pre-assembled.
For those who wish to assemble their own interconnects, I recommend D.H. Labs’ Pro Studio Interconnect Cable, plus the RCA-HC Ultimate RCA Plugs, both available from Parts Connexion. Parts Connexion also carries a D.H. Labs cable custom-manufactured for them, the BL-Ag, which consists of 23 AWG solid-core silver center conductors, a foamed Teflon tape-wrapped dielectric, plus a foil shield and drain wire. I have not tried it, but it’s certainly worth investigating. The BL-Ag is too small for the Ultimate RCA Plugs— D.H. Labs recommends its RCA-2C for this cable. For a cost-effective solution, D.H. Labs’ BL-1 fitted with RCA-2C connectors is still hard to beat for the money.
Normally, I recommend putting a jumper between the two ground posts, and running a single ground wire to the preamp. Make the ground and jumper wires with 18 AWG stranded, insulated wire and crimp-on spade connectors. My system is silent using this grounding arrangement.
However, some preamps or integrated amplifiers may yield lowest noise with separate ground wires from the tonearm and the turntable chassis ground posts. The two-ground post arrangement allows maximum flexibility for a variety of installation requirements.
The upgraded turntable is shown in Photo 5. The number of high-priced turntables on the market continues to amaze me, with some stretching well into the five-figure range. With the tonearm wiring upgrade, and a new stylus or cartridge, the Galo/Merrill/Grado turntable should continue to provide musically satisfying sound from your vinyl collection for years to come, without breaking your bank account.
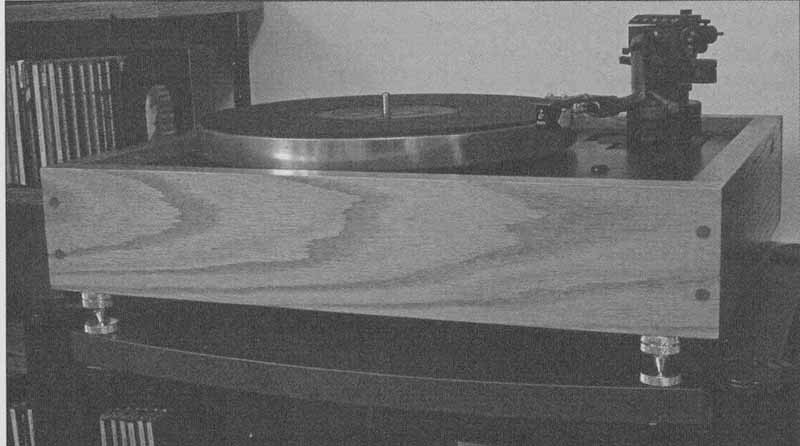
PHOTO 5: The upgraded belt-driven turntable. Dayton adjustable brass cones
replace the old turntable sub-base.
REFERENCES:
1. “AR System Drives New Turntable,” Audio Amateur, 3/85, PP. 27-38.
2. “An Electronic Speed Control,” Audio Amateur, 1/86, pp.
3. “The Belt-Driven Turntable Re-visited,” Audio Amateur, 3/88, pp. 24-30 (including the sidebar “Sub-chassis Design and Hum Shielding Considerations” by George Merrill).
4. The LP is Back! Peterborough, NH, Audio Amateur Press, 1999.
5. “A Turntable Isolation Shelf Audio Amateur, 1/87, pp. 45-47 (Not reprinted in The LP is Back.).
VENDORS:
Grado Laboratories, 4614 Seventh Ave., Brooklyn, NY 11220, (718) 435-5340
Parts List:
(1) piece 13064 thick brass stock 2 wide x 5 3/8 long K&S Engineering #14121 10249 or equivalent (local hard ware store or hobby shop)
Cardas SDIN 5 pin DIN tonearm connector straight (Parts Connexion #53481)
Cardas 4 x 33 AWO tonearm wire with shield
12 (Parts Connexion #64312)
(1) pair OH Silver Sonic CM-R1 chassis RCA jack (Parts Connexion #68098)
(2) each 6/32 x 5/8 machine screws lock washers nuts and knurled thumbnuts (local hardware store)
(1) each nylon shoulder washer and flat washer (local hardware store)
(3) #6 ground lugs (Mouser #534-7312)
(3) 1/8” polypropylene cable clamps (Radio Shack #64-3028)
(5) #6 5/8” brass wood screws (local hardware store)
1/8” heat shrink tubing (Radio Shack #278 1627)
Dayton 180-40 (gold) or ISO4C (chrome)
Isolation Cones (Parts Express 240 720 or 240721)
DH Labs Air Matrix Interconnect Cables (Audio Concepts)
Or:
OH Labs Pro Studio bulk interconnect cable (Parts Connexion #64786 or Audio Concepts) and RCA HC Ultimate RCA Plugs (Parts Connexion #64434 or Audio Concepts)
Or:
DH Labs BL Ag bulk interconnect cable (Parts Connexion #66070) and RCA-2C RCA Plugs (Audio Concepts)
Or:
DH Labs RL 1 interconnect cable (Audio Concepts) and RCA-2C RCA Plugs (Audio Concepts)
Miscellaneous 18AWG ground wire crimp-on spade connectors (Radio Shack #278 1220 & #64-3124)
.
= = = =