Suppose that you're monitoring a stereo recording in progress or listening to a recording you've already made. Something doesn't sound right. How can you pinpoint what's wrong, and how can you fix it? This section lists several procedures to solve audio-related problems. Read down the list of bad sound descriptions until you find one matching what you hear, then try the solutions until your problem disappears.
Before you start, check for faulty cables and connectors. Also check all control positions, rotate knobs, and flip switches to clean the contacts.
Distortion in the Microphone Signal
• Use pads or turn down the gain trims in your mixer.
• Switch in the pad in the condenser microphone, if any.
• If your recorder has a pad, switch it in. If your recorder has a mic gain switch, set it to the low-gain setting.
• Use a microphone with a higher "maximum SPL" specification.
Too Dead (Not Enough Reverberation)
• Place microphones farther from performers. Play CD track 25 to hear how miking distance affects the amount of reverberation and depth.
• Use omni-directional microphones.
• Record in a concert hall with better acoustics (longer reverberation time).
• Add artificial reverberation.
• Add plywood or plastic sheeting over the audience seats.
• If the venue acoustics are good, mix in a second pair of mics about 30 feet from the main pair.
Too Detailed, Close, or Edgy
• Place microphones farther from performers. Play CD track 25 to hear how miking distance affects the amount of reverberation and depth.
• Place microphones lower or on the floor (as with a boundary microphone).
• Using an equalizer in your mixing console, roll off the high frequencies.
• Use duller-sounding microphones.
• If using both a close-up pair and a distant ambience pair, turn up the ambience pair.
• If using spot mics, add artificial reverb or delay their signals to coincide with the main pair's signals.
Too Distant (Too Much Reverberation)
• Place microphones closer to performers. Play CD track 25 to hear how miking distance affects the amount of reverberation and depth.
• Use directional microphones (such as cardioids).
• Use a spaced pair of directional mics aiming straight ahead.
• Record in a concert hall that is less "live" (reverberant).
• If using both a close-up pair and a distant ambience pair, turn down the ambience pair.
Narrow Stereo Spread
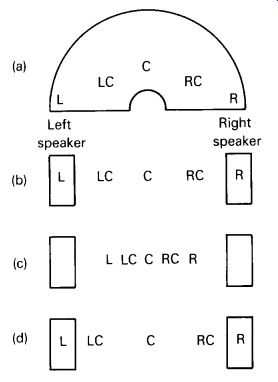
FIG. 1 Stereo localization effects: (a) orchestra instrument locations
(top view); (b) images accurately localized between speakers (the listener's
perception); (c) narrow stage effect; and (d) exaggerated separation effect.
See FIG. 1(c). Play CD track 9 to hear narrow stereo spread:
• Angle or space the main microphone pair farther apart.
• If doing mid-side stereo recording, turn up the side signal.
• Place the main microphone pair closer to the ensemble. Note: This also will make the ensemble sound closer.
• If monitoring with headphones, narrow stereo spread is normal when you use coincident techniques. Try monitoring with loudspeakers, or use near-coincident or spaced techniques.
Excessive Separation, Hole-in-the Middle, or Soloist Moves Too Much
See FIG. 1(d). Play CD track 20 to hear excessive separation:
• Angle or space the main microphone pair closer together.
• If doing mid-side stereo recording, turn down the side signal or use a cardioid mid instead of an omni mid.
• In spaced-pair recording, add a microphone midway between the outer pair and pan its signal to the center.
• Place the microphones farther from the performers. Note: This also will make the ensemble sound more distant.
• Place the loudspeaker pair closer together. Ideally, they should be as far apart as you are sitting from them, to form a listening angle of 60°.
Poorly Focused Images
• Avoid spaced-microphone techniques. Play CD tracks 6, 18-20, 22, and 24 to hear the image focus of some spaced-microphone techniques.
• Use a microphone pair that is better matched in frequency response.
• If the sound source is out of the in-phase region of microphone pickup, move the source or the microphone. For example, the in-phase region of a Blumlein pair of crossed figure-eights is +/-45° relative to center.
• Be sure that each spot mic is panned so that its image location coincides with that of the main pair.
Maybe the image-focus problem is in your monitoring system instead of the mic technique. Try these suggestions:
• Use loudspeakers designed for sharp imaging. Usually these are signal aligned, have vertically aligned drivers, have curved edges to reduce diffraction, and are sold in matched pairs.
• Place the loudspeakers several feet from the wall behind them and from side walls to delay and weaken the early reflections that can degrade stereo imaging.
• Put acoustic foam on the wall behind the speakers to absorb early reflections.
• Use Nearfield monitors (about 3 feet apart and 3 feet from you).
Images Shifted to One Side (Left-Right Balance Is Faulty)
• Adjust the right-or-left recording level so that center images are centered.
• Use a microphone pair that is better matched in sensitivity.
• Aim the center of the mic array exactly at the center of the ensemble.
• Sit exactly between your stereo speakers, equidistant from them.
Adjust the balance control or level controls on your monitor amplifier to center a mono signal. Play CD tracks 1-4 to set up your speakers correctly for stereo listening.
Lacks Depth
Play CD track 25 to hear a voice reproduced with gradually increasing depth:
• Avoid spot mics.
• If you must use spot mics, keep their level low in the mix, and delay their signals to coincide with those of the main pair.
• The problem might be your monitor speakers. Use monitors with signal-aligned drivers, put acoustical absorption on the wall behind the speakers, and space the speakers several feet from the wall behind them.
Lacks Spaciousness
• Use spatial equalization (described in Section A under the heading "Spaciousness and Spatial Equalization").
• Space the microphones apart.
• Place the microphones farther from the ensemble. Play CD track 25 to hear how miking distance affects the sense of spaciousness.
• Mix in a distant mic pair placed about 30 feet back in the hall.
• Use a spaced pair or near-coincident pair instead of a coincident pair.
• Record in a venue with stronger side reflections or longer reverberation time.
• Add artificial reverb.
• See the suggestions under the heading "Early Reflections Too Loud" below.
Early Reflections Too Loud
• Place mics closer to the ensemble and add a distant microphone for reverberation (or use artificial reverberation).
• Place the musical ensemble in an area with weaker early reflections.
• If the early reflections come from the side, try aiming bidirectional mics at the ensemble. Their nulls will reduce pickup of side-wall reflections.
Bad Balance (Some Instruments Too Loud or Too Soft)
• Place the microphones higher or farther from the performers.
• Move quiet instruments closer to the stereo pair and vice versa.
• Ask the conductor or performers to change the instruments' written dynamics.
• Add spot microphones close to instruments or sections needing reinforcement. Mix them in subtly with the main microphones' signals.
• Increase the angle between mics to reduce the volume of center instruments and vice versa.
• If using a mid-side mic and matrix, vary the mid-side ratio to slightly change the balance of middle instruments to side instruments. This will also change the stereo spread.
Muddy Bass
• Aim the bass-drum head at the microphones.
• Put the microphone stands and bass-drum stand on resilient isolation mounts, or place the microphones in shock-mount stand adapters.
• Suggest that the tympani player use hard sticks instead of soft, and maybe play quieter.
• Roll off the low frequencies or use a high-pass filter set around 40-80Hz.
• Record in a concert hall with less low-frequency reverberation.
Rumble from Air Conditioning, Trucks, and So On
• Temporarily shut off air conditioning. Record in a quieter location or at a quieter time of day.
• Use a high-pass filter set around 40-80Hz. Use microphones with limited low-frequency response.
• Mike closer and add artificial reverberation.
Bad Tonal Balance (Too Dull, Too Bright, Colored)
• Try different microphones.
• If a microphone must be placed near a hard reflective surface, use a boundary microphone to prevent phase cancellations between direct and reflected sounds.
• Adjust equalization. Compared to omni condenser mics, directional mics usually have a rolled-off low-frequency response and may need some bass boost.
• If strings sound strident, move mics farther away or lower.
• If the tone quality is colored only in mono monitoring, use coincident pair techniques.