Stereo miking is the preferred way to record classical music ensembles and soloists, such as a symphony performed in a concert hall or a string quartet piece played in a recital hall.
Stereo mic techniques capture the sound of a musical group as a whole, using only two or three microphones. When you play back a stereo recording, you hear phantom images of the instruments in various spots between the speakers. These image locations-left to right, front to back-correspond to the instrument locations during the recording session.
In this section we look at several techniques for recording in stereo.
Advantages of Stereo Miking
When recording popular music, we put a mic near each instrument, record it, and pan its image somewhere between our two monitor speakers. Then we hear where each instrument is: left, center, half-right, or whatever.
But panned mono tracks are not the same as true stereo. A two-mic stereo recording captures the holistic sound of the ensemble playing together in a shared space. Large single instruments-such as piano, drums, and pipe organ-also benefit from being recorded in stereo.
Stereo miking adds lifelike realism to a recording because it captures:
• The left-to-right position of each instrument.
• The depth or distance of each instrument.
• The distance of the ensemble from the listener (the perspective).
• The spatial sense of the acoustic environment, the ambience or hall reverberation.
• The timbres of the instruments as heard in the audience.
These characteristics are lost with multiple close-up microphones.
Another advantage of stereo miking is that it tends to preserve the ensemble balance as intended by the composer. The composer has assigned dynamics (loudness notations) to the instruments in order to produce a pleasing ensemble balance in the audience area. Thus, the correct balance or mix of the ensemble occurs at a distance, where all the instruments blend together acoustically. But this balance can be upset with multiple miking.
You must rely on your own judgment (and the conductor's) regarding mixer settings to produce the composer's intended balance. Of course, even a stereo pair of mics can yield a faulty balance. But a stereo pair, being at a distance, is more likely to reproduce the balance as the audience hears it.
Some outstanding examples of non-orchestral two-mic stereo recordings are those by Bob Katz (chesky.com), Pierre Sprey (mapleshaderecords.com), and Kavi Alexander (waterlilyacoustics.com).
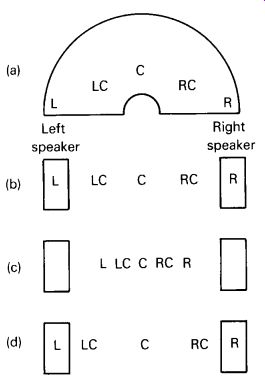
FIG. 1
Stereo localization effects: (a) orchestra instrument locations (top view);
(b) images localized accurately between speakers (the listener's perception);
(c) narrow-stage effect; and (d) exaggerated separation effect.
Goals of Stereo Miking
One goal we aim for when miking an ensemble in stereo is accurate localization. That is, instruments in the center of the group are reproduced midway between the two speakers. Instruments at the sides of the group are heard from the left or right speaker. Instruments halfway to one side are heard halfway to one side, and so on.
FIG. 1 shows three stereo localization effects. FIG. 1(a) shows some instrument positions in an orchestra: left, left-center, center, right center, right. In FIG. 1(b), the reproduced images of these instruments are accurately localized between the speakers. The stereo spread, or stage width, extends from speaker to speaker. (You might want to record a string quartet with a narrower spread.) A stereo pair of microphones can be angled apart, spaced apart, or both. Angling and spacing affect the stereo localization, as does the polar pattern of the microphones.
If you space or angle the mics too close together, you get a narrow stage width (FIG. 1(c)). If you space or angle the mics too far apart, you hear exaggerated separation (FIG. 1(d)). That is, instruments halfway to one side are heard near the left or right speaker.
To judge stereo effects, you have to sit exactly between your monitor speakers (the same distance from each). Sit as far from the speakers as the spacing between them. Then the speakers appear to be 60° apart.
That is about the same angle an orchestra fills when viewed from a typical ideal seat in the audience (say, tenth-row center). If you sit off-center, the images shift toward the side on which you're sitting and are less sharp.
Play CD tracks 1-4 to set up your monitor speakers correctly for stereo listening.
Types of Stereo Mic Techniques
To make a stereo recording, you can use one of these basic techniques:
1. Coincident pair
2. Spaced pair
3. Near-coincident pair
4. Baffled pair
Let's look at each technique.
Coincident Pair
With this method (also called XY), you mount two directional mics with grilles touching, diaphragms one above the other, and angled apart (FIG. 2). For example, mount two cardioid mics with one grille above the other, and angle them 120° apart. You can use other patterns too: super cardioid, hypercardioid, or bidirectional. The wider the angle between mics, the wider the stereo spread.
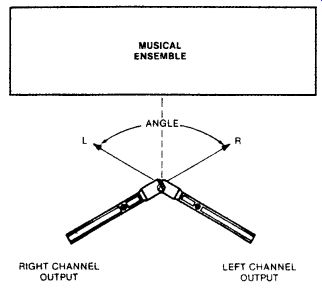
FIG. 2 Coincident-pair technique.
How does this technique make images we can localize? Recall that a directional mic is most sensitive to sounds in front of the mic (on axis) and progressively less sensitive to sounds arriving off axis. That is, a directional mic puts out a high-level signal from the sound source it's aimed at, and produces lower-level signals from sources to the side of the mic.
The coincident pair uses two directional mics that are angled sym metrically from the center line (FIG. 2). Instruments in the center of the group produce the same signal from each mic. When you monitor the mics, the same signal comes out of each speaker. Identical signals from two speakers produce a phantom image midway between the speakers. So you hear the center instruments in the center.
If an instrument is off-center to the right, it is more on axis to the right-aiming mic than to the left-aiming mic. So the right mic will produce a higher-level signal than the left mic. When you monitor the mics, the right speaker's signal is louder than the left speaker's signal. This reproduces the image off-center to the right. So you hear the right-side instruments toward the right side.
That is how coincident stereo miking works. The coincident pair codes instrument positions into level differences between channels. The brain decodes these level differences back into corresponding image locations. A pan pot in a mixing console works on the same principle. If one channel is 15-20 dB louder than the other, the image shifts all the way to the louder speaker. Play CD track 5 to hear image location versus level differences between channels.
Suppose we want the right side of the orchestra to be reproduced at the right speaker. That means the far-right musicians must produce a signal level 20dB higher from the right mic than from the left mic. This happens when the mics are angled apart by a certain amount.
Instruments partway off-center produce interchannel level differences less than 20dB, so you hear them partway off-center.
Listening tests have shown that coincident cardioid mics tend to reproduce the musical group with a narrow stereo spread. That is, the group does not spread all the way between speakers. Play CD tracks 8-11 to hear the image localization of some coincident cardioid techniques.
A coincident-pair method with excellent localization is the Blumlein array. It uses two bidirectional mics angled 90° apart and facing the left and right sides of the group.
A special form of the coincident-pair technique is the mid-side (MS) recording method illustrated in FIG. 3. It uses a "mid" microphone facing the middle of the orchestra and a bidirectional microphone aiming to the sides. The middle mic is most commonly cardioid, but it can be any pattern.
In a device called a matrix, the signals from both mics are summed (mixed together) to produce the left-channel signal and are differenced (mixed in opposite polarity) to produce the right-channel signal.
You can remote-control the stereo spread by changing the mid/side ratio in the matrix. This remote control is useful at live concerts, where you can't physically adjust the mics during the concert. You can also control the stereo spread during mixdown rather than during the recording. In Section 9 under the heading "Stereo-Spread Control," I describe how to use a computer digital audio workstation (DAW) to vary the stereo spread without using a matrix device. MS is covered in detail in Section B under the heading "Mid-Side." As described in Section 7, a recording made with coincident mics is mono-compatible. If you expect that your recordings will be heard in mono (say, on TV), then you'll probably want to use coincident methods.
Spaced Pair
With this method (also called AB), you place two identical mics a few feet apart and aim them straight ahead (FIG. 4). The mics can have any polar pattern, but omni is most popular for this method. The greater the spacing between mics, the greater the stereo spread.
How does this method work? Instruments in the center of the group produce the same signal from each mic. When you monitor the mics, you hear a phantom image of the center instruments midway between your speakers.
If an instrument is off-center, it is closer to one mic than the other, so its sound reaches the closer microphone before it reaches the other one.
Both mics produce the same signal, except that the farther mic's signal is delayed compared to the closer mic's signal.
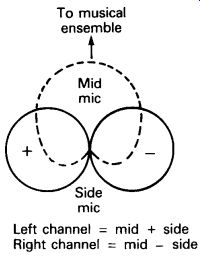
FIG. 3 MS technique.
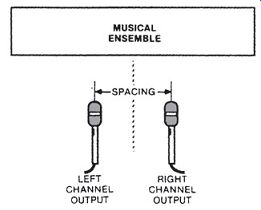
FIG. 4 Spaced-pair technique.
If you send the same signal to two speakers with the signal in one channel delayed, the sound image shifts off-center. With a spaced-pair recording, off-center instruments produce a delay in one mic channel, so they are reproduced off-center.
The spaced pair codes instrument positions into time differences between channels. During playback, the brain decodes these time differences back into corresponding image locations. Play CD track 6 to hear image location versus time differences between channels.
A delay of 1.2 milliseconds (msec) is enough to shift an image all the way to one speaker. You can use this fact when you set up the mics. Suppose you want to hear the right side of the orchestra from the right speaker.
The sound from the right-side musicians must reach the right mic about 1.2 milliseconds before it reaches the left mic. To make this happen, space the mics about 2-3 feet apart. This spacing makes the correct delay to place right-side instruments at the right speaker. Instruments partway off-center produce interchannel delays less than 1.2 milliseconds, so they are reproduced partway off-center.
If the spacing between mics is, say, 12 feet, then instruments that are slightly off-center produce delays between channels that are greater than 1.2 milliseconds. This places their images at the left or right speaker. I call this "exaggerated separation" or a "ping-pong" effect (FIG. 1(d)). Play CD tracks 18-20 to hear the image localization of some spaced-pair techniques.
On the other hand, if the mics are too close together, the delays produced will be too small to provide much stereo spread. Also, the mics will tend to emphasize instruments in the center because the mics are closest to them.
To record a good musical balance of an orchestra, you need to space the mics about 10 or 12 feet apart. But then you get too much separation.
You could place a third mic midway between the outer pair and mix its output to both channels. That way, you pick up a good balance, and you hear an accurate stereo spread.
The spaced-pair method tends to make off-center images unfocused or hard to localize. Why? Spaced-pair recordings have time differences between channels. Stereo images produced solely by time differences are not very sharp. You still hear the center instruments clearly in the center, but off-center instruments are harder to pinpoint. Spaced-pair miking is a good choice if you want the sonic images to be diffuse or blended, instead of sharply focused. Play CD track 24 to hear a comparison of a spaced pair versus a coincident pair on a drum set.
Another flaw of spaced mics: if you mix both mic channels to mono, you may get phase cancellations of various frequencies. This may or may not be audible.
Spaced mics, however, give a "warm" sense of ambience, in which the concert-hall reverb seems to surround the instruments and, sometimes, the listener. Here's why: the two channels of recorded reverb are incoherent-that is, they have random phase relationships. Incoherent signals from stereo speakers sound diffuse and spacious. Since spaced mics pick up reverb incoherently, it sounds diffuse and spacious. The simulated spaciousness caused by the phasiness is not necessarily realistic, but it is pleasing to many listeners.
Another advantage of the spaced pair is that you can use omni mics.
An omni condenser mic has deeper bass than a uni-condenser mic.
Near-Coincident Pair
In this method, you angle apart two directional mics, and space their grilles a few inches apart horizontally (FIG. 5). Even a few inches of spacing increases the stereo spread and adds a sense of ambient warmth or air to the recording. The greater the angle or spacing between mics, the greater the stereo spread.
How does this method work? Angling directional mics produces level differences between channels. Spacing mics produces time differences. The level differences and time differences combine to create the stereo effect.
Play CD track 7 to hear image location versus level and time differences between channels.
If the angling or spacing is too great, you get exaggerated separation.
If the angling or spacing is too small, you hear a narrow stereo spread.
A common near-coincident method is the ORTF (French) system, which uses two cardioids angled 110° apart and spaced 7 inches (17 cm) horizontally. Usually this method gives accurate localization. That is, instruments at the sides of the orchestra are reproduced at or very near the speakers, and instruments halfway to one side are reproduced about halfway to one side.
The NOS (Dutch) system uses two cardioids angled 90° and spaced 12 inches (30 cm), while the DIN (German) system is 90° and 7.9 inches (20 cm). Compared to ORTF, those methods have less off-axis coloration because the mics are less angled away from the center instruments. Also their 90° angle between mics is easier to set up visually than the ORTF 110° angle between mics. Play CD tracks 12-14 to hear the image localization of some near-coincident-pair methods.
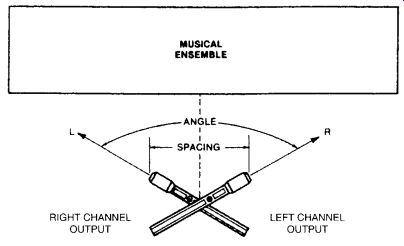
FIG. 5 Near-coincident-pair technique.

FIG. 6 Baffled-omni technique.
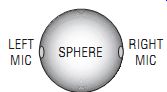
FIG. 7 Sphere microphone.
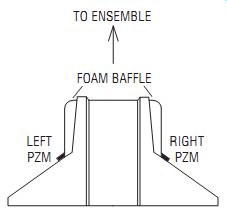
FIG. 8 Crown SASS-P MKII stereo PZM (Pressure Zone Microphone) microphone (top view).
Baffled-Omni Pair
This method uses two omni mics, usually ear-spaced, and separated by a hard or padded baffle (FIG. 6). To create stereo, it uses time differences at low frequencies and level differences at high frequencies. The spacing between mics creates time differences. The baffle creates a sound shadow (reduced high frequencies) at the mic farthest from the source.
Between the two channels, there are spectral differences (differences in frequency response).
Some examples of baffled-omni pairs are the Schoeps or Neumann sphere microphones (FIG. 7), the Jecklin Disk, and the Crown SASS-P MKII stereo microphone (FIG. 8). The omni condenser mics used in the baffled-omni method have excellent low-frequency response. Play CD tracks 15-17 to hear the image localization of some baffled-omni-pair methods.
A special form of the baffled-omni pair is binaural recording with an artificial head (dummy head). The head contains a microphone flush mounted in each ear. You record with these microphones and play back the recording over headphones. This process can re-create the locations of the original performers and their acoustic environment with startling realism. For more detail on binaural recording see Section D.
You can clip a pair of miniature omni or cardioid mics onto the temple pieces of eyeglasses. Each mic is on the opposite side of your head, either in your ears or on your temples. Section 12 lists some manufacturers of these binaural microphones. To compensate for the acoustic effect of the head, the signals need some equalization (EQ) (a broad dip around 3 kHz).
Boundary (surface-mounted) mics can be used for any type of stereo miking. Section C describes some stereo mic techniques using boundary mics. Play CD tracks 21-23 to hear the image localization of some stereo boundary mic techniques.
Comparing the Four Techniques
1. Coincident pair
• Uses two directional mics angled apart with grilles touching.
• Level differences between channels produce the stereo effect.
• Images are sharp.
• Stereo spread ranges from narrow to accurate.
• Signals are mono-compatible.
2. Spaced pair
• Uses two mics spaced a few feet apart, aiming straight ahead.
• Time differences between channels produce the stereo effect.
• Off-center images are diffuse.
• Stereo spread tends to be exaggerated unless a third center mic is used, or unless spacing is under 2-3 feet.
• Provides a warm sense of ambience.
• Provides excellent low-frequency response if you use omni condensers.
• Tends not to be mono-compatible, but this might not be audible.
3. Near-coincident pair
• Uses two directional mics angled apart and spaced a few inches apart horizontally.
• Level and time differences between channels produce the stereo effect.
• Images are sharp.
• Stereo spread tends to be accurate.
• The hall sounds more spacious than with coincident methods.
• Tends not to be mono-compatible.
4. Baffled-omni pair
• Uses two omni mics, usually ear-spaced, with a baffle between them.
• Level, time, and spectral differences produce the stereo effect.
• Images are sharp.
• Stereo spread tends to be accurate.
• Excellent low-frequency response.
• Good imaging with headphones.
• The hall sounds more spacious than with coincident methods.
• Stereo spread is not adjustable except by panning the two channels toward the center.
• More conspicuous than other methods.
• Tends not to be mono-compatible, but this might not be audible.
Mic Requirements for Stereo
For sharp imaging, the microphone pair should be well matched in frequency response and polar pattern. Be sure both mics are the same model number, and match their levels when picking up a sound source in the center. Or use a stereo mic, which mounts two mic capsules in a single housing for convenience.
Surprisingly, different transducer types have different imaging. Why? For sharpest imaging, microphone polar patterns and off-axis phase shift should be uniform with frequency. In a ribbon mic, these needs are met. But a condenser mic tends to be less uniform with frequency, and a dynamic tends to be still less uniform. These characteristics affect the imaging of a stereo pair of microphones.
How to Test Imaging
Here is a way to check the stereo imaging of a mic technique:
1. Set up the stereo mic array in front of a stage.
2. Record yourself speaking from various locations on stage where the instruments will be: center, half-right, far right, half-left, far left. Announce your position.
3. Play back the recording over speakers. Sit exactly between them, as far away from them as they are spaced apart.
You'll hear how accurately the technique translated your positions, and you'll hear how sharp the images are. If you hear a narrow stereo spread, you need to angle or space the mics farther apart. If you hear exaggerated separation, you need to angle or space the mics closer together.
We looked at several mic arrays to record in stereo. Each has its pros and cons. Which method you choose depends on the sonic compromises you're willing to make.
Refs:
Blumlein, A. "British Patent Specification 394,325." Journal of Audio Engineering Society, Vol. 6, No. 2 (April 1958), p. 91.
Keller, A. "Early Hi Fi and Stereo Recording at Bell Laboratories (1931-1932)." Journal of Audio Engineering Society, Vol. 29, No. 4 (April 1981), pp. 274-280.
These references can be found in Stereophonic Techniques, an anthology published by the Audio Engineering Society, 60 E. 42nd Street, New York, NY, 10165.