In the last section, we talked about some of the machinery available for the recording and editing of television programs, and the technical processes of the recording and editing with videotape and film.
In this section we will attempt to give a brief introduction to the processes of editing, which we call picturization, and how the machines can be used. Picturization means the control and structuring of a sequence of shots. Specifically, these points are especially pertinent in the context of television production: (1) transition devices and their functions, including the cut, dissolve, fade, and wipe; (2) switching, or instantaneous editing, with a multicamera setup, and the switcher and its operation in continuity and complexity editing; and (3) postproduction work with emphasis on splicing silent and sound film, and electronic videotape editing with both simple machines and complex, computer-assisted systems.
In Section 4 we dealt with picture composition, the framing of a single shot, which is often referred to as visualization. Now we will turn our attention to the process of picturization, the control or the structuring of a shot sequence. Sometimes the whole process of picturization is called editing.
But while picturization includes all aspects of controlling a shot sequence so that it becomes a structural whole-such as its rhythmic continuity, and the various phases of its composition and how they relate, or even lead, from shot to shot-editing more accurately describes the process of selecting the shots and putting them together. Since a detailed discussion of picturization is beyond the scope of this guide, we will limit our discussion to three basic factors: (1) transition devices, (2) switching, or instantaneous editing, and (3) postproduction editing. [1]
[1. For more information on picturization, see Herbert Zettl, Sight-Sound-Motion (Belmont, Calif.: Wadsworth Publishing Co., 1973), pp. 292-324.]
=============
A-B Rolling
Preparation of a film for printing. All odd-numbered shots are put on one reel (A-roll), with black leader replacing the even shots. The even-numbered shots, with black leader replacing the odd shots, make up the B-roll. Both rolls are then printed together onto one film, thus eliminating splices.
Address
Also called birthmark. A specific location in a television recording, as specified by the time code.
Assemble Mode
The adding of shots on videotape in a consecutive order.
Bus, or Buss
A row of buttons on the switcher.
Sometimes called bank.
Complexity Editing
The juxtaposition of shots that primarily, though not exclusively, help to intensify the screen event.
Continuity Editing
The preserving of visual continuity from shot to shot.
Cut
The instantaneous change from one shot (image) to another.
Cutaway Shot
A shot of an object or event that is peripherally connected with the overall event and that is neutral as to screen direction (usually straight-on shots). Used to intercut between two shots in which the screen direction is reversed.
Cut Bar
A button or small metal bar that activates the mix buses alternately. The effect is cutting between the two mix buses.
Dissolve
A gradual transition from shot to shot, whereby the two images temporarily overlap. Also called lap-dissolve, or lap.
Double Re-entry
A complex switcher through which an effect can be fed back into the mix bus section, or the mix output into the effects section, for further effects manipulation.
Editing
The selection and assembly of shots within the picturization concept.
Effects Bus
Rows of buttons that can generate a number of electronic effects, such as keys, wipes, and mattes.
Electronic A-B Rolling
1. The editing of a master tape from two playback machines, one containing the A-roll and the other the B-roll. By routing the A and B playback machines through a switcher, a variety of transition effects can be achieved for the final master tape.
2. The projection of an SOF film on one film chain (A-roll), with the silent film projected from the other island (B-roll). The films can be mixed through the switcher.
Electronic Editing
The joining of two shots on videotape without cutting the tape.
Fade
The gradual appearance of a picture from black (fade-in) or disappearance to black (fadeout). Fader Bars Two levers on the switcher that can produce dissolves, fades, and wipes of different speeds, and superimpositions.
Film Base
The shiny side of the film.
Film Emulsion
The dull side of the film.
Film Splicer
The piece of equipment with which two lengths of film can be joined.
Frame 1. The smallest picture unit in film, a single picture. 2. A complete scanning cycle of the electron beam, which occurs every 1/30 second. It represents the smallest complete television picture unit.
Generation
The number of dubs away from the master tape. A first-generation dub is struck directly from the master tape; a second-generation tape is a dub of the first-generation dub (two steps away from the master tape), and so forth. The greater the number of generations, the greater the quality loss.
Hard Copy
A computer printout showing in typewritten form all editing decisions of the completed helical scan workprint or the quadruplex master tape. (Soft-copy information appears only on the computer screen.) Insert Mode The inserting of shots in an already existing recording, without affecting the shots on either side.
Instantaneous Editing
Same as switching.
Jump Cut
Cutting between shots that are identical in subject yet slightly different in screen location.
Through the cut, the subject seems to jump from one screen location to another for no apparent reason.
Mix Bus
Rows of buttons that permit the "mixing" of video sources, as in a dissolve and super. Major buses for on-the-air switching.
Montage
The juxtaposition of two (often seemingly unrelated) shots in order to generate a third, overall idea, which may not be contained in either of the two.
Off-Line
Helical scan editing system for producing computer-assisted videotape workprints. The workprint information is then fed into the on-line system for (automated) production of the release master tape.
On-Line
A computer-assisted master editing system, using quadruplex videotape recorders for high-band release master tapes.
Picturization
The control and structuring of a shot sequence.
Postproduction
Any production activity that occurs after (post) the production.
Usually refers either to editing of film or videotape or to post-scoring and mixing sound for later addition to the picture portion.
Postproduction Editing--The assembly of recorded material after the actual production.
Preview Bus--Rows of buttons that can direct an input to the preview monitor at the same time another video source is on the air.
Program Bus--The bus on a switcher whose inputs are directly switched to the line-out.
Roll-Through--Keeping the film (or tape) rolling while temporarily cutting back to another video source (usually a live camera). Splice The spot where two shots are actually joined, or the act of joining two shots. Generally used only when the material (such as film or audio-tape) is physically cut and glued (spliced) together again.
Stock Shot
A shot of a common occurrence clouds, storm, traffic, crowds-that can be repeated in a variety of contexts since its qualities are typical. There are stock-shot libraries from which any number of such shots can be obtained.
Super
Short for superimposition, the simultaneous showing of two full pictures on the same screen.
Switching
A change from one video source to another during a show, or show segment, with the aid of a switcher.
Time Code
Also called the SMPTE Time Code, or address code. An electronic signal recorded on the cue track of the videotape through a time code generator, providing a time "address" (birthmark) for each frame in hours, minutes, seconds, and frame numbers of elapsed tape.
Vector Line
A dominant direction established between two people facing each other or through a prominent movement in a specific direction.
Wipe
Electronic effect where one picture seems to push the other off the screen. (In film, an optical wipe can be accomplished in the special effects printer.)
=============
----------

10.1 A shot is the smallest convenient visual unit in film and television.
It is generally the interval between two distinct video transitions, such
as cuts, dissolves, or fades.
------------
Transition Devices
Whenever you put two shots together, you need a transition between them, a device that leads us to perceive the two shots as relating to each other in some specific way. There are four basic transition devices: (1) the cut, (2) the dissolve, (3) the fade, and (4) the wipe. All four have the same basic purpose: to provide an acceptable link from shot to shot. However, each one differs somewhat from the others in its function; that is, how we are to perceive the transition in a shot sequence.
The Cut
The cut is an instantaneous change from one image (shot) to another. It is the most common and least obtrusive transition device. The cut itself is not visible; all you see are the preceding and following shots. It resembles most closely the changing field of the human eye. Try to look from one object to another, one located some distance from the other. Notice that you don't look at things in between (as you would in a pan) but that your eyes jump from one place to the other, as in a cut.
The cut (like all other transition devices) is basically used for the clarification and intensification of an event. Clarification means that you show the viewer the event as clearly as possible. For example, in an interview show, the guest holds up the book she has written. In order to help the viewer see better, to identify the title of the book, you cut to a closeup.
Intensification means that you sharpen the impact of the screen event. In an extreme long shot, for example, a football tackle might look quite tame; when seen as a tight closeup, however, the action reveals its brute force. Through cutting to the closeup, the action has been intensified.
The main reasons for using a cut are: (1) To continue action. If the camera can no longer follow the action, you cut to another shot that continues the action. (2) To reveal detail. As indicated above, if you want to see more event detail than the present shot reveals, you cut to a closer shot. (3) To change place and time. A cut from an interior to the street indicates that the locale has now shifted to the street. In live television, a cut cannot reveal a change in time. But as soon as the event has been recorded on film or videotape, a cut can mean a jump forward or backward in the event time, or to another event that takes place in a different place at the same time (the "meanwhile back-at-the-ranch" cut). (4) To change impact. A cut to a tighter shot generally intensifies the screen event; a cut to a longer shot reduces the event impact. (5) To establish an event rhythm. Through cutting, you can establish an event rhythm. Fast cutting generally gives the impression of excitement; slow cutting that of calm and tranquility (assuming that the content of the screen material expresses the same feeling).
The Dissolve
The dissolve, or lap-dissolve, or simply "lap," is a gradual transition from shot to shot, whereby the two images temporarily overlap. While the cut itself cannot be seen on the screen, the dissolve is a clearly visible transition. As such, it constitutes not merely a method of joining two shots together as unobtrusively as possible, but represents a visual element in its own right. You should, therefore, use the dissolve with greater discretion than the cut.
Basically, you use a dissolve (1) as a smooth bridge for action, (2) to indicate a change of locale or time, and (3) to indicate a strong relationship between two images.
For an interesting and smooth transition from a wide shot of a dancer to a closeup, for instance, simply dissolve from one camera to the other. The movements will temporarily blend into each other and indicate the strong association between the two shots. The action is not interrupted at all.
Where the mood or tempo of the presentation does not allow hard cuts, you can use dissolves to get from a long shot to a closeup or from a closeup to a long shot. A closeup of a soloist, for instance, can be dissolved into a long shot of the whole choir, which may be more appropriate than an instantaneous cut.
You can use a dissolve during continuous music. This is at least one way to change cameras in the middle of musical phrases when it would be awkward to cut.
You may prefer to indicate a change of locale by dissolving rather than cutting to the new set area.
A change of time can also be suggested by a slow dissolve (long time lapse, slow dissolve; short time lapse, fast dissolve). Matched dissolves are used for decorative effects or to indicate an especially strong relationship between two objects. For instance, a decorative use would be a sequence of two fashion models hiding behind sun umbrellas. Model one closes her sequence by hiding behind an umbrella; model two starts her sequence the same way. You can now match-dissolve from camera 1 to camera 2. Both cameras must frame the umbrellas approximately the same way before the dissolve. An example of an associative use is a closeup of a door in a very expensive dwelling match-dissolved to a closeup of a door in an old shack.
Depending on the overall rhythm of the event, you can use slow or fast dissolves. A very fast one functions almost like a cut and is, therefore, called a "soft cut." Since dissolves are so readily available to you in television, you may be tempted to use them more often than necessary or even desirable.
Don't overuse them; they create no rhythmic beat. Your presentation will lack precision and accent, and bore the viewer.
The Fade
In a fade, the picture either goes gradually to black (fade-out) or appears gradually on the screen from black (fade-in). You use the fade to signal a definite beginning (fade-in) or end (fade-out) of a scene. Like the curtain in the theater, it defines the beginning and end of a portion of a screen event. As such, it is technically not a true transition.
Some experts use the term cross fade for a quick fade to black followed immediately by a fade-in to the next image. Here the fade acts as a transition device, decisively separating the preceding and following images from each other. The cross-fade is also called a "dip to black." If you fade one of the two pictures of a superimposition to black, you have a split fade.
In general, start each program by fading in the camera picture from black. The fade from black always indicates a beginning.
The fade to black suggests a complete separation of program elements. It usually indicates that one program element has come to an end. You should end every program by taking it to black.
If you have to insert a commercial message in your program, you may want to go to black before the commercial, not so much to warn the viewer of the upcoming distraction as to tell him that this is a segment not directly connected with the material of the show.
You can also use a fade to black in an emergency. Rather than showing the viewer all the details of a collapsing set, take the picture to black until the emergency has passed or until you have put up a "one moment, please" stand-by sign.
Be careful not to go to black too often; your program continuity will be interrupted too many times by fades that all suggest final endings. The other extreme is the "never-go-to-black" craze.
Some directors won't dare go to black for fear of giving the viewer a chance to switch to another channel. If a constant dribble of program material is the only way to keep a viewer glued to the set, the program content, rather than the presentation techniques, should be examined.
The Wipe
In a wipe, one picture seems to push the other off the screen. This is such an unabashed transition device that it must be classified as a special effect.
There is a great variety of wipe configurations available (see 11.13). Like the fade, the wipe generally signals the end of one scene and the beginning of another. Unlike the fade, it does not put a permanent stop to the show; it simply pushes on the next video sequence. As a special effect, it seems rather obvious to treat the wipe with the utmost care. Use it sparingly, and only after you are convinced that no other transition could do the job better.
In television, all these transition devices are easily accomplished through the switcher. In film, a cut can be accomplished by simply cutting the film at one point and gluing (splicing) it onto another piece. All other devices must be done in the film laboratory during the printing process.
Therefore, special transition devices in film are not only much harder to accomplish technically, but they also prove much more expensive than in television.
Switching, or Instantaneous Editing
Whether you do a live television show, or record your show or show sections on videotape, you usually work with two or more video sources, such as two studio cameras and a film chain. The switching from one video source to another such as cutting from one camera to the viewpoint of another, or from the live camera picture to a slide-while the show or a show segment is in progress represents instantaneous editing. Contrary to film or videotape editing, where you have ample time to deliberate exactly where and with what transition device to combine two shots, switching in a live situation demands instantaneous decisions. The decision for a cut and the execution of the cut are virtually simultaneous.
The technical device that makes such instantaneous editing possible is the video switcher. We will now briefly describe (1) its basic layout and functions and (2) its basic operation.
Layout and Functions
Video switchers can be relatively simple or extremely complex in their production function and electronic design. However, even the most complex, all digital-controlled video switching system performs the same basic functions as a simple production switcher. The complex ones can perform more visual tricks than the simple ones, and with greater reliability and stability.
These are the basic functions of a production switcher: (1) to provide the fundamental transition methods between video sources: cut, dissolve, fade, wipe; (2) to create special effects: wipe patterns, key and matte inserts; and (3) to permit previewing of any video source or special effect before it is switched on the air.
Some of the more complex switchers perform an additional function: the automatic switching of program audio with the video (called "audio-follow-video"). The audio-follow-video switchers are especially important for master control switching, where you must switch from a live studio show to a commercial on videotape to network. When you switch from studio to VTR to network, you simply press the respective buttons for "studio," "VTR," and "network." The audio from these sources is automatically switched with the video. No special audio board operator is therefore necessary.
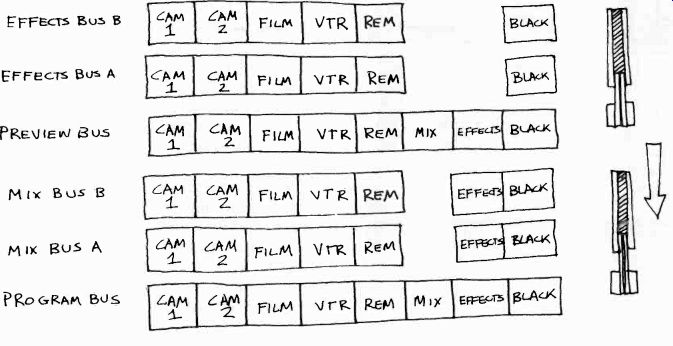
Let's look at a simple switcher that will perform the most basic production functions: a cut or dissolve from one video source to another (studio camera to studio camera, or studio camera to film, or studio camera to VTR); a fade from black and to black; a superimposition (one image overlaps the other, like stopping a dissolve in the middle); and a preview of the video source before it is actually put on the air. (See 10.2.) As you can see in figure 10.2, there are four rows of buttons, or buses, as they are called.
There is a program bus, two mix buses (mix bus A and mix bus B), and a preview bus. Their arrangement varies greatly with different types of switchers.
The preview bus, for example, may be right above the program bus (see 10.7). Each bus has buttons for cameras 1 and 2, film (representing the film island with any one of two film projectors or a slide projector), VTR for videotape, and remote, which is an auxiliary input for any additional video source needed, such as a second VTR or film island, or an actual remote feed. Then there is a black button, which puts the screen to black. The preview and program buses have an additional mix button. Let's find out what the individual buses and their buttons can do. We will work from the bottom up, starting with the program bus.

10.2 Basic Switcher: This simple switcher has four buses: a program bus,
two mix buses, and a preview bus. Also, it has a pair of fader bars that can
be pushed either individually or together into the mix bus A or B position.
The program bus switches the inputs (cameras 1 and 2, film, VTR, remote) directly
to the line-out. The mix buses go to the line-out, if the mix button on the
program bus is punched up. The mix buses make possible the mixing of two inputs,
as in a dissolve or super. Through the preview bus, any input can be previewed
on a special monitor before being punched up on the air. The fader bars accomplish
the mixing of two sources (dissolves, supers) and fades.
10.3 Production switcher refers to the switcher that is located in the control
room of a studio or remote van. There are other switchers that simply assign
videotape machines or film island to specific studios or monitors. These assignment
switchers are distinct from the production switcher and will not be discussed
here.

10.4 As in the audio control board, the line-out in video means that the
selected (picture) material is sent to master control and distributed from
there to the desired destination, such as the transmitter or a VTR machine.
For the sake of convenience, we say that whatever is sent to the line-out
is put "on the air.,,

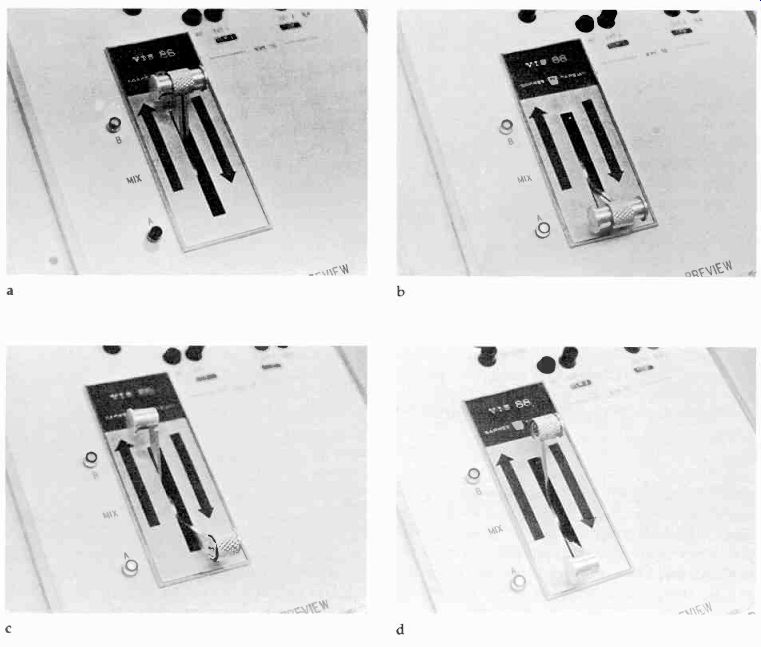
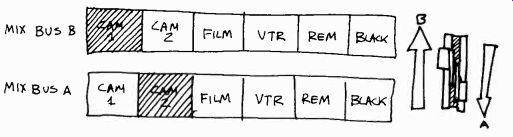
10.5 (a) With both fader bars in the up position, B bus is activated. (b)
With both fader bars in the down position, A bus is activated. (c) With the
fader bars split, with fader bar B in the B bus position and fader bar A in
the A bus position, both buses are activated. If a video source is punched
up on either bus, we will have a superimposition. (d) With the fader bars
split against their direction (the B bar in the A bus position, and the A
bar in the B bus position) neither of the mix buses will be activated.
The screen remains in black. A warning: this method works only if the signal entering the switcher is non-composite, which means that the video signal is without the sync signal. If your video signal is composite (with the sync signal), the overload may cause severe damage to the switcher.
10.6 Switcher with Special Effects: In this case, the program bus, mix, and
preview buses have an additional effects button, which assigns the effects
buses to preview or the line-out.
Program Bus
The program bus represents in effect a selector switch for the line-out. It is a direct input-output link. Whatever button you press will send its designated video input (such as camera 1 or VTR) to the line-out.
The mix button represents the input from whatever comes down from the mix buses. If, for example, you press the mix button on the program bus, but no button is pressed on either mix bus, no video source will go to the line-out. If you press the camera 1 button on mix bus A (assuming that the fader bars are in the bus A position as in figure 10.2), with the mix button already pressed on the program bus, camera 1 will be on the air. Disregarding the mix button for a moment, you could accomplish simple cuts among cameras 1 and 2, film, and VTR, and black with the program bus only. For example, if you press the camera 1 button on the program bus, camera 1 will be on the air. If you now press the camera 2 button, camera 2's picture will instantly replace camera l's image on the screen. In effect you have cut from camera 1 to camera 2. If you now press the black button, the screen will go to black instantly. In order to provide you with more transition possibilities than just simple cuts, such as dissolves and fades, and even such simple effects as a superimposition, we need, however, two additional buses, the mix buses (at least in our switcher design). Mix Buses The mix A and mix B buses allow you to mix the images from two sources, such as the temporary mixing (overlapping) of camera 1 and camera 2 in a dissolve, or the total overlapping of the two cameras in a super. The fader bars gradually activate either bus A or bus B, depending on how far you move them toward the bus A position or the bus B position. The fader bars function as a pot (or fader) does on the audio board, except, of course, that the fader bars control the fading in or out of the picture, while the audio pot regulates the fading in and out, or mixing, of sound.
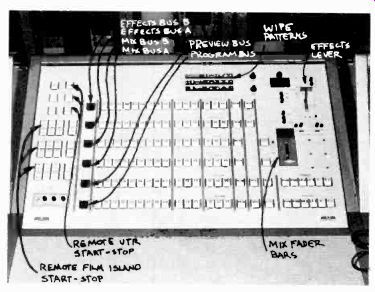
10.7 Large Production Switcher (Studio 1, San Francisco State University).
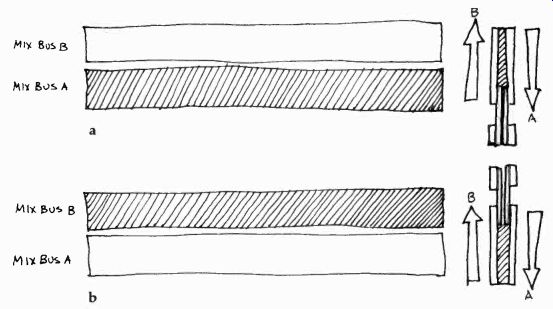
As you can see in figure 10.5, there are left and right fader bars, which can be moved independently, or both together. Since in most mixing tasks they are moved in unison, they have a locking device that keeps them together. In our simple switcher, the left bar activates mix bus B, the right bar mix bus A. When you move both levers in unison up to mix bus B, the left fader activates the B bus, while the A bus is deactivated (the A fader is away from the A bus in the B position)
(10.5a). When you bring both faders down to the A bus position, the right A fader activates the A bus, while the left B fader, which is away from the B bus, has deactivated the B bus (10.5b). If you split the levers and move the left fader into the B bus position and the right fader into the A bus position, you have activated both buses. In effect, you are sending whatever button is pressed on the B bus and on the A bus to the line-out simultaneously. On the line monitor the two video sources would appear as a superimposition (10.5c). If you move the left fader down to the A bus position, and the right fader up to the B position, you would deactivate both buses; the result would be a black screen (10.5d). How a dissolve, a fade-in or fade-out, and superimpositions are accomplished on our simple switcher will be discussed in the section on switcher operations.
Preview Bus
The preview bus functions almost the same as the program bus, except that its lineout does not go on the air or to a recording device, but simply to a preview monitor. If, for example, you press the camera 1 button on your preview bus, that camera's image will appear on the preview monitor, regardless of what the line monitor shows. If you press film, you can, for example, preview the academy leader countdown before you switch the actual film on the air on your mix or program bus. When you press the mix button, you can preview whatever you have punched up on the mix bus or buses, including a superimposition.
Additional Buses
More complex switchers have additional buses for effects, such as key and wipe effects. (We will discuss the electronic effects in Section 11.) As you can see, the number of buttons and buses increases drastically the more complex a switcher gets. In order to reduce the number of buses so that one person can operate it without totally losing his or her sanity, many of the more complex production switchers combine the mix and effects buses. You can then assign to the bus either a mixing or special effects function (or mode). (See 10.8.) With the expanded special effects on a large production switcher, you can insert the picture from one camera, such as lettering for a title, into a base picture (the picture from another camera), a process called keying. Then, if you like, you can fill the cut-out letters (usually white) with any one of a variety of background colors or shades of gray, or even with parts of an image from a third camera through a process called matting. You can also accomplish a variety of wipes, depending on the number and configurations of wipe patterns provided by your switcher. (See Section 11 for more detail on such special effects.) Large production switchers also have at least one additional pair of fader bars for the control of special effects. Also, with a complex switcher (such as a "double re-entry" switcher, into which the effects are fed back twice for further manipulation) you can dissolve out of, or into, a splitscreen or a keyed title, for example. With a less complex switcher, you can only take-that is, cut to-such effects.
Most switchers contain, or have close to them, remote start and stop buttons for VTR's and telecine equipment (see 10.7). Some switchers contain a cut bar. This is a large button that will cut back and forth between two video sources as preset on the mix buses each time you press it. You could, of course, accomplish the same thing by pressing the buttons representing these video sources on the activated mix or program bus. In very fast cutting, the cut bar is a little easier to operate than the mix bus.

10.8 Large Grass Valley Production Switcher: On large production switchers,
the various switching modes can be assigned to the buses, such as preview
and key (top bus) and effects and mix (effects 1 and 2 buses).

10.9 The mix button on the program bus activates the mix buses.
Operation:
Using our could you fade? Let's simple switcher in figure 10.2, how achieve a cut, a dissolve, a super, a do some basic switching exercises.
10.10 (a) Fader bars in the down position activate mix bus A (see 10.5b).
(b) Fader bars in the up position activate mix bus B (see 10.5a).
Cut:
If you were to cut exclusively between two sources, without fading or dissolving, you could do the entire switching on the program bus. But as you know, the program starts and ends usually with a fade, and most programs contain one or more dissolves. Usually, we transfer our switching to the mix section, regardless of the types of transition devices contained in the show.
To connect the mix buses to the line-out, you first press the mix button on your program bus (10.9). If nothing has been pressed on the mix bus, or if both black buttons are punched up on the mix buses, the line monitor will remain in black.
Now you are operating in the mix bus section.
You need to pay close attention to the location of the fader bars. If they are in the down position, mix bus A is activated (on our switcher) and you must do your simple cutting on mix bus A. If the fader bars are up in the mix bus B position, you must do your cutting on mix bus B (10.10).
Let's work with the fader bars in the down, bus A, position. The director says, Ready one. This means that a cut to camera 1 is coming up, in this case a take from black to camera 1. You should be ready to press the camera 1 button on mix bus A. Take one. You simply press the camera 1 button, bus A, and camera l's picture will appear on the line monitor. If camera 1 doesn't show up on the line monitor, you may have missed one or both of these important preceding switching steps: (1) to press the mix button on the program bus, and (2) to have the faders in the bus A (down) position.
If you now want to cut to camera 2, simply press the camera 2 button on the same (mix A) bus. If you want to cut from camera 1 to film, simply press the film button instead of the camera 2 button. (See 10.11.)
10.13 Split Fader Bars for Super: With the fader bars split in the direction
of their assigned buses (fader A to bus A and fader B to bus B) a super can
be achieved with more than half the signal strength for each image.
This technique will give you more control over the signal strength for each of the images, especially if one or both of the two pictures are less than full signal strength to begin with.
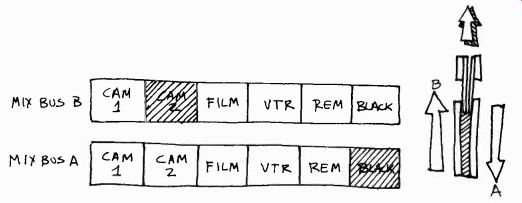
10.14 Fade: Camera 2 on bus B is faded in (from black). In effect, you "dissolve" from
black (bus A) to camera 2 on bus B. If the fader bars are moved from bus B
to bus A, you fade to black.
In order to cut back to camera 1, simply press the camera 1 button again. If you want to see what camera 2 has to offer you before you take it (assuming now that camera 1 is on the air), simply press the camera 2 button on your preview bus.
Camera 2 will now appear on your preview monitor. If you like what you see (especially in relation to camera l's image), you can take camera 2 by pressing the camera 2 button on mix bus A. In case the mix buses fail you completely because of a technical problem, you can simply press the camera 2 button on your program bus and thus put the camera back on the air. Remember to press the mix button again on your program bus before you resume switching in the mix bus section.
Dissolve
For a dissolve from camera 1 to camera 2, press the camera 2 button on bus B while camera 1 is already punched up on bus A (and on the air, since the fader bars are still in the down position, activating bus A) (see 10.12a, b). Now move both fader bars up to the B position (see 10.12c, d). Depending on how fast you move the levers to the bus B position, your dissolve will be either slow or fast. In any case, while you are moving the bars from A to B, you will gradually fade out camera l's picture on bus A, while simultaneously fading in camera 2's picture on bus B. Once your fader bars are in the B position, only camera 2's picture will be on the air. The dissolve is finished.
If you stop the dissolve halfway between the A and B buses, you have a superimposition. If you want to preview the super, simply press the mix button on your preview bus.
Super
As we have just indicated, you can accomplish a superimposition by stopping a dissolve halfway between buses A and B (see 10.12c). Both buses will be activated, each delivering a picture with exactly one-half video (signal strength). Most supers are accomplished this way.
Another method, which provides for a little more control of picture strength for each individual video source (camera picture) is the splitting of the levers and moving up the B fader bar, with the A fader bar remaining in the bus A position.
If the full-strength bus A picture (camera 1) is too strong, you can move the A fader bar up toward the B bus a little, thus reducing its intensity somewhat (10.13). Fade You can fade in a picture on either bus by moving the fader bars from one mix bus, on which the black button has been punched up, to the other bus with the desired source punched up.
Try to fade up on camera 2 from black. Assume that the fader bars are both in the bus A position.
How would you do it? You can check your switching on figure 10.14. Bus A is activated by both fader bars in the A position. The line monitor shows black, since the bus A black button is punched up. On the B bus, you punch up the camera 2 button. Now move both fader bars up to the B bus. Camera 2 will gradually fade in from black. Going to black works in reverse. If you want to go from a video source to black, simply punch up the black button on the non-activated bus and literally "dissolve" to black.
Special effects switching is similar to switching in the mix bus section. Special buttons control the special effects mode (wipe, key), the pattern of the wipe, and the matte configurations. For this kind of switching you either move to the special effects buses or assign the mix buses the special effects function. A special effects button on your preview bus shows the desired effect on the preview monitor, similar to the mix button that shows the specific mix (such as a super). We will discuss some of the special effects in Section 11.
Switching Principles:
In switching, or instantaneous editing, we are, as in postproduction editing, basically concerned with two types of construction (1) continuity and (2) complexity. Continuity editing means the preserving of visual coherence from one shot to the next; it is basically concerned with the clarification of an event. Complexity editing means the selection and assembly of shots that primarily, though not exclusively, help to intensify the screen event.
For example, if you cannot follow a skier any longer with your on-the-air television camera, you must switch to another camera that has the skier in view. This type of cutting is indicative of continuity editing. You simply continue the action from one shot to the next. If, however, you cut from a medium shot of the skier to a closeup of his legs in order to show the extreme strain he is undergoing while racing over rough terrain, you have begun with complexity editing.
In the following discussion, we will mention some of the major principles and conventions of continuity and complexity editing. Please realize that these principles are not absolutes. They work well under most circumstances, and are a basic part of the visual literacy of most television viewers and (hopefully) of television production personnel. However, depending on the event context or communication aim, some of the dos may easily become the don'ts and the don'ts the dos of editing.
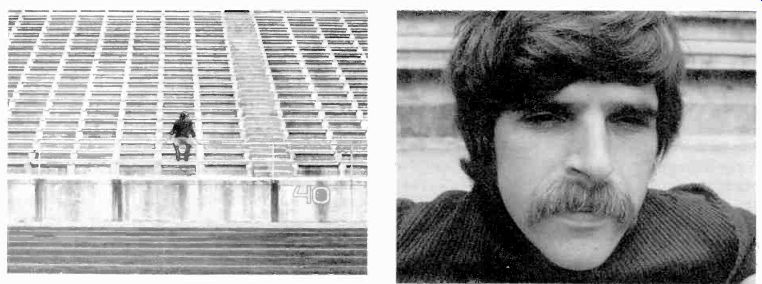
10.15 When you cut from an extreme long shot to a closeup, we may not be
able to recognize exactly whose closeup it is. You should zoom in somewhat,
or cut to a medium shot, before cutting to the closeup.
10.16 A similar problem arises if you cut from extreme angles. It is difficult
for the viewer to tell exactly whether or not the reverse angle shot is of
the same person.

10-17 When shooting dose-ups of two people conversing, bear in mind that
the viewer expects them to remain in their relative screen positions. An abrupt
position change would disturb the shot continuity.
Continuity Editing:
In continuity cutting, you should try to preserve continuity in the appearance of the subject (sometimes called identification cutting), its location on the screen, and its screen motion.
Appearance:
When cutting from camera to camera, try to keep the subject recognizable in each shot, avoiding any extreme changes in distance or angles that may prevent the viewer from readily identifying it or him. (See 10.15 and 10.16.) Cutting from an extreme long shot to an extreme closeup, or from extreme angles, makes for poor subject continuity. However, don't cut to nearly identical shots unless you want to repeat a certain picture sequence for effect. When you cut from one camera to another, the second camera shot should reveal the subject from a slightly different point of view. Why cut, if you show the viewer exactly the same thing? Two succeeding shots varying only slightly in viewpoint may produce a jump cut, in which the image merely shifts its position within the screen-for no apparent reason. If you cannot vary the shot, don't change it. Don't be afraid to stay on one camera, even for a relatively long period of time.
Location:
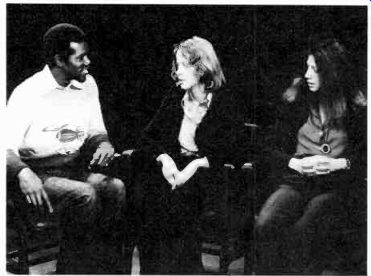
In order to make sense out of a series of shots, we try to locate-organize and stabilize in our mind-the picture field as much as possible. We tend to preserve continuity by remembering the relative screen positions of objects from one shot to the next. If, for example, you have two people talking to each other in an over-the-shoulder two-shot, the viewer expects the people to remain in their relative screen positions even during dose-ups or reverse-angle shooting (see 10.17 and 10.18). By establishing a vector line--or, as it is also called, "line of conversation"--and keeping the cameras on one or the other side of it, you will avoid many confusing picturization mistakes. (See 10.18.) But even if you establish and observe a main vector line, you can still violate the screen positions through improper placement of objects or subjects. In an interview in which a host talks with two or more guests, put the host, not in the middle, but to one side of the guests. Otherwise you will not be able to maintain proper screen positions. (See 10.19 and 10.20.)
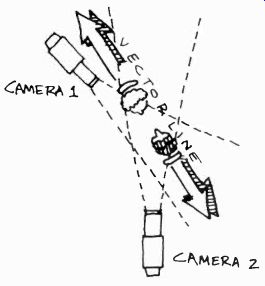
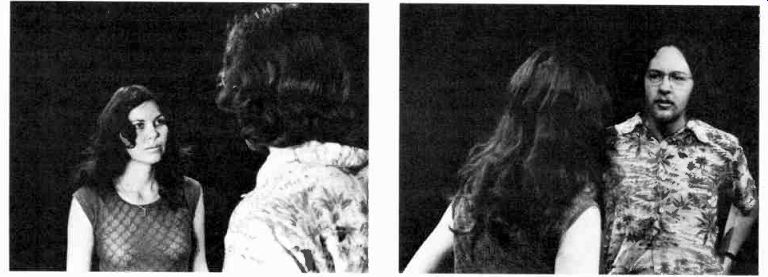

10.18 When two people face each other, you can draw an imaginary line, a
vector line, connecting them. For closeups as well as over-the-shoulder shooting,
keep both cameras on the same side of the vector line. Don't have one camera
look at the scene from one side of it and the other camera from the other
side.
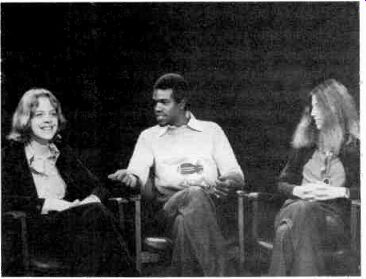

10.19 If the host sits in the middle, you will not be able to maintain screen
positions on subsequent two-shots. A cut from a three-shot to a two-shot with
the guest on screen-left puts the host on the right side of the screen. A
subsequent two-shot with the guest at screen-right will switch the host to
screen-left.
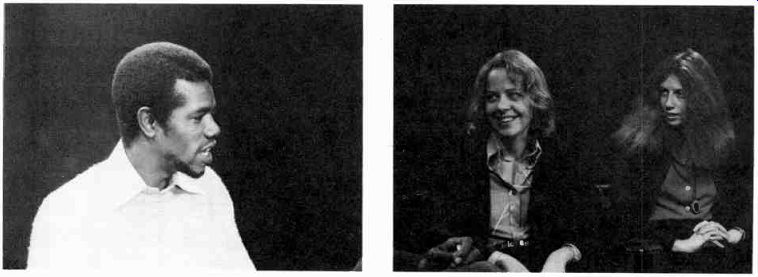

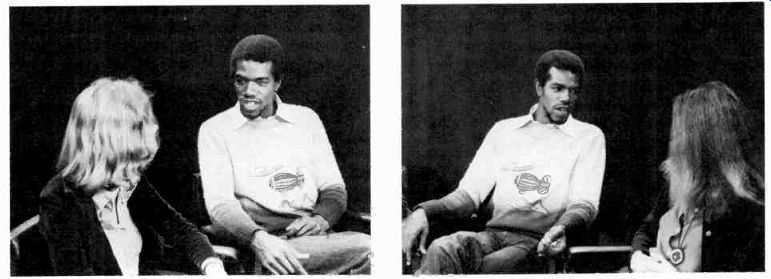
10.20 By isolating the host at one side of the guests, you will have no trouble
maintaining screen positions. Keep the closeup of the host on the left side
of the screen, since we remember his screen-left position from the previous
shot.
Motion When cutting on action and movement, you should try to continue the action as much as possible through the cut. Here are some of the major points to remember:
1. When cutting on action, cut during the motion of the object or subject, not before or after it. For example, if you have a closeup of a person who is just preparing to rise from a chair, cut to a wider shot just after she has started to rise but before she stands. Or you let her almost finish the action on the closeup and then cut to a wider shot. A cut during action looks smooth and, if properly done, goes unnoticed.
2. If you follow a moving object with a panning camera, don't cut to a stationary camera. Have the second camera panning too before you cut to it. Equally jarring is a cut from a stationary camera to a moving one.
Remember that we are now speaking of continuity editing.
In complexity editing, you may well use these don'ts in order to intensify the motion through a motion-no motion counterpoint.
3. A motion with a specific direction also forms a vector line. Therefore, don't cross this vector line with your cameras, or you will reverse the action on the screen when cutting. Hence, don't cut on lateral action from opposite sides, if you want to preserve continuity in screen direction (10.21).
4. Sometimes the sound rhythm dictates certain cutting procedures. In an interview, the cut occurs generally at the end of a question or answer, since cutting at the end of a sentence or phrase produces a cleaner rhythm than in the middle. However, reaction shots are often smoother when they occur during, rather than at the end of, phrases or sentences. In any case, if someone moves while in the middle of delivering a speech, cut on the action. Don't wait until the performer has come to an appropriate point in his or her delivery. Action is usually the stronger motivation for a cut than dialogue.
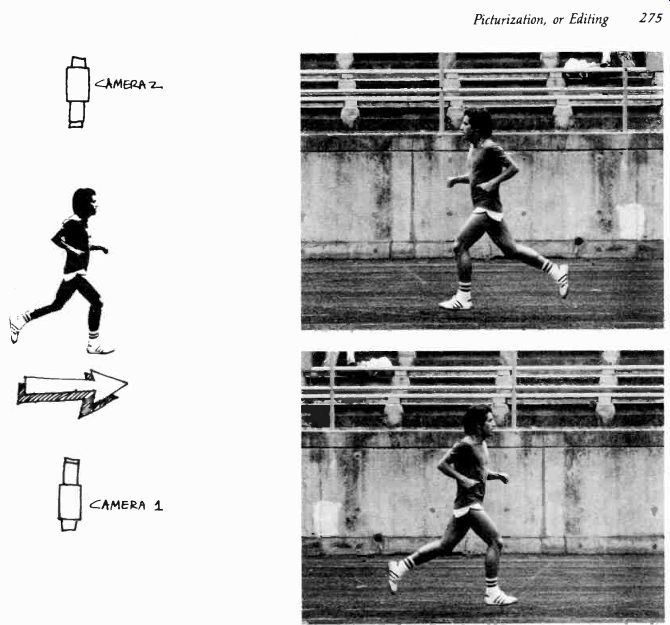

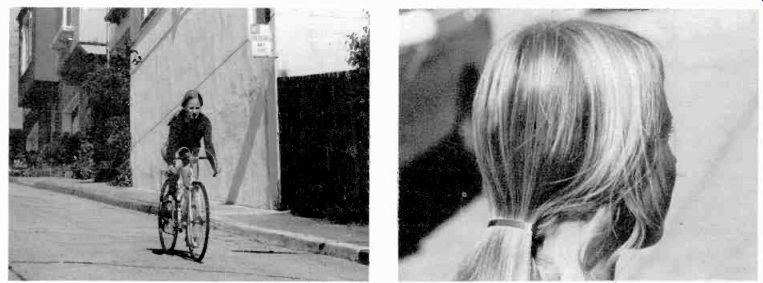
10.21 Any motion generates a strong vector line. If you cut between cameras
positioned on opposite sides of the motion, that is, across from each other
on the vector line, you will reverse the direction of the motion on the screen
at each cut. Since such a reversal can become very confusing, you should keep
all your cameras either on one or the other side of the vector line.
In music, try to cut with the beat. Cuts are like visualized bars; they determine the beat of the visual sequence and keep the action rhythmically tight. Cutting against the beat in music generally does not produce increased tension through syncopation; rather it appears as sloppy switching. If the general rhythm of the music is casual or flowing, use dissolves instead of cuts.
Complexity Editing:
Editing that is associated with the intensification of the screen event is generally more the province of postproduction editing, where you literally build up an intensified screen event from recorded bits and pieces from one or several events.
Nevertheless, there are possibilities for instantaneous complexity editing (switching a live event, even if the line-out leads to a videotape recorder rather than the transmitter) that include the use of (1) the closeup and extreme closeup, (2) zooms, (3) supers and keys, and other special effects, and (4) fast cutting.
Closeup
Cutting to a closeup, or even extreme closeup, cannot fail to direct the viewer's attention forcefully to event detail. Thus, the event is perceived more intensely than if shown in a medium or long shot. The closeup is an especially effective intensifier if the action remains largely internal, such as in a quandary of indecision, moments of extreme fear, or the supreme ecstasy of love.
Zoom
A fairly fast zoom-in on an event detail can be even more compelling than a simple cut to a closeup. In a zoom-in, the event is literally pushed into the viewer's lap. Be careful with such intensification devices: when overdone, the sensitive viewer will lose interest, simply as a defense against perceptual overkill.
Superimposition
You can make a scene more complex by supering or keying two events or event details. If the actual event is highly complex, and not only justifies but demands a complex screen treatment, the portrayal of such complexity on the screen through multi-images can become a powerful intensification device. But don't super two images just because the original event is dull. In instantaneous editing you usually try to reflect the action and feeling of the actual event rather than constructing a new one, as in postproduction editing. For other special effects, see Section 11.
Cutting
Fast cutting that reflects the fast pace of the event is also a powerful intensifier. Unfortunately, it is very difficult to do in switching.
Unless you have twenty cameras in the field, your cutting will have to slow down after you have cut among the three or four available cameras, unless you are content to return to the same shots.
Of course the audio track, especially music, adds considerably to the intensification of a screen event.2 As pointed out before, complexity editing usually needs a careful and deliberate weighing of the available choices and their potential impact on the viewer. Yet switching a multicamera show rarely permits the time and overview necessary for the optimal choice. If, therefore, you intend to engage in intricate complexity editing, you should resort to postproduction editing.
[2. Zettl, Sight-Sound-Motion, pp. 336-343, 358-373. ]
Postproduction Editing:
Postproduction editing means assembling shots and scenes that have been previously recorded on film or videotape into a meaningful whole. It is so called because the editing takes place after (post) the production and not during it, as in switching. Editing this way offers some immediate advantages over instantaneous editing: (1) Once the material is recorded, you have more time to examine it and to ponder carefully over which of the shots should be included in the final edited show, and which should not. In switching, such deliberations are obviously extremely difficult, if possible at all. (2) You can reshoot some of the material if necessary, or draw on other sources to fill in missing shots, such as the film stock library, where you can obtain stock footage of airplane arrivals and takeoffs, clouds, crowd scenes, and others. (3) You have the opportunity-especially if you are engaged in complexity editing--of mixing a special sound track independently of the recorded video images for the final show.
Depending on the magnitude of the show project, the postproduction activity can take many times longer than the actual production. Some feature-film editors may spend a whole year, or more, on editing material that may have been shot in a few months.
In television production, especially in small station operation, you will not come across such ambitious postproduction jobs. Most often you are called upon to edit film or videotape material that has been shot for local news stories, documentaries, commercials, or an occasional ambitious entertainment show that proved too complex for one uninterrupted taping session. Film editing usually involves news films, locally produced documentaries, an occasional film commercial, and the cutting down of feature films to a reasonable length or inserting commercial spots in feature films.
Videotape editing spans a greater variety of show material. Generally, the videotaped scenes have been produced with a multicamera setup and have often been shot in the actual sequence, the first scene first, the second scene second, and so on, with the closing shot last. In this case, videotape editing is merely a hooking together of shorter scenes onto a large reel.
However, many videotaped shows are produced in film-style, which means that only one television camera is used for all "takes" (shots), and that the shots are recorded not in their actual story sequence but according to production convenience. For example, if the opening and the closing scenes of the show occur in the same location, they are shot first, and the middle scenes later. We will talk more about film-style videotape later in this section.
Let us now briefly consider the areas of (1) editing principles (2) film editing, and (3) videotape editing. Before we go into any detail, you should realize that the art of editing cannot be mastered overnight. Indeed, editing-the building of screen space through a careful juxtaposition of visual and aural images-is as creative and challenging a task as directing. What we intend here is not to give an exhaustive treatment of the principles of editing but, rather, enough of an overview so that you can communicate intelligently with the editor, or perform simple editing jobs yourself without having to search elsewhere for basic references. But major editing should be left to the editing specialist.

10.22 Most feature films come already edited for television viewing before
they reach the local station. Also, the places for the commercial inserts
are usually labeled with a strip of film that says: "Place commercial
here." If you don't want to "place your commercial there," you
must clip out these commercial indicators before showing the film on the air.

10.23 Occasionally, in struggling with a show concept that calls for inventive,
atypical complexity editing, you may find that you not only can, but must,
violate many or all of the customary editing principles, such as continuity
of action and screen direction. A jump cut, generally regarded as an editing
mistake, may be just the right technique for portraying and intensifying a
highly volatile situation, or a feeling of extreme anxiety and restlessness.
But such exceptions do not render the common editing principles invalid. All
this means is that even principles are contextual; their validity depends
on the context, the specific circumstances, and communication purpose for
which they are used.
Editing Principles:
The principles of continuity and complexity editing, which we have discussed under switching, or instantaneous editing, apply of course also to the postproduction editing process. The basic aim of any editing process is to tell a story with clarity and impact.
Although there is a very basic aesthetic difference between film and the television image (film as a series of frozen pictures versus the evanescence of television scanning), we can discuss the postproduction principles for film and television together; after all, both media are edited for the same small screen and the intimate atmosphere of most television viewing.3 In the following list, we assume that in most television postproduction work you will be concerned primarily with continuity rather than complexity editing.
1. Whenever approaching an editing job, have a clear idea of the overall story, its basic theme (what the story is all about), its plot (how the story develops from beginning to end), and its communication purpose (what you want the viewer to perceive and experience). Always edit (select what is important and what is unimportant) within the context of all story elements and the communication purpose. What is the show's central message? If you can't answer this question, you are not yet ready to edit. Don't be led astray by beautiful footage that has nothing to contribute to the central theme.
2. The important prerequisites for story continuity are the continuity of pictures and sound. The viewer should be able to combine the various shots, scenes, and sequences into a complete whole, smoothly assimilating the jumps in time and space induced through editing. Maintaining visual continuity (maintaining proper location within the frame and screen directions) is more difficult in postproduction editing than in instantaneous editing, since the event has generally been shot in bits and pieces, with large portions of the actual event missing. A good camera operator will provide you with shots that "cut together" well, which means that the two shots provide for the necessary visual continuity. For example, if you end one shot with a medium closeup of a car, start your next shot from either closer or farther away, and from a distinctly different angle. A change of angles helps to prevent jump cuts.
If you work with a single camera, such as a film camera or a portable television camera, make sure that you don't cover a dominant action, such as somebody running in a specific direction, from one side of the action first and then the other. As with the multicamera setup, you must keep your single camera on one side of the vector line only, unless you intend to reverse the screen direction on purpose. The same goes for getting over-the-shoulder shots with the single camera. Shoot from only one or the other side of the vector line. Since in news photography such careful camera positions are not always possible, get some cutaway shots that fit the overall event context. Cutaway shots are made of neutral event details, which do not indicate any specific screen direction, such as a straight-on shot of an emergency vehicle or another news photographer, a street sign, spectators. When two shots do not cut together directly (since, for example, they would change the screen direction without motivation), you can put a cutaway shot between them, thereby enticing the viewer to accept the change. What you have done with the cutaway shot is pretend to the viewer that there was a lapse of event time (a looking away) in which the shift of viewpoint could have taken place.
[3. See Zettl, Sight-Sound-Motion, for a detailed account on the aesthetic differences between television and film. ]
It goes without saying that the audio track must have continuity, too. In fact, good continuity of sound can at times help provide continuity to the video portion.
3. In film, transitions other than cuts (dissolves, fades) are expensive unless they are done within the camera. Besides being cheaper, cuts keep the action rhythmically tighter than dissolves or fades. If you have a television system that allows you to edit videotape from two machines to the master recorder, you can probably route the various show segments to be edited through the studio switcher. Hence, you can add any number and kinds of transitions or effects to the show material during the editing process. The two playback VTR's that contain the unedited prerecorded material, with the unflattering designation of "slaves," simply act as video sources, very much like two studio cameras, and the "master" recorder as the VTR upon which the video material is assembled in an orderly fashion.
Highly sophisticated editing facilities can be programmed to perform such editing tasks automatically. Again, use special effects and special transitions only if they indeed help to clarify and intensify the screen event.
4. Since editing means the manipulation of prerecorded material for a specific communication purpose, you are ultimately responsible to the viewers for your choices. Don't violate the trust they put in you. There is a fine line between intensifying an event through careful editing and willfully distorting an event so as to serve your aims rather than the viewers' needs. Except for the principles of communication that help you to avoid gross violations, there is no clear-cut guidebook to help you in this task. An essential prerequisite for the editor, as for any serious mass communicator, is respect and love for his fellow human beings.
Here are some examples of editing practices that range from the permissible to the unethical: Event: A speech by a candidate running for political office.
Communication Aim: To give a condensed, yet balanced, overview of what the candidate said to the audience for the local evening news.
Your camera operator shot the speaker from opposite sides of the main vector line (running from speaker to audience) without any cutaway shots. You need a cutaway to splice between the two shots that were taken from opposite sides.
You pick some stock footage, showing a closeup of a news photographer taking a picture-permissible.
You pick a stock shot of somebody obviously bored with the whole thing-unacceptable. The cutaway might be misleading and grossly unfair to the generally high-energy event.
Manipulations with the audio track are even more dangerous. For example, to add applause, simply because the speaker said something that you happen to support, is a blatant case of lying.
So, of course, is editing out all the statements that happen to go against your convictions, and leaving in only those with which you agree.
The use of the montage is an especially powerful, but potentially dangerous, device. It consists of a juxtaposition of two images that creates by implication a third idea not contained in either of the two shots. A montage might, for example, show a shot of soldiers taking aim at some unknown target, followed by a butcher, brutally slicing open the bellies of cattle. Idea implied: cruelty and brutality of war. A shot of crowded people followed by a shot of a herd of cattle might imply that people are living in subhuman conditions, or that people have the herd instinct of animals. A shot of somebody slightly drunk getting into a car, followed by a speeding ambulance with the lights flashing, might imply that this person had caused, or suffered, an accident.
Especially, if you edit a news story or a documentary (which means that you are not creating, but documenting, an event) stay away as much as possible from video and audio material that is not directly related to the event.
Film Editing
When you edit a film, you literally cut the film apart, pick out the sections that contribute to telling the story with optimal effectiveness, and glue the pieces back together again so that they form a continuous whole. The actual operation of gluing the film pieces together is called splicing. As with all skills, splicing can be learned only by doing it. Nevertheless, we will try to cover some aspects of sound film splicing and the basic points of electronic A-B rolling.
Splicing Sound Film
Splicing double-system sound film is quite involved and generally left to the professional film editor. Most local news film is shot single-system, however, and you may occasionally have to edit single-system sound film.
Even this simple kind of splicing can become quite tricky, since the sound does not run exactly parallel with the pictures but ahead of them.
In 16mm film, the sound precedes the corresponding picture by 26 frames for optical tracks, and 28 frames for magnetic tracks. In Super-8mm film, which usually has magnetic tracks, the sound is advanced by 18 frames. (In 35mm, sound has a 20-frame advance.)
----------------------
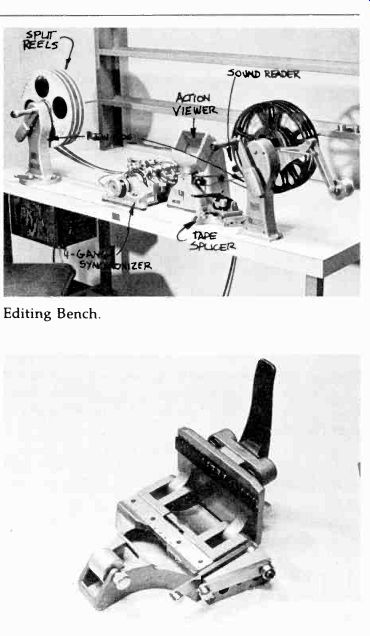

10.24 The minimum film equipment you need for simple 16mm film editing includes:
(1) A film splicer.
It will help you cut the film straight at the right place and press the tape over the splice (tape splicer), or hold the film in place while scraping the emulsion, and overlap it for the gluing (cement splicer). (2) A pair of rewinds and different-sized reels. With the rewind, you can wind the film backward and forward with ease and speed. (3) An action viewer. This is like a little projector. When you move the film through it with the aid of the rewinds, the film pictures appear on the small screen of the viewer. The faster you turn the rewinds, the faster the action appears on the viewer; the slower you turn the rewinds, the slower the action appears.
You can stop the film and examine a single frame in the action viewer. (4) An optical and magnetic sound reader. Usually placed next to the splicer between the rewinds, the sound reader translates the optical or magnetic sound track into actual sounds. (5) A program timer, and (6) a four-gang synchronizer.
The program timer, or the more cumbersome footage counter, gives you an accurate running time of the individual film sections, or the completed film. The four-gang synchronizer is needed only for double-system film editing (sound and pictures are edited separately and "married" later) or if you A-B roll your negative (see __ for an explanation of A-B rolling). And (7) miscellaneous material, such as film cement (a strong glue that dissolves the film base somewhat and literally cements the two pieces of film together), gloves to avoid fingerprints on the film, a trim barrel that catches in its cloth bag the temporarily discarded pieces of film, marking pencils, and film cleaner.
Film Tape Splicer: Contrary to the cement splicer, which welds the base sides of two pieces of film together with film cement, the tape splicer uses a piece of transparent tape for joining two pieces of film. The advantage of the tape splicer over the cement splicer is operational speed. No scraping is necessary, and there is no drying time for the cement. The film is cut and taped in one quick operation.
-------------------
-----------------

10.25 As pointed out before, single-system sound means that the sound is
recorded simultaneously with the pictures on the same film. The single-system
sound track can be optical or magnetic. In double-system sound film, the pictures
are recorded on one film (system one) while the sound is recorded at the same
time or later on magnetic tape (system two). Pictures and sound are edited
separately (with the aid of a four-gang synchronizer) and then printed together
on one film, the composite print.
------------------
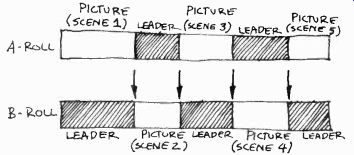
10.26 A-B Rolling: In A-B rolling, roll A is composed of all odd-numbered
shots, separated by leaders that correspond exactly to the even-numbered shots;
roll B is composed of all even-numbered shots, separated by leaders that correspond
exactly to the odd-numbered shots.
So, if you start your picture editing with somebody just opening his mouth for a statement, you have already lost part of the statement itself, because the sound precedes the picture by 26 frames (assuming a 16mm film with optical track). A good rule of thumb is to splice the film on audio for the beginning of a statement, and on video for the end of a statement. Operationally, you run the film through the action viewer and sound reader. If, for example, the statement you want is, "Your request for more up-to-date television equipment has been granted," you mark the film at the audio track directly at the sound head of the sound reader as soon as you hear the "Your." Then you look in your viewer until you see the person who is making the announcement has closed his mouth after the word "granted." If he continues talking right after this statement, but you do not want the beginning of the second statement to be heard over the shot that follows, you must bloop (render inaudible) the audio track. If you have an optical track, you simply run a small piece of tape (blooping tape) along the 26 frames ahead of the last splice. With a magnetic track, you use a small magnet that degausses (erases) the 28 frames to the last splice. Sometimes you may want to cut the film on audio, which means that when you hear the speaker say the last word on the sound reader you cut the film. Your picture will, however, still show him mouthing a word. The next shot should, therefore, show a reaction that makes some sense, such as a shot of delighted production people hearing the good news.
If you have to splice together two statements by the same speaker, you need to cut the first statement on both ends (beginning and end of the statement) on audio. The beginning of the second statement needs to be cut on audio and end on video. The problem is that at the splice you see the speaker's lips obviously mouthing different words from what you actually hear. Fortunately, this "lip flap" lasts for a relatively short while, and is generally ignored by the viewer (at least, let us hope so). If your "lip flap" splicing is too distracting, you may want to cut back live to the newscaster, or insert a cutaway shot with voice-over from the newscaster. In either case, the film is kept rolling, which explains why such an editing method is often called a "roll-through" or "roll-thru." If you want to go back to the newscaster between two SOF statements, you splice either a black or an academy leader between the two SOF films, just long enough to cover the roll-through period (usually five seconds). If you use a cutaway shot (silent film), it must be long enough to cover the voice-over announcement of the newscaster. You can, of course, have roll-throughs between two silent films, in which case you simply cut back to the newscaster for the roll-thru voice bridge, with the academy leader or black leader rolling through off-air.
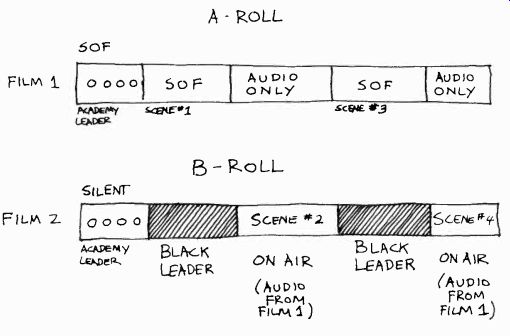
10.27 Electronic A-B Rolling: In electronic A-B rolling, the complete SOF
interview is played on one film island (constituting the A roll). The silent
shots, which are carefully matched to the narration and separated from each
other by black leader whenever necessary (when the A-roll is on the air with
video and audio), are played simultaneously on the other film island (constituting
the B roll). You can switch to the B-roll video while resuming the A-roll
audio.
Electronic A-B Rolling
In order to make the single-system SOF more flexible, a system of electronic A-B rolling has been developed. "A-B rolling" is a term for film editing in which you splice the first, third, and all subsequent odd-numbered shots together on one reel, constituting the A-roll; and all even-numbered shots on another reel, the B-roll. All shots are separated by black leader, which is spliced opposite the shots on the other reel. Both rolls are then printed together for the final composite print. Through A-B rolling, all splices are eliminated in the printing process, and optical effects, such as dissolves and fades, can be accomplished. (See 10.26.) Electronic A-B rolling uses a similar principle.
Let us assume that you have to cover the construction of a music center in your city. With your single-system sound camera, you cover the interview with the director of the center in one continuous take at one location. In the interview, however, the director of the center makes many references to particular sections of the partially constructed building. After the interview, you film these sections of the building with a regular 16mm silent film camera. You then prepare a B-roll with the silent footage, making the pictures of the various building parts correspond exactly to the sound track of your SOF footage. The A-roll, containing the interview, is put on a film projector of one film island, let's say film island
1. The B-roll, containing the individual construction scenes, is put on a projector of another film island, in our case film island 2. Both films are started at the same time. The A-roll with the interview is put on the air first. But whenever the director of the music center is referring on the A-roll to one of the construction sites, you simply switch the video over to the B-roll on film island 2, with the explanatory audio still coming from the A-roll on film island 1. In other words, both films remain running throughout the interview.
Thus, you have a running commentary from the music director, with the appropriate B-roll illustrations continuously paralleling it. In fact, you are "editing" your film on the air, using the original sound track as your editing guide. (See 10.27.) Videotape Editing Videotape editing ranges all the way from a simple hooking together of several long scenes that have been recorded in their natural sequence (the opening first, then the scenes as they occur, and the closing credits last) in a multicamera studio production, to the complex building of a show from many out-of-sequence shots obtained with a single camera, from other video sources, such as slides and film, and several independent audio tracks.
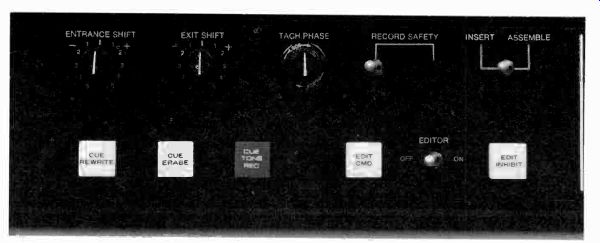
10.28 Ampex AVR-2 Editec Electronic Editor.
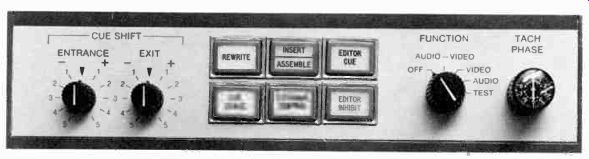
10.29 Ampex AVR-1 Editec Electronic Editor.
In the early days of videotape editing, the videotape had to be cut physically and fastened to the other piece of tape with a special splicing tape.
In order to avoid picture roll at the splice, you had to cut both tape ends at exactly the right spot, one of the control track spikes (made visible through an iron-particle solution). Even with the help of a special splicing block and a magnifying glass, or even a low-powered microscope, the splices did not always turn out satisfactorily; not to speak of the necessity of cutting an expensive tape apart every time a splice was required.
Today, mechanical splicing is used only occasionally, mostly to repair tape needed for archival purposes. It is especially difficult to do with helical videotape recordings. Virtually all videotape editing is done, therefore, by means of electronic editing. In that way, you can insert new video and audio information into an existing videotape recording, or add various pieces of video and audio information in a desired sequence, all without cutting the tape. An "electronic editor" seeks out the sync pulses on the control track at the exact point you have selected for editing and puts the new material on the tape without any picture or sound deterioration, however momentary, at the points of transition. The electronic editor permits the simultaneous editing of video and audio, or of either track (video or audio) separately, without affecting the other. (See 10.28 and 10.29.) As mentioned before, the basic principles of editing-the principles of continuity and complexity-apply also to videotape editing. Operationally, however, electronic videotape editing differs considerably from switching (instantaneous editing) and film editing. We will, therefore, briefly discuss these five areas: (1) edit modes, (2) simple editing methods, (3) advanced methods, (4) SMPTE time code, and (5) editing production procedures.
Edit Modes
There are two basic edit modes, (1) the assemble mode and (2) the insert mode.
In the assemble mode you can add onto a blank master tape shot after shot selected from another videotape, or tapes. If, for example, you recorded a short play by "stopping down" (stopping the videotape machine) between scenes, and now want to hook them together into a unified whole, you can put the tape recording on the playback machine (sometimes called "slave") and add the scenes in consecutive order on the "master" videotape recorder. As you can see, you need at least two videotape machines for electronic editing: the playback machine, which supplies the various scenes, and the recorder, which edits them together.
In the assemble mode, you can add scene B to A, C to B, and so on, regardless of what video sources they may originate from. For example, scene A may be on one tape reel, scene B on another. But once the tape is assembled, you cannot go back and substitute a new scene B for the old scene B, without having to edit on all the subsequent scenes anew (10.30). If you now want to substitute the new scene B for the old one, without affecting the previous or following scenes in any way, you must use the insert mode (10.31.) This allows you to insert any amount of material at any number of places in an existing tape, without having to re-record the adjacent material.
In the insert mode you can insert material into an existing recording, as well as add shots consecutively, as in the assemble mode. However, before you can add a series of shots or scenes in the insert mode, you must first "lay a control track"--that is, run the blank master tape through the videotape recorder and record the sync pulses of the control track for as long as you expect the finished, completely edited program to be. This control track will guarantee a synchronous match of the segments as they are added at the edit point, which means roll- or tear-free transitions. In the assemble mode, you do not have to prerecord a control track on the master tape. Whenever you record a new segment next to the old one, the tape will be totally erased for the new segment (from the previous segment on), and the new segment supplied with its own control track. The electronic editor then tries to match the two control tracks, the one from the previous shot and the one from the following, as best it can. Unfortunately, this matching does not always work out exactly right, and the transitions in assemble mode editing are highly susceptible to picture roll or tear. Most high-quality editing is, therefore, done in the insert mode.
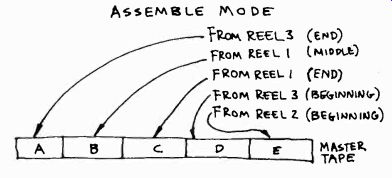
10.30 Assemble Mode Editing: In the assemble mode, any number of scenes can
be assembled consecutively onto the master tape. But no inserts can be made
without affecting the material that follows the desired insert.
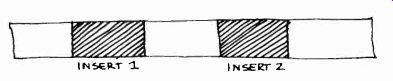
10.31 Insert Mode Editing: In the insert mode, material can be introduced
into an existing recording without affecting the material preceding and following
it. Also, if a control track has been laid before the insert-mode editing,
any number of scenes can be assembled very much as in the assemble mode, except
with higher electronic stability.

10.32 While all electronic editors can perform assemble mode editing, not
all have an insert mode, especially on small helical scan videotape recorders.
Simple Methods Editing methods vary greatly, depending on how sophisticated your electronic editing equipment is.
In its most elementary form, you simply depress an edit button at the exact spot where you want the next shot to adjoin the preceding one. Holding this button down changes the machine from a playback mode to a record mode (thereby erasing everything on the master tape and replacing it with the new video material, which is being fed from the second, playback, machine). When the scene is finished, release the edit button, which returns the machine to the playback mode. It's a good idea to let the machine run for an additional 10 or 15 seconds before pressing the stop button, just in case the return to the playback mode does not happen immediately. Wind the machine back and check the edit. If it is good, you can advance to the next one. If you don't check each edit, you may later discover a bad "splice" right in the middle of your edited tape. Unless your machine has an insert mode, you will have to go all the way back to the error and start again.
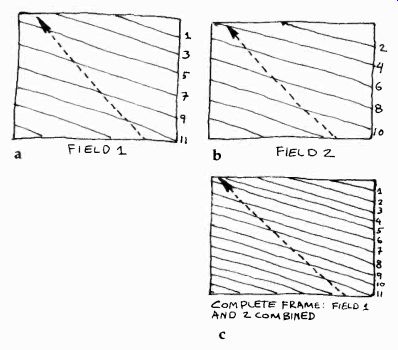
10.33 An electronic frame consists of one complete scanning process. The
electron beam that scans the camera pickup tube and the surface of the kinescope
tube moves from left to right, and from top to bottom, very much the way we
read the lines in a book. Unlike reading, however, the beam skips every other
line during its first scan (reading only odd-numbered lines [see a]) and then
jumps back and scans all the even-numbered lines (see b). This process is
called interlaced scanning. The scanning of either the odd- or even-numbered
lines constitutes a field; the scanning of two consecutive fields, that is,
the one complete reading of both odd- and even-numbered lines, makes up a
frame (see c). The frame, then, constitutes the smallest complete picture
unit. The broadcast television system works with 60 fields, or 30 frames per
second. Note, however, that the frame is never visible on the videotape itself.
The television frame consists merely of a completed scanning cycle; it is
therefore visible only on the television screen. A film frame, on the other
hand, is clearly visible on the film itself, and does not need to be projected
to be seen.
Advanced Methods
More advanced editing systems cut in and out of the edit mode automatically.
What you do is place an "in" or "entrance" cue on the cue track of the videotape (done electronically through pressing a cue button), back up both tapes (the one on the playback machine with the scene to be transferred and the master tape) to the normal roll time (anywhere from six to ten seconds), and start both machines at the same time. As soon as the master recorder reads the edit signal on the cue track, it automatically shifts from a playback to an edit (record) mode and records the material from the other machine. You can also place an "out" or "exit" cue on the cue track, through which the master recorder is switched back from the edit (record) mode to the playback mode. Thus, insert edits can be precisely placed without any button pushing during the edit itself.
The trouble with this method lies in achieving precise synchronization of both machines and continuous identification of tape "addresses," locations on the tape that can be pinpointed quickly and repeatedly.
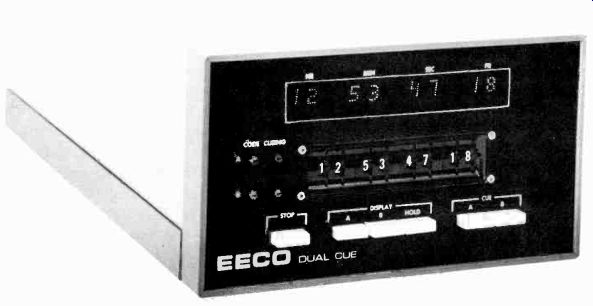
10.34 Time Code Reader.
SMPTE Time Code The development of the SMPTE Time Code has not only solved the address problem but also paved the way for extremely precise, computer-controlled editing.
Through this invention, videotape became in every respect as flexible as film in building a show from prerecorded segments.
The SMPTE Time and Control Code is an electronic signal that, when recorded on the cue track of a videotape through a time code generator, provides an address, or a "birthmark" for each electronic frame. The address is given in elapsed time for each frame. The lime code reader displays, like a digital clock, hours, minutes, seconds, and frames (10.34). The numbers in the frame column run from 0 to 29, after which the seconds column is advanced by one digit (since we have 30 television frames per second). The readout works at any tape speed, whether you turn the reels by hand or run the recorder in fast forward or reverse.
Since each television frame can be located with ease and precision, the editing process itself can now be partially or fully automated. There are numerous computer-assisted systems in operation that can perform an astonishing array of editing tasks. Although in small station operations you may not need a highly sophisticated computer-controlled editing system very often, you should at least have an idea of what such a system could do for you. By simply pressing a few buttons of the command-display console, which might be located in your office, the computer-assisted editor performs, among others, these miracles: Tells you what machines are available for editing, what the preroll requirements are for each machine, the types of tapes used on each of the playback machines, the length of the scenes on the playback tapes, and other such information.
Advances or rewinds the tape to the exact address stipulated. If you give an erroneous address that lies beyond the tape being previewed, the tape will automatically stop before it runs off the reel.
Calculates the entrance or exit addresses (in and out edits) from a given duration time of a scene, and displays continuously the time remaining until the end of an edit. Once the exit cue has been reached, the computer remembers it and changes it into an entrance cue for the next segment.
Lets you rehearse any number of edits before you actually record them on the master tape. Audio and video can be rehearsed together or separately. If you don't like the exact spot of the edit during rehearsal, you can shift the edit points somewhat without having to refigure new entrance or exit times. If the change is drastic, the computer will automatically shift the following edit points accordingly.
Activates in A-B rolling (using two playback machines so that the scenes can be assembled alternately onto the master tape) all machines at their proper time (even if they have different preroll requirements), keeps the machines synchronized, and overlaps the A-B rolls for dissolves or wipes.
Prints out a hard copy of every editing decision you have made for later reference.
Produces a punched paper tape that represents the final editing positions. When fed into the system, it activates the quadruplex machines for fully automated editing of the master tape.
But don't worry. You are still the most important element in the system. After all, it is responsible human beings that put the event on the tape in the first place, and it is your sensitivity, experience, knowledge of the overall context and communication aim, artistry, and technical skill that help to decide just which shot goes where, and what image should be juxtaposed with what other for maximum effectiveness. Even in these decisions, however, the machine can help.
Let's assume that you have been shooting on a documentary for several weeks, using a single television camera and a portable quadruplex videotape recorder. You now have a great number of small single 2-inch reels and are preparing for editing.
Viewing and reviewing all the tapes on a quadruplex machine would be very costly. Also, the frequent plays of these master tapes may reduce their quality. What you can do, therefore, is to transfer the 2-inch tapes to a 1-inch (or %-inch) helical tape for initial viewing, decision making, and even precise edit preparation. All you need to do is put a time code on the 2-inch tapes. When dubbed down to the 1-inch tape, the time code readout can be keyed into, or supered over, the actual scenes. When you view the 1-inch tape, you can view the scene with its corresponding code address. Since the helical machines permit you to play back in slow motion or arrest the playback for a freeze frame, you can leisurely look for the best edit spot. Reading the time code addresses off the monitor screen, you can prepare an accurate shot list. Once you know exactly which shot goes where, you simply transfer this off-line time code information via a punched paper tape to the on-line electronic editing system of the quadruplex recorders and have lunch while the computer takes over (10.35). 4
[4 Central Dynamics, PFC-102, The Computer Evolution in VTR Editing (Montreal: Central Dynamics, 1973), p. 11.]
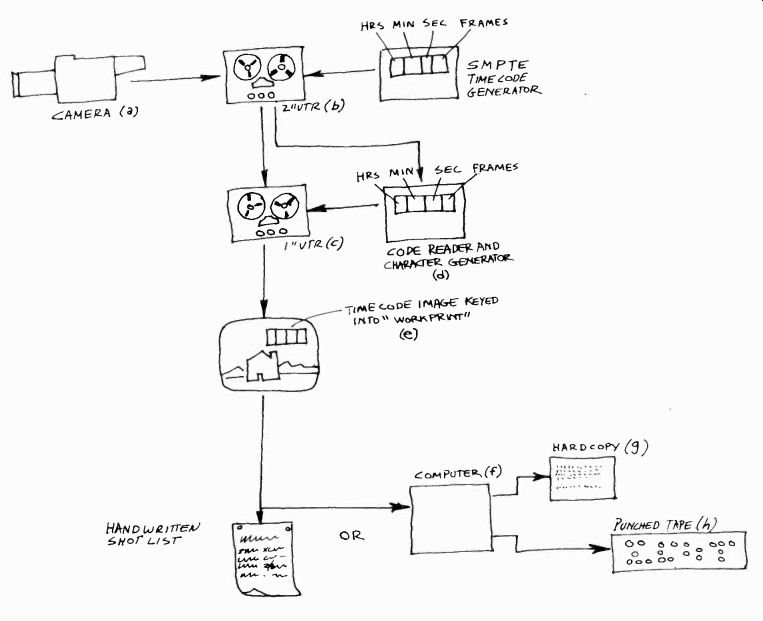
10.35 Off-Line Editing System: The scene is captured by the camera (a) and
recorded on the quadruplex master recorder (b). A time code is then added
to the master tape (c). The master tape is then transferred onto helical tape
with the time code reader (d) providing a visible time code key insert over
the helical scan recording (e). From this information, you can then make your
choices and tell the computer of your decisions (f). The computer remembers
your choices, and makes a hard copy of your choices (a shot list, just in
case yours isn't too accurate) (g), and at the same time produces a punched
paper tape with the decision list (h). Your off-line editing is terminated
at this point. You can now tape the paper tape and feed it into the computer
for the actual on-line editing (which is done fully automatically).
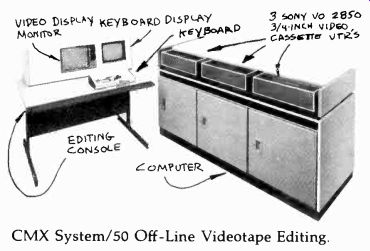
10.36 The leading systems are the CMX systems by the Orrox Company, the Central
Dynamics Systems, and the 3/4-inch cassette systems by Sony.

10.37 A complex computerized system is, of course, very expensive to purchase.
If you do not have access to one, however, you may think of renting the facility
for a certain period. Its advantage is the speed and efficiency with which
edits can be performed. An hour with one of these sophisticated editing systems
gives you more, and more precise, edits than a whole day or two would produce
with the machine-to-machine method.
Production Procedures
As was just pointed out, technical sophistication in editing does not guarantee an effective end product. Your sensitive choices are still the major prerequisite for quality editing. Like any other production technique, efficient videotape editing requires you to pay close attention to certain basic procedural steps. Here they are:
1. Hopefully, you have kept accurate records of each good or bad take during the actual videotaping. The search for the required segments is thus made relatively easy. Nevertheless, in a complicated editing job you will have to review the various tape segments a great number of times. Therefore, dub your original material down to a 1-inch or 3%-inch helical format (if you recorded on 2-inch), or make a simple dub of all material recorded (if your original material was recorded on the 1-inch format) for a workprint.
2. If you haven't done so during the shooting, write down some basic information about the various recorded segments, such as the cut number, scene number, take number, duration of the shot, the subject (what is the scene all about?), the time code addresses of the beginning and end of each recorded segment (if available), and whether or not the shot is good or bad (acceptable or unacceptable). (See 10.38.)
3. When selecting the edit points (entrances and exits) for each shot, watch for visual and aural continuity.
Write down briefly how each of the selected shots begins and ends with video and audio. For example, your video column in your shot sheet may read: "CU (closeup) of 3/ profile to screen left of Steve"; and your audio column, "Begins speech: 'In this crisis . . ends with 'suggest these ten points.' " You should also write down any "wild" sounds that accompanied the speech, such as audience noise, or other prominent background soup ls. These background sounds must continue through the subsequent shots, until the scene changes to another time and/or location (see 10.39). Sometimes you may find that you have to record the "sounds of silence"-the hisses or hums in an empty room-and dub them over the electronic edit points in order to maintain continuous noise. Otherwise your edits, though visually perfect, may be easily recognizable by short, yet distinct, drops in the hum present even during silent periods.
4. If you edit with the SMPTE Time Code, list all the reel numbers, the entrance and exit addresses (as displayed by the time code), the duration of each shot, and the desired transitions in consecutive order. You might protect yourself by briefly indicating also the content of the shot, in case the numbers do not check out. Now you are ready to edit, that is, to press the buttons yourself or give it to the videotape editor or to the computer.
5. Review the finished product carefully. Realize that the more tape generations you produce (number of dubs)
during your editing process, the more the final product suffers in technical quality. Even a simple edit from the raw material to the master tape produces a second generation. If you then have to fix up the master tape by editing portions of it to a second master, you work already with a third generation. Only the very best high-band quadruplex recorders can perform such a feat without noticeable picture deterioration.
10.38 Basic Shot Information.
One final comment on videotape editing. The technical capability of frame-by-frame videotape editing does not necessarily mean good television.
In fact, indiscriminate editing can often destroy television's great aesthetic potential of "aliveness," the immediate communication of the ever-changing moments of life. If the director or videotape editor does not recognize the specific requirements of the television medium-for example, editing rhythm-the various tempi of the individual segments and the overall pacing of the show may look artificial to the sensitive viewer.
In a dramatic show it is often better to record as long a segment at a time as possible than to rely on many short takes, which must later be spliced together. The sustained action of the longer takes will often help to preserve a live, organic television quality in the performance and in the final rhythm of the play.
10.39 Editing Shot Sheet.
Summary
Picturization, the process of structuring a shot sequence, consists of three elements: (1) transition devices, (2) switching, or instantaneous editing, and (3) postproduction editing.
The four basic transition devices include (1) the cut, the instantaneous change from one image (shot)
to another; (2) the dissolve, or lap-dissolve, the gradual transition from shot to shot whereby the two images temporarily overlap; (3) the fade, whereby the picture goes gradually to black (fade-out) or appears gradually on the screen (fade-in); and (4) the wipe, in which one picture is partially or fully replaced by another.
Instantaneous editing is made possible by means of a video switcher, an electronic machine equipped with rows of buttons and fader bars.
The switcher can bring about the basic transitions between any two video sources (such as two studio cameras, or camera to VTR, or studio camera and telecine camera) while the production is in progress. The switcher can also (1) create special effects, such as wipe patterns, key and matte inserts, and (2) permit previewing of any video source or special effect before it is switched on the air. Switchers that carry the corresponding audio portion of the program, together with the video portion are called audio-follow-video switchers.
The buttons on the switcher are usually arranged in rows, called buses, including a program bus, two mix and effects buses, and a preview bus. The mix and effects buses are usually switch-able to either mode. Fader bars allow dissolves from one bus to the other, or the gradual appearance or disappearance of effects. In switching, as in postproduction editing, we are concerned with (1) continuity editing, the preserving of visual continuity from shot to shot, and (2) complexity editing, the juxtaposition of shots in order to intensify the screen event.
Postproduction editing means that shots and scenes that have been previously recorded on film or videotape are assembled after (post) the production into a meaningful program. The principles of continuity and complexity editing apply in post-production editing the same way as they apply in instantaneous editing.
In film editing, we cut the film apart and splice the various pieces (shots) back together again in the desired order. A special film editing procedure is electronic A-B rolling, whereby one film carries the sound and one type of pictures (A-roll), while the other roll (B-roll) carries another set of pictures, but no sound. When televised, the sound of the A-roll is played throughout the film program, but the pictures fluctuate between A and B rolls.
In videotape editing, the shots are assembled on the videotape electronically. There are two types of edit modes: (1) the assemble mode and (2) the insert mode. Advanced videotape editing uses a time code, which permits frame-by-frame editing, and a computer for search of shots or shot sequences, execution of a variety of transitions, and the recording of the editing decisions made. Most computer-assisted editing has an off-line and an on-line system.