This section covers the major aspects of television directing, which means controlling the complex production machinery. Important aspects are the director's language, the interpretation of a production plan or script into video and audio images, and the coordination of production personnel and talent during rehearsals and on-the-air performance. The discussion falls into these subdivisions.
1. Terminology, the means of coordinating a great many production elements and persons with a maximum of communication effectiveness.
2. Timing-its dual aspects in television and some techniques of time control.
3. Visualization and picturization, the processes by which the director perceives a scene in screen images and maps the sequence of actions.
4. Different types of script formats.
5. Script preparation, including analysis and script marking.
6. Rehearsals for both technical crews and talent.
7. On-the-air directing, together with stand-by procedures and postshow duties.
8. Postproduction activities from the director's point of view.
=============
Back-Timing
The process of figuring additional clock times by subtracting running times from the clock time at which the program ends.
Camera Rehearsal
A full rehearsal with cameras and other pieces of production equipment. Similar to the dress rehearsal in theater.
Character
The person who appears in a play.
Usually defined by clarifying and intensifying specific physiological traits (the way the person looks, moves, runs, behaves, dresses) and psychological traits (the way the person thinks, feels, plots, schemes, loves). Climax The high point in the plot, usually expressed as the major conflict--as distinguished from a crisis, which is relatively less intense.
Clock Time
Also called schedule time. The time at which a program starts or ends.
Density
The number of events happening within a certain time unit. Visual density can be expressed as a multiple superimposition or key, or successively as a series of quick, montage-like cuts. Audio density may be a chord consisting of many notes, or a rapid series of many notes, or the simultaneous playing of several audio tracks.
Or: the degree of complexity in the vertical (depth) development of an event.
Dry Run
A rehearsal without equipment during which the basic actions of the talent are worked out.
Also called blocking rehearsal.
Fact Sheet
Also called rundown sheet. Lists the items to be shown on camera and the key ideas that should be expressed verbally by the performer.
Serves often as a guide to a show format.
Front-Timing
The process of figuring out clock times by adding given running times to the clock time at which the program starts.
Fully Scripted
Used to describe a show for which the dialogue is completely written out, as well as detailed video and audio instructions.
Horizontal Development
The way the story moves forward from one event to another; similar to plot.
Objective Time
Also called clock time. The time we measure by the clock.
Pace
Perceived duration of the show or show segment. Part of subjective time.
Plot
How the story develops from one event to the next.
Running Time
The duration of a show or show segment. Also called program length.
Schedule Time See Clock Time.
Semiscripted
Used to describe a show for which the dialogue is indicated but not completely written out. The opening and closing of the show are usually fully scripted, with the middle only semiscripted.
Shot Sheet
Lists every shot a particular camera has to get. Is attached to the camera as an aid to the camera operator for remembering a shot sequence.
Show Format
Lists the order of the various show segments according to appearance.
Show Rhythm
Indicates how well the parts of the show relate to each other sequentially, how well the show flows.
Storyboard:
A series of sketches of the key visualization points of an event, accompanied by corresponding audio information.
Subjective Time:
The duration we feel. Also called psychological time.
Theme:
What the story is all about; its essential idea.
Time Cues:
Cues to the talent in regard to the time remaining in the show.
Usually consist of a 3-minute cue, a 2-minute cue, a 1-minute cue, a 30-second cue, and a 15-second cue.
Vertical Development:
The way a situation takes on complexity and depth.
Walk-Through An orientation session with the production crew (technical walk-through) and talent (talent walk-through), by actually walking through the set and explaining the key actions to both parties.
Walk-Through Camera Rehearsal:
A combination of walk-through and camera rehearsal in order to save time. Usually conducted by the director from the studio floor, with all technical production positions manned and operational.
Z-Axis:
The imaginary line that extends in the direction the lens points from the camera to the horizon. Z-axis motion is the movement toward or away from the camera.
===============
As a television director, you are involved in coordinating a great number of production elements and people within a rigid time limit. You will find that in the beginning the coordination of the various production elements-cameras, audio, film, slides, videotape, remote feeds, and the clock-seems to provide the greatest challenge.
Managing this complex production machinery is, indeed, no easy job. During a simple two-camera show, for example, you find yourself (1) talking and listening to studio engineers and production crew: camera operators, microphone boom operator, floor manager, floor-persons; (2) conversing with the people in the control room, telecine, and VTR room: T.D., audio engineer, light board operator, telecine operator, videotape operator, and master control engineers; (3) watching at least six monitors all the time: two camera preview, telecine, VTR, general preview, and line; (4) watching the time: the control-room clock for the schedule times, and the stopwatch for the running times of the individual show segments and inserts; (5) listening to the program audio (usually one of the most difficult tasks for the beginning director); and (6) following the script.
But once you have mastered the control of the machine to some extent, you will notice that your most difficult job is, after all, the translation of a show idea or script into medium requirements, and the dealing with people, those in front of the camera (talent) and those behind it (production crew and engineers). We will, therefore, cover in this section some aspects of controlling the complex production machinery, with special emphasis on the director's language, the major points of interpreting a production plan or script into video and audio images, and the coordination of production people and talent during rehearsals and on-the-air performances. Specifically, we will stress these eight points: (1) terminology, (2) timing, (3) visualization and picturization, (4) script formats, (5) script preparation, (6) rehearsal, (7) on-the-air performance, and (8) postproduction activities.
Terminology:
Like any other human activity where many people work together for a common task, television directing demands a precise and specific language.
This jargon, which must be understood by all members of the team, is generally called the director's terminology. By the time you get to learning television directing, you will probably have mastered most of the production jargon in general and perhaps even the greater part of the director's specific language. But since the latter is such an essential factor for the successful functioning of the production team, you may want to review some of the most common director's signals to its various members (see 15.1 through 15.6). If you use this section as a general review, simply cover up the column that shows the director's signal and try to call out the necessary commands by looking at the picture or the action.
Like any other living language, the director's terminology is subject to habit and change. You may find that in some stations the directors use a term that differs somewhat from yours or one listed here, although the list shown here is fairly standard throughout the industry. Whatever language you use, it must be understood by everyone concerned. It also should be precise and clear.
There is little time during a show to do much explaining; the shorter and less ambiguous the signals are, the better the communication will be. In the tables (15.3 through 15.6), we list the director's terminology in these groups: (1) visualization, (2) picturization, (3) special effects, (4) audio, (5) film chain and VTR cues, and (6) floor directions.
Timing
Correct, split-second timing is essential in all television operations. Every second of a day's telecast is preplanned and logged. All television stations work on similarly tight program schedules. For them time is money, and they hire salespersons to sell time. Your Standard Rate and Data Book will tell you how much your station's time is worth in dollars and cents.
Timing is important to television in another sense as well. It produces the pace of a show. In a well-paced show, the viewer perceives the progression, the speed, to be appropriate with the theme and the mood of the content or the story.
We will first take up the control of the clock time, the physical or objective time as listed in the log.
Then we will briefly discuss the time we feel, psychological or subjective time, and how we relate it to program matter.
Objective Time
When you look at the log, you will see that it lists two types of time: (1) the time when a program, or program segment, such as a commercial, begins and ends, and (2) how long a program, or program segment, runs.
The start-stop time is called clock time or schedule time. The time specifying how long a program runs is called running time or length. Except for the very beginning and end of the broadcast day, the end-time of one program always marks the beginning time for the next. The running time may be as short as 10 seconds for a commercial announcement, or as long as two or three hours for a television special or a film.
------------------------
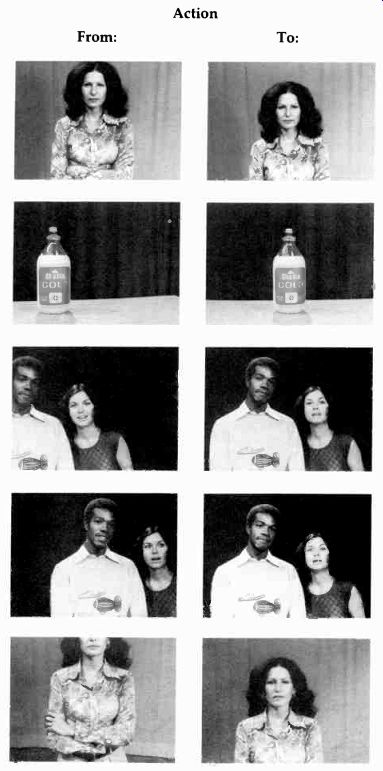
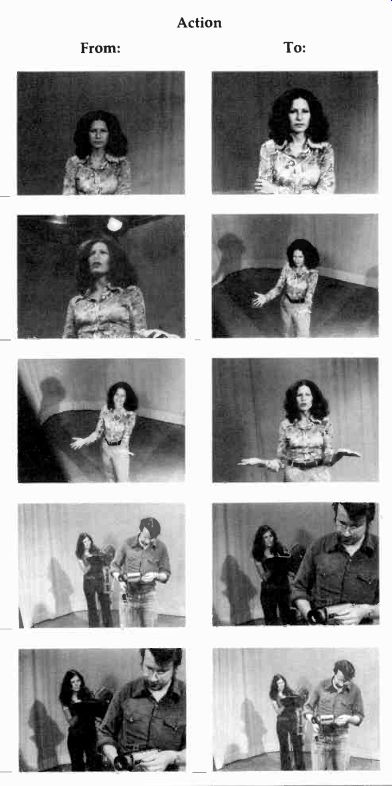
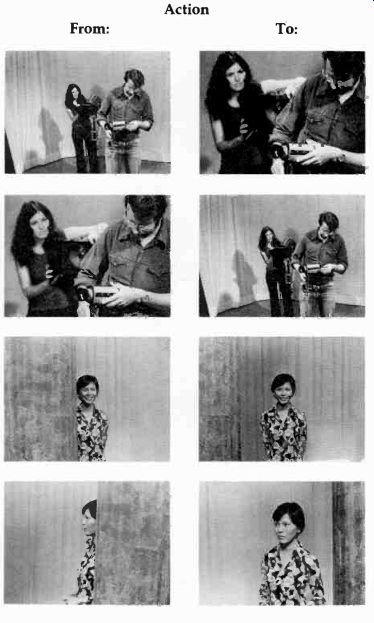

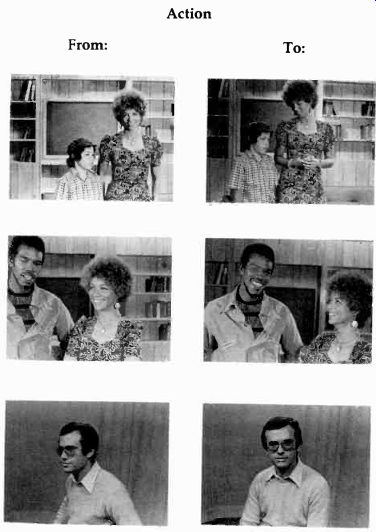
15.1 Visualization Cues.
Action Director's Cue
---------------------

15.2 Picturization Cues.
Action
Cut from camera 1 to camera 2.
Dissolve from camera 3 to camera 1.
Horizontal wipe from camera 1 to camera 3.
Fade in camera 1 from black.
Fade out camera 2 to black.
Short fade to black between cameras 1 and 2.
Cut between camera 1 and film on F-2.
Cut between film and slide.
Cut between slide and slide.
Going to black or taking out super before new slide comes up.
Dissolve between camera 3 and VTR (assuming that VTR is already rolling and locked in).
----
Director's Cue
Ready two-take two.
Ready one for dissolve-dissolve.
Ready three for horizontal wipe (over 1)-wipe.
Ready fade in one fade in one. Or: Ready up on one-up on one.
Ready black go to black.
Ready cross fade to two-cross-fade.
Ready F-Iwo (assuming that the film is coming from film chain 2)-take F-two. (Sometimes you simply call the camera number as it appears on the switcher. If, for example, the telecine camera of film island No. 1 is labeled 6, you will say: Ready six-take six.) Ready slide-take slide. Or: ready slide on F-two-take F-two (assuming that the film is on F-1 and the slide on F-2). Ready to change slide-change slide.
Ready slide out-slide out, change slide, up on slide.
Ready VTR two for dissolve-dissolve.
---------------------------

15.3 Special Effects.
Action:
Super camera 1 over 2.
To return to camera 2.
To go to camera 1 from the super.
Super slide over base picture on camera 1.
Key studio card title on camera 1 over base picture on camera 2.
Fill keyed-out title from studio card on camera 1 with yellow hue over base picture on camera 2.
To have title from character generator appear in drop-shadow outline over base picture on camera 1.
To have background scene from slide (F-1) appear behind newscaster on camera 2.
To have a wipe pattern appear over a picture, such as a scene on camera 2 replace a scene on camera 1 through a circle wipe.
To have the picture become high-contrast and lose detail (attain a solarizing effect) of camera 1 picture.
To have one part of the picture defocus while another part is getting into focus (selective focus).
-------
Director's Cue:
Ready super one over two super.
Ready to lose super-lose super. Or: Ready to take out one-take out one.
Ready to go through to one-through to one.
Ready super slide (over 1)-super. Or: Ready super F-two (assuming that the slide appears on F-2)-super.
Ready key one over two-key.
Ready matte-key one, yellow, over two-matte-key.
Ready C.G. (for character generator) drop shadow over one-key C.G. (Sometimes, the director may use the name of the character generator manufacturer, such as Chiron. Thus, you would say: Ready Chiron over one-key Chiron. Since the character generator information is almost always keyed, the "key" is usually omitted in the ready cue.) Or: Ready effects, drop shadow--take effects.
Ready matte (or chroma, or chroma matte) one over two-matte. Or: Ready F-one effects over two-effects.
Ready circle wipe two over one-wipe.
(Any other wipe is called for in the same way, except that the specific wipe pattern is substituted for the circle wipe.) (If you need a soft wipe, whereby the edges of the wipe pattern are purposely soft and indistinct, simply call for Ready soft-wipe instead of Ready wipe.) Ready debeam one-debeam.
Ready to rack focus on foreground-rack focus. Or: Ready to rack focus on background-rack focus.
---------------------------

15.4 Audio Cues.
Action:
To activate microphone in the studio.
To start music.
To bring music under for announcer.
To take music out.
To close the microphone in the studio (announcer's mike) and to switch over to the sound on film or videotape.
To roll audio tape.
To fade one sound source under and out while simultaneously fading another in (similar to a dissolve). To fade one sound source out and then fade another one in.
To increase the volume of the program speaker for the director.
To play sound effect from cartridge machine.
To start videotape beeper.
To put slate information on videotape (either open floor manager's mike or talkback patched to VTR).
---
Director's Cue:
Ready to cue talent (or something more specific, like "Mary")-cue her. (The audio engineer will automatically open her mike.) Or: Ready to cue Mary-open mike, cue her.
Ready music-music.
Ready to fade music under-music under, cue announcer.
Ready music out-music out. Or: Fade music out.
Ready SOF (or SOT, sound on tape; close mike) track up. Or: Ready SOF (SOT)-SOF (SOT). Ready audio tape-roll audio tape. (Don't just say: Roll tape, since the T.D. may start the VTR.) Ready cross-fade from (source) to (other source)-crossfade.
Ready segue from (source) to (other source)-segue.
Monitor up, please.
Ready sound effect No. X on audio cart. Or: 'Ready cart No.
X-sound effect.
Ready beeper-beeper.
Ready to read slate-read slate.
----------------------------
15.5 Film Chain and VTR Cues.
Action :
To cut from camera 1 to film (SOF) on F-2.
To start black-and-white videotape for recording of a program.
To "slate" the program after the VTR is in the record mode. The slate is on camera 2, the opening scene on camera 1. We are assuming that you are not using the optional 35-sec. alignment signal and reference level audio tone, but that you use the customary 10-sec. beeper countdown.
Putting the opening beeper on the audio track and fading in on camera 1. (Don't forget to start your stopwatch as soon as camera 1 fades in.) To start a color videotape for recording a program.
To put on the color bars and the reference audio tone.
To "slate the program" after the color bars.
To beep the program.
To roll a VTR as a program insert, while you are on camera 2; sound is on tape. Assuming a 6-sec. roll.
To return from film or VTR to camera and live announcer on camera 2. (Don't forget to stop your watch and reset it for the next insert.) To A-B roll, with SOF on F-1 and silent footage on F-2. SOF scene comes up first, then you switch to B-roll with SOF continuing from A-roll, then back to A-roll with SOF. We are now back in the SOF on F-1.
If you shift to VO (voice over) on the B-roll while discontinuing the SOF from the A-roll, you will have to give audio cues; otherwise, the audio engineer simply lets the A-roll SOF continue.
To cut to VTR commercial (SOT) from a tape cassette or cartridge. (Usually, the switchers are labeled CART, regardless of whether the VTR is from a cassette machine or a cartridge.)
----
Director's Cue :
Ready to roll film, F-fuw, SOF-roll film, four-three-two-one, fake F-two, SOF. (Assuming that you still work with a countdown. Otherwise: Ready film, SOF, F-two-take F-two. The T.D. rolls and takes the film at the same time.) Don't forget to start your stopwatch as soon as the film appears in the F-2 monitor.
Ready to roll VTR one-roll VTR one. (Now you have to wait for the "in-record" confirmation by the VTR operator.) Ready Iwo, ready to read slate-take two, read slate.
Ready black. Ready beeper-black, beeper. Ten-nine-eight seven-sir--five four-three-two-one-up on one.
Ready to roll VTR too-roll VTR two. (Again, you have to wait for the "in-record" confirmation by the VTR operator.) Ready bars-take bars. Tone. (Start your stopwatch and record the bars for 60 seconds.) As above in black-and-white recording. But leave slate on for 15 seconds minimum.
As above in black-and-white recording.
Ready to roll VTR three, SOT-roll VTR three, six-five four-three-two-one, take VTR three, SOT. If you don't use a countdown because of instant start, simply say, Ready VTR three, take VTR three.
(Start your stopwatch for timing the VTR insert.) Ten seconds to two, five seconds to Iwo. Ready two, ready cue announcer-cue announcer, take two.
Ready A-B roll on F-one and two. A-roll SOF on F-one.
(This is merely a confirmation. In case the films have been switched, the telecine operator would call over the intercom and inform you, the T.D., and the audio engineer of the switch.)-Roll them, four-three two-one, up on F-one, SOF. (Start your stopwatch and keep track of the time and the word cue for the switchover.) Five seconds to B-roll. Or, more accurately: Five seconds to F-two. Ready F-two-take F-two. Ready F-one on a dissolve-dissolve to F-one.
Ready F-two (or B-roll), ready VO, studio (or 'Bob" or whoever supplies the VO)-fake F-two, cue Bob.
Ready to take cart-fake cart. (Usually the VTR carts have instant start, so no prerolls are necessary. Some directors call them "video carts" to distinguish them from audio carts.)
---------------------------------

15.6 Floor Directions.
Action | Director's Cue
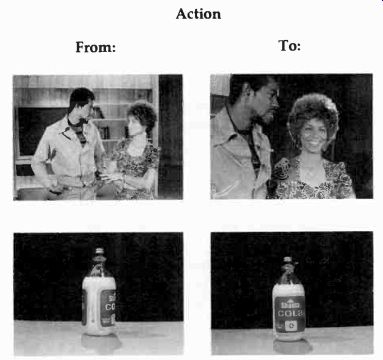
From: To:
Move talent to camera left.
Move talent to camera right.
Have talent turn toward camera, face camera, or turn in.
To floor manager to flip from one studio card to another.
To microphone boom operator to raise boom so that microphone will no longer appear in the camera shot.
To stop the entire action.
Have the woman turn to her left.
Turn the object clockwise (counterclockwise). Ready change card-change card. Or simply: Card.
Boom up, or mike up.
Cut.
-----------------------------------
All clocks in all television stations are synchronized with one another, as far as the minute and second hands are concerned. Only the hour hands show local time. Clock time, therefore, is the single most important element of synchronizing programs within a station and among stations. If, for example, your log shows that the network news program comes in at 6:30:00 P.M., your local programming must end exactly at 6:30:00 P.M. Master control will then switch from your local news program, which may have started at 6:00:00 P.M., to network at 6:30:00 P.M. The network will come in on this time, regardless of whether you are ready for it or not, that is, whether you have ended your local news program a little earlier or whether your local newscaster is still in the process of saying good-bye to the audience.
Obviously, you must control the running lime of your newscast (30:00 min.) so that your program finishes at the exact time the network comes in.
Or you may have several commercial inserts within a feature film. If you take too long with getting in and out of the commercials at the scheduled breaks, you will run long with the last part of the film and miss the start-time of the next program. Or, if you don't control the running time of a commercial, you may cut it short by two or three seconds. Considering that each second of a commercial can cost the sponsor as much as $1,000, this seemingly slight timing error can become quite costly.
In order to control objective time (the clock, or schedule, time, and the running time, or length), you must keep an eye on at least two instruments: the control-room clock and your stopwatch.
The control-room clock will help you meet the schedule times-the end times of programs, which represent the beginning times of other programs. In a computer-controlled operation, these schedule times are fed into the computer. The computer than prerolls films and VTR's so that they come on the air exactly at the specified clock time, or switches from one program source to another at the exact clock time as shown in the log.
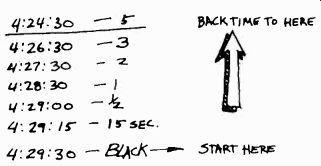
15.7 Back-Timing Cues.
If a schedule change becomes necessary, traffic (or anyone responsible for the change) will feed the new information to the computer, which then will automatically adjust the schedule times of all programs ahead of the change. If you don't end a locally produced program on time, the computer will override you and switch to the network according to the schedule time as logged. So, you had better be ready.
The stopwatch will help you measure the length of show segments, the running time of film or videotape inserts, such as a piece of news film or a VTR commercial. Don't use your stopwatch to time entire shows, unless they are videotaped for later playback. Except for the highly accurate digital ones, stopwatches may be off as much as two seconds in a 30-minute program. Worse yet, if you go by the running time as shown on your stopwatch for timing a local program, you may not be able to meet the next program source at the scheduled time.
In videotaping a show, you can use the stopwatch for the overall timing since the tape timer on the VTR machine, or the time code, will give you a highly accurate timing of the overall show anyway. If you have VTR inserts within the show you are videotaping, you will need to use two stopwatches: one for measuring the overall time of the show, the other for the running times of the inserts.
Don't forget to start your stopwatch at the beginning of each program insert and to stop it and reset it at the end. Inexperienced directors are apt to have difficulty in remembering to start their watches at the beginning of a film or VTR insert.
In order to meet the times as scheduled in the log, you are greatly aided by (1) back-timing and (2) front-timing.
Back-Timing
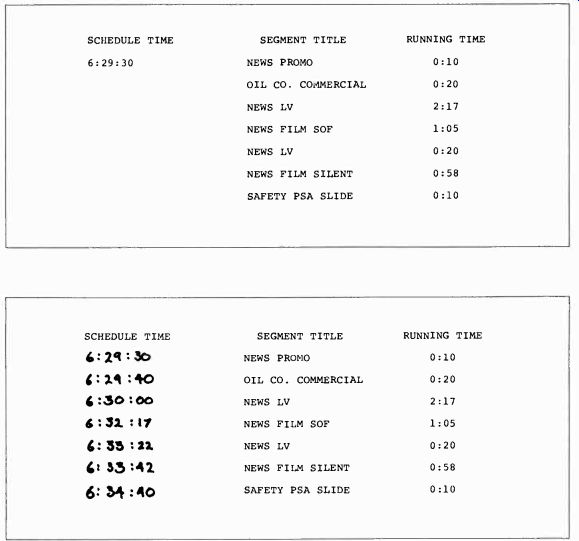
One of the most common time controls involves cues to the talent, so that he or she can end the program, such as a newscast, on the scheduled time. In a 30-minute program, the talent normally expects a 5-minute cue, and subsequent cues with three minutes, two minutes, one minute, thirty seconds, and fifteen seconds remaining in the show. In order to figure out such time cues quickly, you simply back-time from the scheduled end-time, or (which is the same thing) the start-time of the new program segment. For example, if your log shows that your live "What's Your Opinion?" panel discussion show is followed by a Salvation Army PSA (Public Service Announcement) at 4:29:30, at what clock times do you have to give the talent the standard time cues? You simply start with the end-time, 4:29:30, and subtract the various time segments. For example, your 15-second cue should come at 4:29:30-0: 00:15 = 4:29:15. Figure 15.7 shows you the cues as determined through back-timing.
If you tape a show and time the VTR with your stopwatch, you simply back-time from the running time as shown on your stopwatch. Let's assume that your show has a running time of 28:30 minutes. Your time cues would have to come at the following stopwatch times:
23:30-5-min. cue 25:30-3-min. cue 26:30-2-min. cue 27:30-1-min. cue 28:00-30-sec. cue 28:15-15-sec. cue 28:30-BLACK
Digital stopwatches can be made to run forward or in reverse. When you are videotaping a program, you will probably want the watch to run backwards, showing you at any point in the show the remaining running time. Since the watch in the reverse shows the time left till the end of the program anyway, no back-timing is necessary.
Although your log usually shows both schedule times and running times, your script or program format may, for example, give you only start and end-clock times for each program segment. In order to figure running times from clock times, you must, once again, back-time. As an example, we will take a feature film that is interrupted by commercials and PSA's. Since the end cues for the films are determined by running time (stopwatch times) only (in that end cue marks are no longer used), you must figure out the running time for each program segment from the clock times as indicated on your program format (15.9). What is the running time for each segment? Again, you start at the last clock time given and work backward. How long is the last feature film segment as shown on the format?
5:23:51-5:11:33 = 12:18 min.
Try now to figure out all the remaining running times, before checking your results (see 15.10).
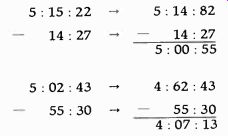
15.8 In subtracting time, you may find it convenient to take one minute from
the minute column and convert it into seconds, especially when you have to
subtract a high number of seconds from a small number. The same way, you can
take an hour from the hour column and convert it into minutes.
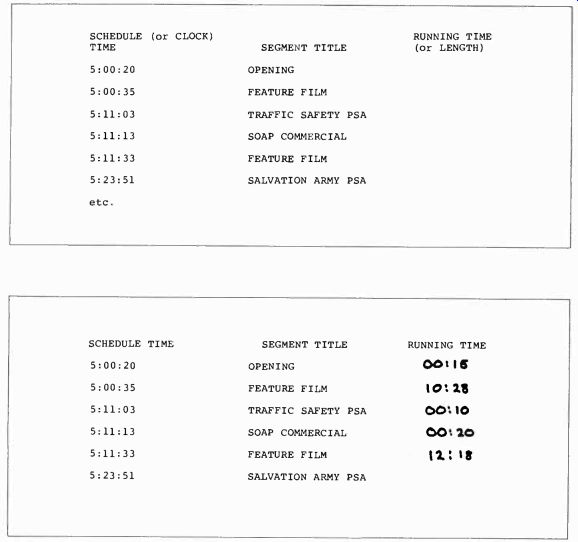
15.9 Timing: Example.

15.10 Timing: Example with running times.
Front-Timing
If you are given the running times for each program segment and only the schedule times for the opening and closing of the total program (such as the entire film feature), you will need to figure out the remaining clock times. The running times alone are not enough.
You need to know the actual clock times for each break so that you can tell whether your show segment is exactly on schedule. Since the running times of each show segment are timed with the stopwatch and not with the clock, your running somewhat late or early at various breaks will not show up until the very end of the program, when it is too late to do anything about it. With the clock times available at each break, you can then dry-run the feature film (rolling the film but not putting it on the air right away) for two or three seconds during a break to make up for lost time, or put up an I.D. slide in order to stretch the break a little, if you run somewhat short.
In order to figure out the additional clock times for each break, simply add the running times to the initial clock time as shown in the log or the program format. Try to figure out the additional clock times for the program rundown (see 15.11). At what clock time, for example, does the PSA come up? Look at 15.12 to see how your schedule (clock) times should appear on your log, or program rundown sheet. If you figured correctly, you will have to hit the PSA slide at exactly 6:34:40.
15.11 Log Segment: Example.

15.12 Log Segment: Example with schedule times.
Subjective Time
The control of subjective, or psychological, time, the time we feel, is much more subtle and difficult than the control of objective time. Unfortunately, there is no mechanical timing device that will tell you whether an actor races through his lines too fast, or whether a whole scene is paced too slowly, and therefore drags for the viewer. In determining subjective time, you must rely on your subjective judgment and on your sensitivity to the relation of one movement to another or one rhythm to another. Although two persons move with the same speed, one may seem to move much more slowly than the other. What makes the movements of the one person appear faster or slower? (See 15.15.) Watch how rush-hour traffic reflects nervous energy and impatience while actually the vehicles move considerably more slowly than when traveling on an open freeway. Good comedians and musicians are said to have a "good sense of timing." This means that they have excellent control of their subjective time.
When dealing with subjective time, we have many ways of expressing its relative duration.
You hear of speed, tempo, pace, hurrying, dragging, and other similar expressions. In order to simplify the subjective time control, you may want to use only two basic concepts: pace and rhythm. The pace of a show or a show segment is how fast or how slow the segment or the entire show feels. Show rhythm has to do with the pacing of each show segment in relation to the next, and to the whole show.
-------------------
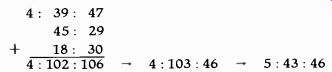
15.13 In front-timing, as in back-timing, remember to compute time on a sixty
scale rather than a hundred scale.
6:33: 42 + 0 : 58 6:33:100 6:34:40
Simply compute the seconds, minutes, and hours individually, and then convert them to the sixty scale.
4: 39: 47 45 : 29 + 18 : 30 4:102:106 4:103:46 5:43:46
-------------------

15.14 Try to pick three or four recordings of the same piece of music, such
as Beethoven's Fifth Symphony, as interpreted by different conductors. Most
likely, you will find that some play the same piece of music much faster than
others, depending on their overall concept of the piece and, of course, their
personal temperament and style. Which tempo, or pacing, do you like best?
Why?
--------------------

15.15 As a director, you are concerned primarily with a four-part division
of a program: (1) the overall show, which is constructed of several segments,
(2)
the show segment, which consists of two or more scenes, (3) the scene, which consists of a series of shots, and (4) the shot, which is the smallest workable program unit.
In controlling subjective time, you will have to consider show pace and rhythm, segment pace and rhythm, and scene pace and rhythm. The shot, as the smallest program unit, has a duration but not a pace.
[Herbert Zettl, Sight-Sound-Motion (Belmont, Calif.: Wadsworth Publishing Co., 1973), pp. 275-276.]
-------------------------
There are many ways of increasing or decreasing the pace of a scene, a segment, or an overall show. One is to speed up the action or the delivery of the dialogue, very much like picking up the tempo of a musical number. Another is to increase the intensity, the relative excitement, of a scene.
Usually, this is done by introducing or sharpening some conflict, such as raising the voices of people arguing, having one car almost go out of control while being pursued by another, or having the lead mountain climber slip at an especially tricky point. A third possibility is to increase the density of the event, by simply having more things happening within a specific section of running time.
For slowing down a scene, you do just the opposite. Whatever you change, you must always perceive your pacing in relation to the other parts of the show and to the whole show itself. Fast, after all, is fast only if we are able to relate the movement to something slower.
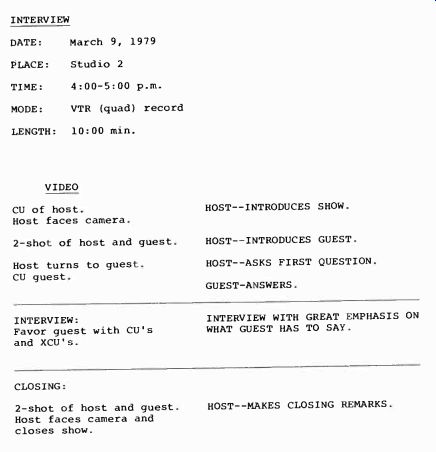
15.16 Two-Person Interview: Sample script.
Visualization and Picturization
As a director, you should be able to convert a scene mentally into television images-video and audio images that appear on the screen and from the loudspeaker. Directing starts with visualizing the key images and deciding on where the people and things should be placed relative to the camera, and the camera relative to the event (people and things). Then, you must consider the sequence of the events, the picturization. By this process you will determine how and where the people will have to move, and how many cameras you will need in order to achieve the event sequence with all the necessary transitions.
As indicated in the previous section, the director, as well as the producer, should start with the process message, the experience the percipient is supposed to undergo during or after the program, and work backward to what the medium needs in order to precipitate such an experience (see Section 14).
----------------
15.17 One Approach to Interview Scene with One Camera.
Video-Staging-Visualization and Picturization--Audio
Opening CU of host.
Host faces camera.
Zoom back to 2-shot.
Host turns to guest.
Zoom in to CU of guest.
During interview stay on guest.
Vary between MS and XCU.
Closing Zoom back to 2-shot.
Host faces camera.
-Introduces show.
Introduces guest.
Asks first question.
Closes show.
-------------------
What and how much equipment do you need? How should it function? These questions can be answered quickly and accurately only after a great deal of experience. In general, try to get by with as little equipment as possible. If you can do a show with two cameras, don't request three.
Otherwise, you might feel obliged to use the third camera, not because you need it but because it is there. Such redundancy is not only costly but often an obstacle to the picturization process of the beginning director. You might, for example, be enticed to cut frequently among the three cameras instead of staying on the one camera that delivers the most expressive picture.
Here is an example. Assuming that you have to videotape a two-person interview (host and guest), with the process message objective stating that the percipient should gain a deeper insight into the thinking and feeling and general behavior of the guest. The script only indicates the opening and the closing by the host, and leaves the visualization and picturization basically up to you, the director (see 15.16). What would you do? How do you preconceive this interview? How do you see it and hear it? The process message and the admittedly vague script suggest that the key visualization should be a closeup of the guest's face.
The viewer should not only see the guest but be able, at least to some extent, to look into his personality.
With all due respect to the host, he simply is not important in this interview. Therefore, you don't need to show him at all, except for the opening and closing of the show.
In figuring out the medium requirements, we can decide on two obvious production items right away. Since the participants don't move about, we can use lavaliere mikes for the audio pickup.
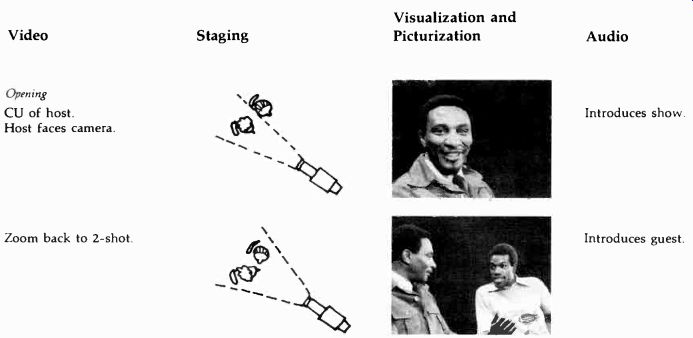
The lighting should be normal; that is, we should have enough light on the guest's face so that his features are clearly visible and the colors as undistorted as possible. How about cameras? Three or two? You really don't need three, and if you picturize the show within the context of the process message, you may not even need two. Your justification for one camera is that you will stay on the guest's face throughout the interview, sometimes viewing it at very close range, and sometimes from a little farther back. Figure 15.17 shows a possible visualization and picturization approach to this interview with only one camera.
As you can see in this exercise, the director first reveals the basic relationship of host and guest.
They are obviously sitting next to each other.
Then the director concentrates on the guest, the object of the process message.
The way the interview is staged (set up for the camera), the camera does not have to move at all.
The host will turn into the camera for the opening and closing, but he will face the guest for the rest of the interview. The camera zooms in on the guest and stays there.
If you want the host to play a more active role visually, you can maintain the same setup but have the camera zoom back to a two-shot from time to time, or even arc right, in order to get more of a full-face shot of the host than is possible from the original camera position.
In this exercise it is assumed that the titles are supplied by telecine and not by a studio camera.
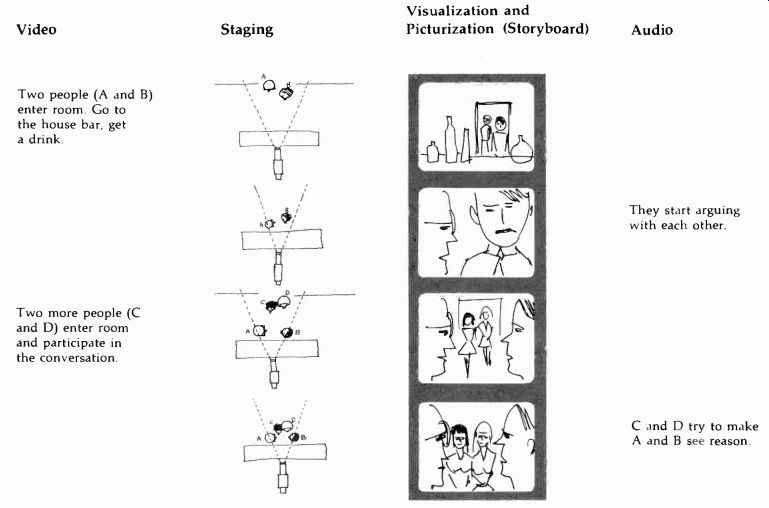
Three of the most important aids for the visualization and picturization processes are (1) the storyboard, (2) the floor plan, and (3) the script.
The storyboard shows the key visualization points, the major shots of an event, and gives some idea as to the Major picturization (see 15.18 and 15.19).
---------------
15.18 Through thoughtful staging for the single camera, even a rather complex
scene can be handled well. As you can see in this illustration, the people
move and converse along the z-axis, the illusionary axis that extends from
the camera to the horizon.* If you have placed the entrance camera-left and
the bar camera-right, you cannot, of course, cover the whole action with only
one camera. In planning your shots, stage your action for the camera, and
not for an audience as you would in the theater.
Video-Staging-Visualization and Picturization (Storyboard)--Audio
Two people (A and B) enter room. Go to the house bar, get a drink.
Two more people (C and D) enter room and participate in the conversation.
They start arguing with each other.
C and D try to make A and B see reason.
--------------
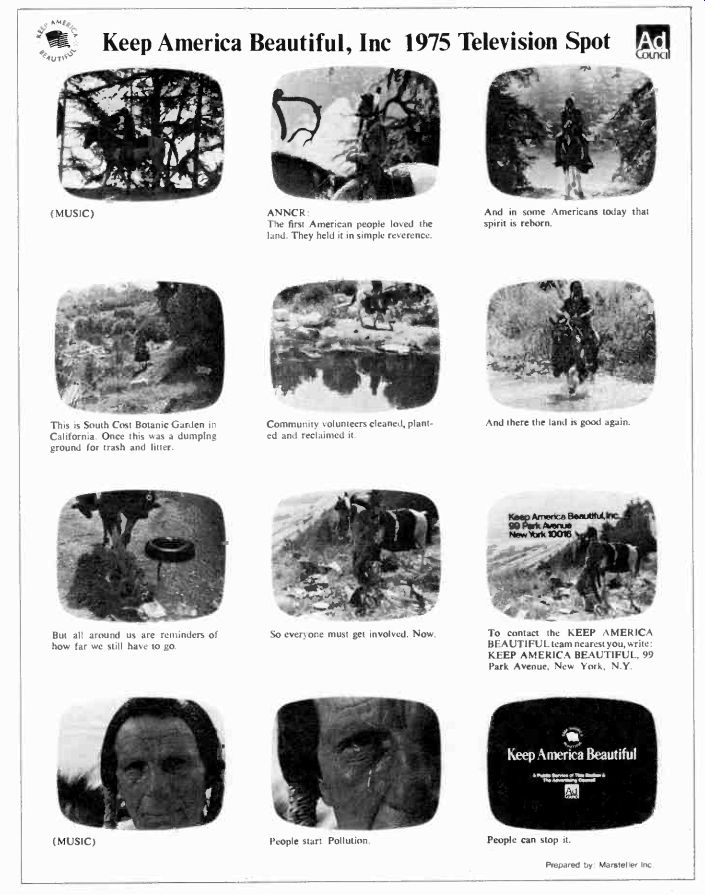
15.19 Storyboard: Keep America Beautiful, Inc., The Advertising Council,
Inc., and Marsteller Inc.
The floor plan shows you the physical environment of the whole setting, the major positions of the performers or actors, and where they can move, if any movement is required.
You should learn to interpret a floor plan into camera shots, into key visualizations from the point of view of the camera.
The floor plan will give you an essential clue as to where your cameras should be in order to achieve certain key images. By thinking the camera positions through carefully relative to the setting as shown on the floor plan, you can often anticipate, and therefore correct, production problems. (See 15.20.) A good script will give you some of the most accurate cues for visualization, picturization, audio elements, and other production factors (15.25). This is one of the reasons why a non-dramatic script is usually divided into a video column, concerned with what the viewer should see, and an audio column, concerned with what the viewer should hear. As a director, you must translate these video and audio instructions into production equipment and its operation. Since the video instructions are generally more indicative of the overall production requirements, many directors begin their analysis of medium requirements by reading that column in a script. Looking at the partial video column in 15.21, what facilities would you need, assuming that the whole show is to be videotaped without postproduction editing?
------------

15.20 Let us go through some visualization and picturization activities and
see how we can spot potential problems, if any, simply by studying the floor
plan carefully. Above are the floor plan, as given to you by the new art director,
and the basic props and equipment list for the show (a). From your script,
you learn that this set is designed for a simple 7-minute interview. Take
a look at the floor plan and try to visualize some of your key shots, such
as a CU of the guest, an opening two-shot, with the host introducing the guest,
an occasional reaction shot of the host.
The way the chairs are placed, a two-shot would be difficult to achieve (a, b, c). If the camera shoots from straight on, the chairs are much too far apart. At best, the two people would seem glued to the edges of the screen, putting undue emphasis on the painting in the middle. Also, you would overshoot the set on both ends. (b) If you shoot from the extreme left, you will get an over-the-shoulder shot from the host to the guest.
Assuming that you pull your camera way back in order to get a narrow-angle zoom lens position (reducing the space between the two people), you will again overshoot the set and not see the host straight on. (c) If you cross-shoot with the other camera, you can get a reverse-angle shot of the host, but again you will overshoot. Also, you will have the rubber plant growing out of the host's head. (d) What other problems do we have with the setup as indicated on the floor plan? Let's go down the prop list. Two plain, off-white hardwall panels are hardly the most interesting background for this color telecast (see make of cameras). The surface will be too plain, and its off-white color will be too bright for the foreground scene, rendering the skin tones of the two persons unusually dark. If a performer happens to be Black, the contrast problem with the white background is even more extreme. And you can't correct the problem by selective lighting. See how close the chairs are to the background flats? Any key light and fill light will inevitably strike the background too. Also there is not enough room between the chairs and the flats for adequate backlighting, unless you want to tolerate a top light shining straight down on the people. The acoustics may also prove to be less than desirable, since the microphones are very close to the hardwall flats.
The large upholstered chairs are definitely not the right chairs for an interview. They look too pompous and would engulf their occupants in upholstery. Moreover, the chairs cannot be placed close enough to each other for adequate camera shots.
The rubber plant will be in the way, from whatever angle you might shoot; at least it will not make much sense if part of it is seen behind the host only.
Since most of the shooting must be done from extreme angles (assuming that you have to go ahead with this setup), the painting is utterly useless. If you want to break up some of the plain background with a picture, it must hang in such a way that you will have it in the actual shot of one of the cameras (which means that it would have to hang in a spot where there are presently no flats to support it). You may even wonder about the compatibility of Monet's subtle impressionistic colors when viewed in black-and-white television. As pleasant as this painting may look in color, in black-and-white the viewer may see nothing but a few indistinct gray blobs.
Lastly, because the chairs are not on a platform, the cameras will have to look down on the performers, unless the camera operators pedestal all the way down and work the whole interview from a very awkward position.
Now, let's suggest to the new art director some possible solutions to these problems: (1) Enlarge the background. Use flats of a different color and texture (such as medium-dark wood panel pattern). Perhaps break up the background with a few narrow flats or large pylons. (2) If you hang pictures on the flats to break up plain surfaces, hang them in places where they will be seen in the most frequent camera shots. (3) Put the whole set on a platform. (4) Use smaller and simpler chairs and place them closer together. (5) Get rid of the rubber plant. Although rubber plants in a set look great to the naked eye, they become a compositional obstacle when the camera is on. And (6) move the chairs out, away from the background flats. Figure e shows how the suggested corrections might be integrated in a new floor plan.
What other ways could you suggest to solve these problems? As you can see, even a cursory study of the floor plan can tell you a great deal about potential production methods. The more complicated the show becomes, the more time and effort you should give to the basic preproduction analysis of the floor plan.
------------------
VIDEO
Fade in LS of rock group.
Key slide Key slide Key slide Cut to MC ducing 1 (name group). 2 (members). 3 (produced and directed by). (Master of Ceremonies) intro-group.
Cut to group MS, playing first number.
Cut to CU's of solos.
Chroma-key psychedelic figures from VTR insert.
Dissolve to MC at end of number.

15.21 Partial Video Column.
----------------
15.22 Fully Scripted Newscast (Excerpts). Courtesy of KNXT, Los Angeles.
The "cut to" instructions from rock group to CU's, and the cutting to the MC, suggest a minimum of two cameras. The keying of slides means a film chain. The chroma key VTR insert means that you need a second VTR in addition to the master VTR on which you are recording the whole program. It also presupposes that the rock group plays in front of a chroma key background, and that you do have chroma key special effects available.
The number of players in the group and the list of what instruments they play will give you, or at least the audio engineer, a clue to what and how many microphones are needed.
Before we go into a very brief discussion on how the director should prepare a script for production, you should acquaint yourself with the major script formats.
Script Formats
There are four basic types of script formats: (1) the fully scripted show, (2) the semiscripted show, (3) the show format, and (4) the fact or rundown sheet.
The Fully Scripted Show
A complete script includes every word that is to be spoken during a show, as well as detailed audio and video instructions. Dramatic shows, comedy skits, news shows, and most major commercials are fully scripted. There are advantages and disadvantages in directing this sort of show. The advantages are that you can visualize and picturize the complete show before going into rehearsal.
You have definite cue lines, and you know where the camera goes at what time and what shot it gets. The disadvantages are that you are tied down to following the script very carefully, and this is an additional burden to the many things you already have to do during a performance.
Also, if the actor or performer forgets to give you the exact text, your shooting procedure may be seriously affected.
Newscasts are usually fully scripted. Figure 15.22 shows an excerpt from a typical one. The large typeface is quite popular-the talent and the director can read the large type more easily than the normal pica typeface.
Some news scripts use white paper for all straight on-camera news copy, and yellow (or any other agreed-upon color) paper for all film and tape insert copy. This way the newscasters and you, the director, will know by the color of the paper whether straight copy or a film or VTR is coming up. This type of color coding is especially helpful when you have to pull some copy in order to keep the show on time.
Documentaries or documentary-type shows, too, are frequently fully scripted. The major camera shots and the major actions of the performers are listed in the video column, and every spoken word and sound effect is listed in the audio column. Figure 15.23 shows an example of a fully scripted documentary-type show.
As you can see in this script sample, the video and audio instructions are separated. This script format is widely used for non-dramatic shows.
The video column is generally on the left side of the page, and the audio column on the right. Note that in the audio column all instructions for audio control are usually written in upper case letters, while the spoken lines are upper and lower case.
Dramatic shows have a script format all their own (see 15.24). The exact camera shots are generally left to the director. But the actor's internal and external actions are generally spelled out, as are the dialogue (upper and lower case) and additional audio material (upper case only).
The Semiscripted Show--A show is semiscripted when the dialogue is indicated but not completely written out. In general, the opening and closing remarks are fully scripted, while the bulk of the dialogue or commentary is only alluded to, such as:
DR. HYDE TALKS ABOUT NEW EDUCATIONAL IDEAS; DR. WOLFRAM REPLIES.
This type of script is almost always used for interviews, for programs of an educational nature, for variety programs, and for other types in which a great amount of ad-lib commentary or discussion occurs.
The important part in semiscripting a show is to indicate specific cue lines that tell the director when to roll a film or when to break the cameras to another set area. (See 15.25.) The Show Format The show format lists only the order of particular show segments, such as "interview from Washington," "commercial No. 1," "book review," and so forth. It also lists the major set areas in which the action takes place, or other points of origination, and major clock and running times for the segments. (See 15.26a, b.) A show format is frequently used in shows that have established performance routines, such as a daily morning show, or a variety show. Most panel discussion shows, or daily interview shows with one established host and several guests, are directed from a show format.
The Fact, or Rundown, Sheet
A fact or rundown sheet lists the items that are to be shown on camera and indicates roughly what should be said. No special video and audio instructions are given. The fact sheet is usually supplied by the advertising agency that likes to have a particular performer ad-lib its commercials (see 15.27). Generally the director rewrites the fact sheet into a show format so that he and the talent know what they are supposed to do. Directing solely from a fact sheet is not recommended. Ad-libbing by both director and talent rarely works out satisfactorily. Their efforts will necessarily remain uncoordinated.
-------------
Up on full color slide
Wipe to:
FILM (showing animated cardio-vascular system of body)
Glenda on Cam Zoom out and Super "Strokes...7,000" Also super: "GENERAL POPULATION-1 in 1,000" "BLACK POPULATION-2 TO 3 IN 1,000" (THIRD SEGMENT) IN CUE: "HIGH BLOOD PRESSURE IS MAINLY A DISEASE OF THE CARDIO-VASCULAR SYSTEM OF THE BODY...;" OUT CUE: ...MILDER ONES ARE HEADACHES, ESPECIALLY AT THE BACK OF THE NECK... DIZZINESS...AND DROWSINESS."
Of course, having these symptoms doesn't necessarily mean you have high blood pressure.
But, if you haven't seen a doctor in a long time, you might check.
By the time you get mild symptoms, the disease may be fairly well advanced.
And, further down the road there are more severe complications, such as stroke, from which over seven-thousand people died in Los Angeles County in 1970. The rate of death for black people from strokes is up to three times as high as that of the general population, which adds another kind of meaning to that old phrase: "different strokes for different folks."
FILM IN CUE: "OTHER COMPLICATIONS ARE THE INCREASED PROBABILITY OF ATHEROSCLEROSIS..." OUT CUE: "...THROUGH THE NARROWED BLOOD VESSELS TO THE HEART AND/OR LUNGS."
15.23 Documentary.
Courtesy KNXT, Los Angeles. (Excerpt from "Hypertension: The Silent Killer.")
--------------------
MARY-ALICE SHOWS UP, FINALLY. WE SEE HER FROM LYNDA'S PERSPECTIVE MAKING HER WAY THROUGH THE CROWDED COCKTAIL ROOM OF THE CHARLIE BROWN BAR. SHE FINALLY REACHES LYNDA'S TABLE AND DROPS INTO THE EMPTY CHAIR LIKE SOMEONE WHO HAS MANAGED TO GRAB THE ONLY REMAINING SEAT ON THE SUBWAY DURING RUSH HOUR. MARY-ALICE:
Sorry, I'm late. But I couldn't get off work any sooner.
LYNDA:
Work? I thought the teachers' strike is still on. (BREAKS OUT IN A SHORT LAUGH, FULL-BODIED AND COMING FROM THE BELLY, AS ONE WOULD EXPECT FROM A PROFESSIONAL SINGER.) By God, what are you all dressed up for? Sit down, relax.
MARY-ALICE:
Yes, it is still on. But I have another--well, how are you? LYNDA:
Another job? What job? What would you like to drink? Still on daiquiris? (TRIES TO GET THE ATTENTION OF THE COCKTAIL WAITRESS WHO IS BUSY WITH THE ADJOINING TABLE. BOTH LYNDA AND MARY-ALICE WATCH THE GIRL IN ANTICIPATION. LYNDA FINALLY SUCCEEDS IN GETTING THE WAITRESS'S ATTENTION.) Miss!
Yes. Can I help you?
LYNDA: WAITRESS:
MARY-ALICE: (NOT WAITING FOR LYNDA TO ORDER THE DRINK FOR HER) Bring me a good daiquiri.
(THE WAITRESS TURNS TO LYNDA.) LYNDA: And another Dubonnet on the rocks for me.
(THE WAITRESS LEAVES. LYNDA TURNS TO ALICE.) Well, now tell me about the new job.
MARY-ALICE: Well, the teachers' strike is not all that good. We don't get any money from the union. This is OK for the teachers whose husbands have good jobs. But for the ones who live alone...
LYNDA: Isn't Robert helping out?
MARY-ALICE: Bob? No. On the contrary. He is still expecting gourmet food, exclusive French wines, you know.
LYNDA: You call him "Bob" now? He didn't like that.
MARY-ALICE: I don't know how to tell him that I don't have any money and that we have to change our life style. At least as long as the strike is on. Well, a change would be good anyhow. I don't know.
LYNDA: Do you still love him?
15.24 Drama.
---------------------
VIDEO AUDIO
GLENDA:
Two-shot of But more important are the reasons that involve Glenda and health. Medical science has linked Mario obesity to a number of harmful diseases, including diabetes, strokes, heart attacks, hardening of the arteries, cancer of the uterus, and high blood pressure.
MARIO: Because of this high rate of health hazards the insurance companies put a different kind of pressure on fat people: high insurance rates. Isn't that true, Dr. Ryan?
DR. RYAN: Cut to CU (SAYS THAT THIS IS QUITE TRUE AND THAT IN-of Dr. Ryan SURANCE COMPANIES DO NOT GENERALLY INSURE MARKEDLY OVERWEIGHT PEOPLE AT NORMAL INSURANCE RATES.)
MARIO: Cut to CU And what about employers? How do they feel of Mario about fat people? Here are four people who can tell us about their experiences.
LYNN: Cut to CU (SAYS THAT SHE FOUND MANY MEDIUM SIZED OR of Lynn SMALL COMPANIES HAVE A WEIGHT LIMIT FOR EMPLOYEES AND CAN THEREFORE NOT HIRE HER.) JUDY: Cut to CU (AGREES WITH LYNN AND SAYS THAT THERE IS of Judy NO QUESTION THAT THERE IS A GREAT AMOUNT OF DISCRIMINATION IN JOBS FOR FAT PEOPLE. ELABORATES.) Etc.

15.25 Semiscripted Show. Courtesy of KNXT, Los Angeles.
(Adapted from "It's a Matter of Fat," a KNXT community special.)
-------------------
VIDEO AUDIO
OPENING FILM
:30 SUPER SLIDE: "CDA: WHAT'S IT ALL ABOUT?" DISSOLVE TO FULL SCREEN COLOR SLIDE: "CDA: WHAT'S IT ALL ABOUT" WITH MAP B.G.
Studio-Betty Ann Bruno:
FOR THE NEXT 21 HOURS WE WILL EXAMINE COMMUNITY DEVELOPMENT IN OAKLAND. WE HAVE KEY CITY, COUNTY AND FEDERAL OFFICIALS HERE IN OUR STUDIO AS WELL AS MANY LEADERS FROM THE COMMUNITY TO DISCUSS THIS VITAL ISSUE. YOU CAN PARTICIPATE, TOO, ON OUR OPEN TELEPHONE DURING THE BROADCAST. SILENT FILM-THEME MUSIC STUDIO-LIVE INTERVIEW #1-8:00 INTERVIEW #1-2ELLICK & PRICE AREA #2 INTRO OF GUEST DISCUSSION
---
VIDEO AUDIO
SUPER SLIDE: "JIM PRICE" HUD (PRICE MAY BRING IN SOME SLIDES TO BE USED IN THIS SECTION) STUDIO-LIVE INTERVIEW #2-8:00 INTERVIEW #2-BRUNO & READING AREA #1 INTRO OF GUEST DISCUSSION SUPER SLIDE: "JOHN READING" MAYOR OF OAKLAND INTERVIEW #3-8:00 INTERVIEW #3-2ELLICK & WILLIAMS AREA #2 SUPER SLIDE: "JOHN WILLIAMS" GRAPHICS: MAP, CHARTS 2 EASELS BREAK 1:10 INTRO OF GUEST DISCUSSION
15.26 Show Format.
(a) Courtesy of KTVU, Oakland-San Francisco.
------------------------
15.26 Show Format (cont.) (b) Courtesy of KNXT, Los Angeles.
-------------------
JENNER ALBUM COMMERCIAL DATE: TIME: PROPS: Jenner Album
Jenner Poster with Band Background
Jenner Album Display
NOTE: Play Cut 1, Side 2, of Jenner Album as background during commercial.
1. New Choban recording of songs by Jenner.
2. Best yet. Great variety.
3. New arrangements. Excellent band backing her up.
4. Songs that touch everybody. Sung with passion.
5. Excellent recording. Technically perfect, true Choban quality. Wide frequency range does full justice to her voice. Available in stereo or four-channel.
6. Special introductory offer. Expires Oct. 20. Hurry. Ask for the new Choban recording of Jenner.
At Tower Records.
15.27 Fact Sheet.
--------------
--------------

15.28 Analyzing a dramatic script is, of course, quite a bit
more complicated than translating the video and audio instructions of a
nondramatic script into the director's production requirements. A good dramatic
script operates on many conscious and unconscious levels, all of which need
to be interpreted and made explicit. Above all, you should be able to define
the theme of the play (the basic idea; what the story is all about), the plot
(how the story moves forward and develops), the characters (how one person
differs from the others), and the environment (where the action takes place).
In general, television drama emphasizes theme and character rather than
plot, inner rather than outer environment.
-----------
Script Preparation
To explain all the intricacies of analyzing and interpreting nondramatic and dramatic scripts would go far beyond the scope of this handbook.
We have already pointed out the importance of translating a script into medium requirements, through proper visualization and picturization processes.
Script Analysis
Let us emphasize some of the major points once more: (1) Read the video and audio columns to get an overall idea of what the show is all about and how complex the production will be. (2) Try to "lock in" on a key shot, key action, or some key technical maneuver. For example, you may lock in on the part in a script where lead guitar player has a particularly beautiful solo. How do you see him? How do you want this passage to appear on the screen? Then you can work backward from the selected shot to the actions that precede it and forward to the ones that follow it.
In a dramatic script, this locking in may occur at the very opening scene, at the closing scene, or at any particularly striking scene somewhere in the middle. And (3) in the context of the process message objective, translate the script into specific video and audio images, and, of course, the necessary production equipment and procedures.
After analyzing the script, you should mark it accordingly for on-the-air presentation.
Script Marking
Since the many monitors in the control room command your close attention, you should free yourself from the script as much as possible. One way is to mark the major cues on it in your own way. Although there are standard marking symbols, you will probably develop some special ones that work best for you. Whatever symbols you may use, keep these points in mind: (1) Your marking symbols should be clear and unambiguous. (2) Once you have arrived at a workable system, stick to it. Standardize your symbols as much as possible. (3) Don't overmark your script.
Too many confusing symbols are worse than none at all. (4) Place your cue markings before the desired action. And (5) if the shots or camera actions are clearly written in the video column, or the audio cues in the audio column, simply underline or circle the printed information. This will keep the script looking clean. But if the printed instructions are hard to read, don't hesitate to repeat them with your own symbols (15.31). Before you mark a script, you should have the process message, the key visualization points, and the major picturization processes in your head. In most cases this means that you will need a floor plan prior to your script marking, unless the show occurs in a standard set, such as for the daily newscast. If the show requires rehearsals, do your preliminary script marking in pencil so that you will be able to make quick changes without creating a messy or illegible script. Once you are ready for the dress rehearsal, however, you should have marked the script in bold letters so that you can read your markings even in the relatively dim light of the control room. Have the A.D. and the floor manager copy your markings for their own scripts.
Figures 15.29 to 15.32 are examples of marking a variety of script formats.
Rehearsal Ideally, you should be able to rehearse everything that goes on videotape or on the air. Unfortunately, in practice this is hardly the case. Since the scheduled rehearsal times always seem insufficient, the pre-rehearsal preparations, just discussed, become extremely important. To make optimal use of the available time during the scheduled rehearsals, there are several methods that may help: (1) script reading, (2) dry run, or blocking rehearsal, (3) walk-through, (4) camera rehearsal, and (5) walk-through camera rehearsal combination.
Script Reading--Under ideal conditions each major production would begin with a script-reading session. Even for a relatively simple show, you should meet at least once with the talent, the producer, and the key production personnel (associate director, T.D., floor manager) to discuss and read the script.
Bring your floor plan along. In this session, which normally doubles as a production meeting, explain these points: (1) process message objective, including the purpose of the show and its intended audience; (2) major actions of the performers, the number and use of special hand props, major crossovers; (3) the performer's relationship to guests. In an interview, for example, clue in the host to the key questions, what you know about the guest, and the general tone expected. Usually such talent preparation is done by the producer. Try to get a rough timing on the show, by clocking the major scenes and show segments as they are read.

15.29 Marking Fully Scripted Newscast. Courtesy of KNXT, Los Angeles.

15.30 Marking Semi-scripted Show. Courtesy of KNXT, Los Angeles.

15.31 Marking Semi-scripted Show: Sometimes, when no specific video and audio
instructions are given, you must write them in. Courtesy KTVU, Oakland-San
Francisco.

15.32 Marking Dramatic Scripts: Dramatic scripts generally have no audio
or video instructions written in.
This way the writer does not dictate the director's specific visualization and picturization processes. You should, therefore, write the key video instructions into the script yourself. Sometimes it is quite helpful to use small thumbnail sketches to indicate key visualization or blocking maneuvers.
---------------

15.33 The script-reading sessions are, of course, particularly important
if you are rehearsing a television drama. Indeed, the more thorough the script
reading is, the easier the subsequent rehearsals will be. In such sessions,
you should discuss at length, besides the obvious process message objective,
the structure of the play (theme, plot, environment) and the substance of
each character. An extremely detailed analysis of the characters is probably
the most important aspect of the dramatic script reading session. The actor
or actress who really understands his or her character, role, and relation
to the whole event will have mastered the major part of his or her screen
performance. More than any other, the television actor or actress must understand
a character so well that he or she is no longer "acting out" the
role but living it. Such internalization can be facilitated through extensive
script reading sessions.
You will find that after this kind of session, the actors will tend to block themselves (under the director's careful guidance, of course) and to move and "act" naturally. There is no need for you to explain each move. Once the actors understand their roles with head and heart, their actions will be motivated most of the time.
------------------
Dry Run or Blocking Rehearsal
Dry runs or blocking rehearsals are required only for complex shows, such as dramas or scenes from variety shows. After the script-reading session, you will call for the dry run, during which the basic actions of the talent are worked out. By that time, you must have a very good idea of where the cameras should be in relation to the set, and the actors in relation to the cameras. The dry run presupposes a detailed floor plan and a thorough preparation by the director. It also presupposes that the actors have internalized (understood with head and heart) their characters and roles.
Tell them approximately where the action is supposed to take place (the approximate location in the imagined set area; the actual set is rarely available at this point), and let them block themselves.
Follow their actions with the director's viewfinder. Watch their actions as screen images, not from the point of view of a live audience. Adjust their blocking and your imagined camera positions so that you have a reasonable assurance that you will achieve the visualized screen image in the actual camera rehearsal. Be ready to give precise directions to the actor who is asking what to do next. A good actor, rather than always knowing what to do without the director's help, asks what he or she should do, and then does it with precision and conviction.
Generally, try to observe these points in your dry run: (1) Hold the dry run in the studio or a rehearsal hall. In an emergency, any room will do.
Use tables, chairs, chalk marks on the floor for sets and furniture. (2) Work on the blocking problems. Use your viewfinder. Have your assistant make notes of the major blocking maneuvers.
(3) Keep the camera and microphone movements in mind when blocking the actors. Some directors walk right into the spot where the active camera will be and watch the proceedings from the camera's point of view. (4) Call out all major cues, if it will help. (5) Go through the scenes in the order in which they are to be taped. If you do your show live, or videotape it in one uninterrupted session (sometimes called "live-tape"), try to go through the whole script at least once. (6) Time each segment and the overall show. Allow time for long camera movements, music bridges, announcer's intro and close, the closing credits, and so forth. And (7) reconfirm the dates for the upcoming rehearsals.
Walk-Through
The walk-through is an orientation session that will help the production crew and performers understand the necessary medium and performance requirements quickly and easily. You can have both a technical and a talent walk-through or, if you are pressed for time, a combination of the two.
The walk-throughs as well as camera rehearsals occur shortly before the actual on-the-air performance or taping session.
Technical Walk-Through
Once the set is in place, gather the production crew (A.D., floor manager, floor personnel, T.D., lighting director, camera operators, audio engineer, boom operator), explain to them the process message objective and your basic concept of the show. Then walk with them through the set and explain these key factors: (1) basic blocking and actions of talent, (2) camera locations and traffic, (3) special shots and framings, (4) mike placements and boom location, (5) basic cuing, (6) scene changes and prop changes, if any, (7) major lighting effects, and (8) easel positions.
The technical walk-through is especially important on remote telecasts where the crew must often work during the setup under the guidance of the floor manager rather than the director, who is isolated in the remote truck.
Talent Walk-Through
While the production people go about their tasks, take the performers or actors on a short excursion through the set and explain once again their major actions, positions, and crossings. Always try to block talent in such a way that the talent rather than your cameras will do most of the moving. Tell them where the cameras will be in relation to their actions. Here are some of the more important aspects of the talent walk-through: (1) Point out to each performer or actor his or her major positions and walks. (2) Explain briefly where and how they should work with specific props. For example, tell the actress that the coffee urn will be here, and how she should walk with the coffee cup to the couch: in front of the table, not behind it. Explain your blocking to the talent from a camera point of view. (3) Once again explain the major visualization and picturization aspects. (4) Have each performer or actor go through his opening lines and then have him skip to the individual cue lines. And (5) give everyone enough time for makeup and dressing before the camera rehearsal.
During this talent walk-through, try to stay out of the production people's way as much as possible. Finish your walk-through rehearsal early enough so that everybody can take a break before camera rehearsal.
Camera Rehearsal
In small station operation, camera rehearsal and final dress rehearsal are almost always the same.
Frequently, your camera rehearsal time is cut short by technical problems, such as minor or major lighting adjustments and camera adjustments. One attribute you must have as a television director is patience. You may get nervous when you see most of the technical crew working frantically on your key camera five minutes before air time. There is nothing you can do, however, except realize that you are working with (1) a highly skilled group of technicians who know just as well as you do how much depends on a successful performance, and (2) a highly complicated machine which, like all other machines, sometimes works and sometimes doesn't.
There are three basic methods of conducting a camera rehearsal: (1) the stop-start method, (2) the uninterrupted run-through, and (3) the film-style rehearsal. The first two are usually conducted from the control room, the film-style rehearsal from the floor.
------------------

15.34 In complicated, fully scripted shows, your task as a director will
be considerably aided if you supply the camera operator with a shot sheet.
This lists every shot a particular camera has to get (see a). As soon as her
camera is free (momentarily off the air), the camera operator, seeing that
the tally light is off, can look at the shot sheet and frame up the next shot
without specific instructions from the director or the associate director.
Some cameras come equipped with a shot-sheet holder directly below the viewfinder.
Such sheets may be quite detailed, telling the camera what to get, how to
frame it, and what position the zoom lens should be in; others simply indicate
the basic framing, in the hope that the camera operator remembers the rehearsed
shot.
Since the director labels all his shots in consecutive order, regardless of the camera used, the numbers of the shots for an individual camera are not in consecutive order. Figure b shows an example of a portion of the director's script with the shots .numbered in consecutive order.
----------------------
The Stop-Start Method
With the stop-start method you interrupt the camera rehearsal whenever you find something wrong; then you go back to a logical spot in the script and start again, hoping that the mistake is not repeated. This is a thorough, but time-consuming, method.
The Uninterrupted Run-Through
The uninterrupted run-through rarely remains uninterrupted. However, you should call for a "cut" (stop all action) only when a grave mistake has been made, one that cannot be corrected at a later time. All minor mistakes and fumbles are corrected after the run-through. Since most plays are videotaped, your uninterrupted run-through will be interrupted at each scene or segment as marked in the script. Since camera rehearsals are generally videotaped for protection and for additional material in the postproduction editing process, you will need the scene breaks to stop and start the videotape and to slate each scene. If you plan to do the entire show live, or videotape the show in one uninterrupted take, you should go through as long a segment as possible in the uninterrupted run-through. A long stretch without any interruptions will not only give you an overview of the general development and build of the play, but will also help the performers or actors enormously in their pacing. The uninterrupted runthrough is one of the few opportunities for you to get a feeling of the overall rhythm of the show.
The Film-Style Rehearsal
Closely related to the stop-start method is the film-style rehearsal.
You rehearse each take (shot) immediately prior to videotaping it. Then you stop, reset the technical facilities-such as lighting, changing of set and properties--rehearse the next shot, and videotape it immediately thereafter. Thus, you end up with a great number of bits and pieces of videotape that will be put together into a (hopefully) coherent story in the postproduction process. Since the film-style rehearsal is used only when you videotape with a single camera in film style, you conduct the rehearsal and the actual videotaping from the studio floor. All you need is a monitor so that you can see what the camera operator sees in the viewfinder.
You will find that even after the most careful script preparation you will be forced to change certain camera shots and blocking procedures.
Try to be as quick and firm in your decisions as possible. Be open-minded to suggestions from the production and engineering crews, as well as talent, but don't be indecisive. Once you have made a change, and it seems to work, stick to it. If some blocking or camera movement gives you special problems, solve them right then and there. Don't think that you "can take care of it" in the post-production activities. Even the most skillful editor can't perform miracles. The better the raw material the editor gets, the easier it will be for him to shape it into a good show.
In the final camera rehearsal (if you have the luxury of going through the show more than once), you should rehearse the complete show, including all video and audio elements-film, tape, sound effects, slides, studio cards, lighting changes. Be sure to finish the rehearsal early enough to allow time to reset the rehearsed production elements and to give crew and talent a short rest before the actual on-the-air performance or taping session. Don't rehearse right up to air time.
Walk-Through Camera Rehearsal Combination
Necessary as the above-mentioned rehearsal procedures seem, they are rarely possible in small station operations. First of all, most of your directing chores in a small station will be of a non-dramatic nature, demanding less rehearsal effort than for dramatic shows. Second, because of time and space limitations, you are lucky to get rehearsal time equal to or slightly more than the running time of the entire show. Forty minutes rehearsal time for a half-hour show is not uncommon.
Most often, you will have to jump from a cursory script reading to a camera rehearsal immediately preceding the on-the-air performance or taping session.
In these situations, you will have to resort to a walk-through camera rehearsal combination.
Since you can't rehearse the entire show, you simply pick the most important parts and rehearse them as well as possible. Usually these are the transitions rather than the parts between the transitions.
Here are some of the major points for conducting a walk-through camera rehearsal:
(1) Do this type of rehearsal from the studio floor. If you try to conduct it from the control room, you will waste valuable time in explaining your shots and blocking through the intercommunication system, even if you happen to have a first-rate floor manager. (2) Get all production people into their respective positions-all camera operators at their cameras (with the cameras uncapped and ready to go), the microphone boom ready to follow the sound source, the floor manager ready for cuing, the T.D. and audio engineer ready for action in the control room. (3) Walk the talent through all the major parts of the show. Rehearse only the critical transitions and shots. For example, if the performer has to demonstrate a small object, show her how to hold the object and the camera operator how to frame it. (4) Call your shots over the "hot" boom (or any other) microphone into the control room and have the T.D. switch the particular camera on line, so that everybody can see the image on the line monitor from the studio floor. (5) As soon as the talent knows how to go on from there, skip to the end of his segment and have her introduce the following segment. (6) Rehearse all major walks and crossovers on camera. Look through the camera's viewfinder to check the framing (especially of the camera that is getting ready for the next shot; the on-the-air camera is punched up already on the studio monitor). (7) Give all cues for music, sound effects, lighting, film clips, tape inserts, videotape rolls, slating procedures, and so forth to the T.D. via the open studio mike, but don't have them executed (except for the music, which can be reset rather easily). (8) Have the floor manager cue the talent and mark the crucial spots with chalk or masking tape on the studio floor.
If everything goes fairly well, you are ready to go to the control room. Don't get hung up on some minor detail while on the floor. Always view the problems in the context of the overall show. For example, don't fret over a picture that seems to hang slightly high while neglecting to rehearse the most important crossovers with the talent. In the control room, contact each camera by number and find out whether he can communicate with you. Then from the control room rehearse once more the most important parts of the show-the opening, the closing, major talent actions, and camera movements. (See 15.35.) It is always a good idea for the director to have rehearsed the opening and closing of a show from the script for himself, prior to camera rehearsal.
Simply take the script, sit in a quiet corner, take your stopwatch (for practice) and start calling out the opening shots: Ready to roll VTR two, roll it, and so on, or Fade in two, ready to key F-one, and so on.

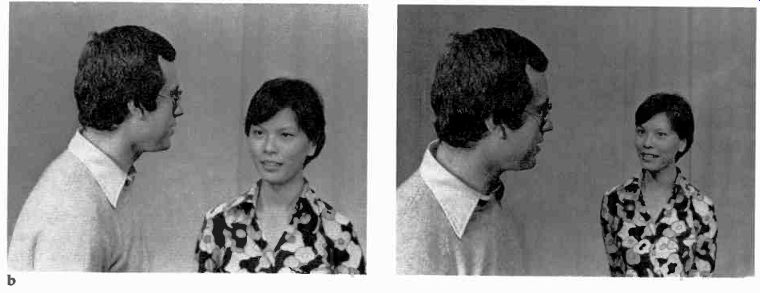

15.35 Once you are in the control room, the only way you can see the action
on the floor is through the camera preview monitors. Most control-room windows
are either blocked with monitors or scenery or, as in most modern control
rooms, nonexistent. You should, therefore, develop the ability to determine
camera positions and zoom lens positions from how the pictures appear on the
monitors. Figures a and b show two obvious examples. a Since the normal camera
setup is from left to right--with camera 1 on the farthest left side of the
action and the highest-number camera on the farthest right side-camera 1 should
give you a view from slightly left, and camera 3 from slightly right. In this
illustration, the cameras are obviously crossed. It will simplify your directing
chores if you keep them in the basic left-to-right position. The relative
size of objects can sometimes give you a clue as to the focal length of the
zoom lens setting.
Camera 1 is zoomed in quite tightly while camera 2 is on a wide-angle zoom position. Camera 2 can, therefore, be moved while on the air; camera 1 cannot.
By the time you enter the control room, you will practically have memorized the opening and closing of the show and will be able, therefore, to pay full attention to the monitors and audio.
As much as you may be pressed for time, try to remain cool and courteous to everybody. Also, this is not the time to make drastic changes. Yes, there are probably some other ways in which the show might be directed, and even improved, but the camera rehearsal is not the time to try them out. Give crew and talent enough time before the actual taping or on-the-air performance to take care of last-minute details.
Some disadvantages of the walk-through camera rehearsal combination make this method less than perfect: (1) No one, including you as the director, ever has a chance to go through the whole show continuously. (2) You don't have the opportunity to see and call all the shots from the control room and to see complete studio traffic develop. And (3), you cannot time the whole show.
On-the-Air Performance:
Directing the on-the-air performance, or the final taping session, is, of course, the most important part of your job as a director, as important as all the preparations put together. After all, the viewer does not sit in on your script conferences or your rehearsals; all he sees and hears is what you finally put on the air. From now on, we will call this phase the on-the-air directing, since, even if you are videotaping the show, you should always act as though it were going on the air at the same time. If you relax too much during videotaping (since "you can always redo a scene if it goes wrong"), you will find that your whole crew and the talent too will assume a dangerous "I-don't-really-care" attitude.
Stand-by Procedures:
Here are some of the most important stand-by procedures immediately preceding the on-the-air telecast: (1) Call on the intercom every member of the production team that needs to react to your cues-camera operators, boom operator, floor manager and other floor personnel, videotape operator, lightboard operator, audio engineer. (2) Check with the floor manager and make sure that everyone is in the studio and ready for action. (3) Announce the time remaining until the on-the-air telecast (or taping) and ask whether the floor manager is ready with the slate (for videotape identification). Much precious time has been lost in television studios simply because the slate wasn't ready or properly labeled. Indicate which camera will take the slate, choosing one that is not involved in the opening shot. (4) Alert everyone to the first cues. (5) Tell the floor manager who gets the first cue. (6) Check with the videotape engineer as to whether he is ready to roll the tape, and with the camera operators and audio engineer about their opening actions. (7) Line up the slate on one camera and the opening shot on the other. (8) Check on the opening slide, film, VTR insert, or character generator display.
The Show
Assuming that you videotape your show, you must first go through the videotape rolling procedures (see 15.5). Once your videotape is rolling and properly slated, you can begin with the actual recording. You are now on the air. Let's repeat the fading in of the opening shot on camera 1: Up on (or fade in) one. Music. Fade music, cue announcer. Ready to key F-two over one (slide over opening shot). Key F-two. Change slide. Change slide. Change slide.
Key out (or F-iwo out, or lose key). Music out. Slowly.
Ready two on Lynn (the performer). Ready to cue Lynn.
Cue Lynn, take two. One, get a closeup of the book ( Lynn is holding). Ready one, take one. Two, stay on Lynn.
Ready two on Lynn. One on the easel. Zoom out a little.
Good. Ready one, take one. Two on the easel. Good. Ready two for a dissolve. Dissolve to Iwo. Ready to roll SOF on F-one. Roll film. Four-three-two-one, take F-one. SOF (assuming that you still use a 4-second film start; otherwise you simply call for Ready F-one, Roll F-one; or simply, Take F-one). By now you are well into the show. Don't forget to watch the time carefully. After the 5-minute cue (if any), you must prepare for the closing. Are the closing slides or the closing crawl ready? Again, watch the time.
Thirty seconds. Wind her up. Wind her up. Fifteen (seconds). One on the crawl. Two zoom out. Ready music. Cut her. Music. Good. Music under, cue announcer. Two, keep zooming. Ready to roll crawl. Roll it. Ready to key one over two. Key. Speed up the crawl. Key out. Fade to black. Music out. Hold. Stop VTR. OK, all clear.
Good job, everyone.
Unfortunately, not every show goes as smoothly as that. You can contribute to a smooth performance, however, by paying attention to these important on-the-air directing procedures:
1. Give all your signals clearly and precisely. Appear relaxed but alert.
2. Cue your talent before you come up on him with the camera. By the time he starts to speak, you will have faded in the picture.
3. Indicate talent by name. Don't tell the floor manager to cue just "him" or "her," especially when there are several anticipating "hims" or "hers" in the studio.
4. Don't give a ready cue too far in advance, or the person may have forgotten it by the time your take cue finally arrives.
5. Don't pause between the "take" and the number of the camera. do not say: Take (pause) two.
Some T.D.'s will punch up the camera before you say the number.
6. Keep in mind the number of the camera already on the air, and don't call for a take or dissolve to that camera.
7. Don't ready one camera and then call for a take of another. In other words, don't say: Ready one, take two.
If you change your mind, nullify the ready cue and then give another.
8. Talk to the cameras by number and not by the name of the camera operator. What would you do if both your camera operators were named Mary?
9. Call the camera first before you give instructions.
For example: Camera 2, give me a closeup of the display. Camera 3, cover shot. Camera 1, dolly in.
10. After you have put one camera on the air, immediately tell the other camera what to do next. Don't wait till the last second; for example, say Take two. One, stay on this medium shot. Three, on the easel. If you reposition a camera, give the operator time to reset his zoom lens; otherwise the camera will not stay in focus during subsequent zooming.
11. If you make a mistake, correct it as well as you can and go on with the show. Don't meditate on how you could have avoided it while you are neglecting the rest of the show. Pay full attention to what is going on.
If videotaping, stop the tape only when absolutely necessary. Too many false starts can take the energy out of even the most seasoned performer and production crew.
12. Spot check the videotape after each take to make sure that the take is technically acceptable. Then go on to the next one. It is always easier to repeat a take, one right after the other, than to go back at the end of a strenuous taping session.
13. If you use the stop-start method or, especially, the film-style approach to videotaping, you may want to play back each take before going on to the next one.
If you don't like the take, you can always do another one immediately.
14. If there is a technical problem that you have to solve from the control room, tell the floor manager about it on the intercom, or use the S.A. system to inform the whole floor about the slight delay. This way the talent will know that there is a technical delay and, what's more, that the delay wasn't caused by them.
15. If you rely heavily on postproduction editing, get some cutaways.
16. During the show, speak only when necessary. If you talk too much, people will stop listening and may miss important instructions.
Postshow Duties
After the show, give thanks to crew and talent.
If something went wrong, don't storm into the studio blaming everyone but yourself. Wait until you can think objectively about the situation.
Then don't just criticize but, instead, make suggestions on how to avoid similar mistakes in the future.
Don't forget the necessary production reports, music lists, and union contracts (if you act as producer-director). File your marked script for future reference.
Postproduction Activities
If a show is assembled in the postproduction editing process, the director is generally still in charge of the editing decisions. In practice, however, relatively simple editing tasks are generally handled by the videotape editor, with a minimum of supervision (or, as editors like to call it, "interference") by the director. Nevertheless, it is a good idea for you as a director to work with the editor until the completion of the postproduction. Actually, there is little difference from a directing point of view whether you tell the T.D. to take 2, or tell the editor to splice this shot to that. In any case, try to work with him, and not against him. If he is experienced, he can help you greatly in the picturization process. But don't be afraid to assert yourself, especially if you feel strong about a certain editing decision, especially if you are the producer-director.
Off-line editing systems have made the post-production editing process extremely simple. Assuming that you are lucky enough to have such a system available to you, you can sit in front of the editing console and make all the editing decisions yourself before giving the small-format copy or the punched paper tape to the on-line editor for the 2-inch master copy.
While editing, try to apply the major principles of continuity and complexity editing, unless you intend to produce special effects in the picturization.
When finished, check the entire tape for serious technical and aesthetic discrepancies. If every-thing looks all right, time the entire videotape recording and have a protection copy made immediately.
General Comments:
As a television director, you have to bear responsibility toward your audience, the great many individuals whose lives you will inevitably touch, however temporarily; to your station, whose members have put their trust in you to use their efforts for a successful communication of their ideas and messages; toward your production team, whose performance is directly dependent upon your skill; and finally toward yourself Like any other artist, you must always try to do your best possible job, no matter how trivial it may seem at the time.
After all, the mark of the professional is consistency, to come up consistently with a quality product, regardless of the scope of the task.
Directing, finally, means to guide with sureness, understanding, and compassion; to guide and coordinate a great number of people and events into a coherent whole, into video and audio images that ultimately affect the percipient in a positive way.
Summary:
Television directing, which calls for coordinating a great number of production elements and people within a rigid time limit, requires understanding and mastery of (1) terminology, (2) timing, (3) visualization and picturization, (4) script formats, (5) script preparation, (6) rehearsal technique, (7) on-the-air performance, and (8) postproduction activities.
Terminology is the language the director uses in order to achieve optimally efficient communication with all persons involved in the production.
A large part of this terminology consists of cues to engineering and production personnel, and to talent.
Timing relates to the control of physical, or objective, time, and psychological, or subjective, time. The control of objective time includes (1) differentiating between clock time, or schedule time, and running time, or length, (2) back-timing, and (3) front-timing. The control of subjective time has to do with the balance of pace and rhythm.
Visualization means seeing single visual images of an object or event. Picturization means controlling and structuring these images into a shot sequence. Both processes are essential to television directing. Good television scripts usually indicate the major visualization and picturization factors.
There are four basic types of script formats: (1) the fully scripted show, (2) the semiscripted show, (3) the show format, and (4) the fact, or rundown, sheet.
The two major points of script preparation are (1) script analysis and (2) script marking.
The major rehearsal methods consist of (1) script reading, (2) dry run, or blocking rehearsal, (3) walk-through, (4) camera rehearsal, and (5) walkthrough camera rehearsal combination.
On-the-air performance by the director includes specific, standardized stand-by procedures, specific cues during the show, and certain customary postshow duties.
The postproduction activities may involve the director in the editing process, whereby he or she, in conjunction with the film or videotape editor, makes the final picturization decisions. Usually, the director and editor work together on the final editing.