Fader-Mixer
Not really a high fidelity set up, but it is a simple and handy circuit for multi-switching and mixing several program sources without the use of tubes, compensated controls, and capacitors. Varying load effects are reduced, and the bass response is not compromised as in a single potentiometer arrangement. I used this device recently with phono, a tape recorder, and a radio for a public affair. The usual switching arrangement was inconvenient. Clicks and sudden application of the following program was annoying. In the diagram, only Channel 2 is shown in the circuit, the 1 megohm stacked controls tend to maintain the same isolation between the input signal, and the stray capacitance of the output cable and amplifier input circuit. As the control is lowered, some loss of high notes may be experienced depending upon the amount of this stray capacitance. The addition of a 47,000 ohm resistor is desirable to improve isolation between channels being mixed. The loss in signal due to these resistors is negligible.
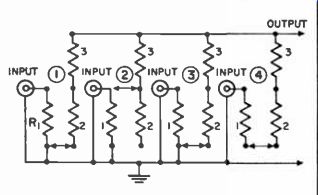
---- Use of dual pots for fading and mixing programs offers compensations
for varying loads. Additional resistors enhance isolation between channels.
Audio Xformer-Speaker Check
When no sound emanates from the speaker of a TV or radio set, it is generally necessary to know whether there is an open winding in the secondary of the output transformer or in the voice coil. To make this check with an ohmmeter, one lead to the voice coil has to be opened. A simple check, while it does make use of the soldering gun, does not require the lifting of any leads.
Turn the soldering gun on and hold it close to the suspected transformer. If transformer and speaker are both okay, hum will be induced into the output transformer from the transformer in the gun, and it will be heard clearly through the speaker. If no such hum is heard, scrape the test leads of an ohmmeter across the voice coil connections. If a noise is not heard, the voice coil is suspect. It the noise is heard, the voice coil and speaker are okay, and the secondary of the transformer comes under suspicion.
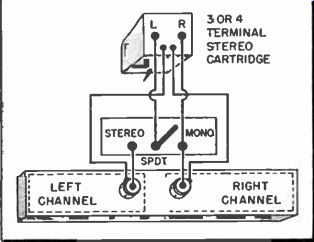
------- SPDT switch parallels both elements in stereo cartridge for monophonic
records without shorting the mono input of some stereo preamps.
Stereo-Mono Switch
Stereo cartridges are purposely designed to have almost as much vertical compliance as horizontal compliance, and to provide an output signal in response to vertical vibrations. This is fine for stereo discs; but for monophonic records, the only information in the vertical plane is undesirable noise and rumble. By paralleling the two elements in most stereo cartridges, the cartridge becomes insensitive to vertical motion. This is a fortunate circumstance, and is due to the fact that a strictly vertical stylus movement causes an output signal in each cartridge element that is equal, but 180° out-of-phase.
Many of the newer record changers are already equipped with SPST switch mounted close to the pickup arm, to parallel the cartridge output signals. There are millions of record changers that will be modified for stereo over the next year or two. It is even more desirable to install such a switch on the older players because not as much attention was paid to vertical rumble before the days of the stereo disc.
Some of the stereo preamps short out the input of the channel not in use, when the system is set for monophonic operation. If the stereo cartridge output is then paralleled the signal would be lost. A SPDT, instead of SPST, switch connected as shown can eliminate this problem. It disconnects the unused and grounded channel from the cartridge.
Phono Cartridge Check
When it becomes necessary to check the output of a phonograph pickup cartridge to see whether it is working, a quick any simple test can be made with a pair of headphones or a single headset. The headset need simply be connected across the output terminals of the cartridge, or more conveniently, across the leads from the output terminals, so that the connections will not interfere with placing the pickup on the record. When the cartridge is then placed on the rotating record, one need simply listen to the output through the headset.
Nearly all standard cartridges (crystal and ceramic types) provide enough output to cause the earphones to operate satisfactorily. The only exceptions are the magnetic and other low-level high-fidelity types of pickups, but even these can be checked through a suitable preamplifier known to be operating properly.
In addition to being quick and easy, the headphone method of checking can be used in the field as well as on the bench. It is only necessary to keep a single headset, which occupies a small amount of space, in the tool box.
A Sound Idea
Overhead loudspeakers solved a tough sound coverage problem in the plant of Olympia Brewing Company.
This public relations-minded beer manufacturer encourages the public to take a tour of the plant. Many people do visit the modern facilities in Washington's state capitol, Olympia.
A brewery is a noisy place, especially in the bottling department.
The genial guide explains what goes on, and without a public address system he cannot be heard. If a high power amplifier were used, the employees would hear the guide's talk several times a day. Even in a noisy department, stray sounds are distracting, especially where running machinery may sing out a warning that something is wrong by developing a new sound. John Andersen, who heads the company's electrical department, designed a sound reinforcement system which covers the visitors' gallery without interfering with the work area.
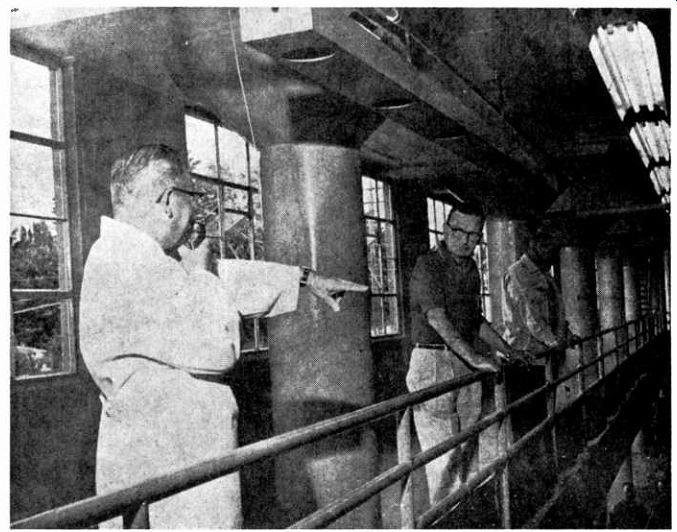
-------- Overhead speakers confine sound to visitors gallery in noisy brewery
plant, without disturbing workers below. Microphone is suspended from a 7" reel
above.
Six 7 inch p-m speakers are mounted in a 16 foot long wooden trough-like cabinet, which is 10 inches wide and 4 inches deep. The cabinet is suspended just above head level and the speakers face downward, as shown in the photo. A 10-watt amplifier mounted in the cabinet provides more than ample volume. Tube life averages more than a year and a half in spite of the fact that the amplifier is never turned off. The microphone is pulled down when it is to be used. A 7 inch reel which operates like a window shade stores the cord and keeps the mike out of the way when not in use.
Phono Hint
In replacing phono cartridges, or often when replacing needles, it is necessary to remove the cartridge from the tone arm. When the time comes to replace the cartridge in the arm, the little screws are often hard to handle, especially when working from the underside of the tone arm.
A dial cord stick can be used for such situations. Scrape the head of the screws across the stick, filling the slot with the compound. It is then a simple matter to make the screw stick to the end of the little screwdriver employed, permitting this screwdriver to be inserted from any position.
Cure for Noisy Speakers
When rattling or distorted output is the result of a defective speaker cone, I have found that coating the defective cone with ordinary shellac will instantly stop the noise in most cases. Apply shellac to the cone with the radio playing. By the time the application is completed, the noise should be all gone. Make sure to get the shellac on heavy around the edge of the cone.
The writer has repaired many speaker cones in this way, several of which have been in use for six months or more. They are still working as good as new, with no apparent need to replace the cones.
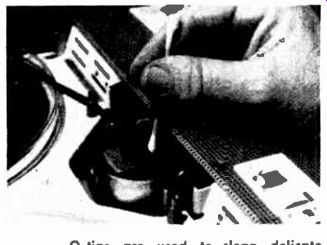
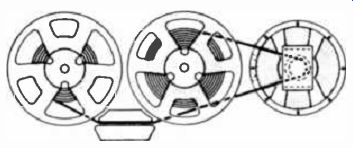
------- Q-tips are used to clean delicate tape recorder heads.
Tape Head Cleaner
Small cotton-tipped sticks, sometimes called Q-tips or quills, are extremely useful for cleaning and oiling tape recorder and record changer mechanisms. They are especially handy for cleaning delicate tape recorder heads. The Q-tips may be dipped in alcohol or special solvent and used on the tape head, as shown.
---------
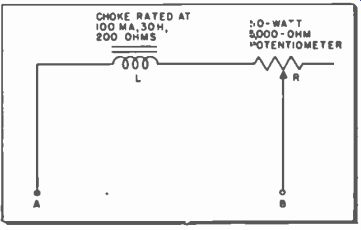
Unmarked Field Coils
In the absence of means to determine the resistance of a burned-out and unmarked speaker field coil, so as to supply a replacement, connect a variable resistance in series with coil L across the field coil terminals of the receiver. The set-up and recommended values are shown in the illustration. Vary R until proper plate and screen voltages appear.
Turn off the juice and measure resistance between points A and B. This is the ohmage for the replacement.
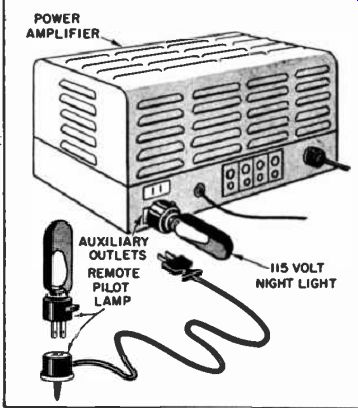
----------- Night lamp serves as amplifier pilot light.
Pilot Light
To prevent the possibility of forgetting to turn off the amplifier of a sound system, a pilot light can be quickly improvised from a plug-in type night light. It is quite discouraging to come back to your record player a couple of days after you last used it, and find that the system has been perking all the time. If the auxiliary outlets on the chassis are suitable, simply plug the lamp into one of these outlets. A suitable outlet is one whose power is turned on and off by the amplifier's on-off switch. Some amplifiers have two AC outlets and only one of them is controlled by the switch. If the desired outlet is occupied, use a double socket.
If the chassis is concealed, a remote pilot lamp can be hooked up using an extension cord.
A tape recorder head can be checked for magnetization by first observing its output without any tape and, without changing the setting of controls, with blank tape. If any appreciable increase in amplitude is seen on the scope, then the head should be demagnetized.
Checking Magnetized Tape Heads
Modern tape recorder heads with small gaps, are particularly susceptible to magnetization. This can be caused by magnetized tools in close proximity to the head. It can also be a result of injecting d-c current into the head windings; for example, when an ohmmeter is used to check winding continuity.
Symptoms of magnetization are generally indicated by a high noise level, hissing and popping sounds when a completely blank tape is played. To check, observe the following procedure:
1. Connect the vertical circuit of an oscilloscope to the speaker jack, as illustrated. (An audio voltmeter may also be used.)
2. With the amplifier warmed up and no tape on the transport, press the PLAY-RECORD button and adjust the loudness control and scope gain for some convenient indication.
Resulting indication will arise from normal amplifier noise. (Tube hiss.)
3. Place a completely blank tape on the transport and again press the PLAY-RECORD button. Do not change the control settings.
Head magnetization will be indicated on the scope by an increase in signal amplitude-the amount of the increase being dependent on the degree of magnetization. A head that is not magnetized will show about the same average level when a blank tape is played, as was shown with no tape.
PM Tape Eraser
Here is a method of erasing tape with the aid of a permanent magnet speaker.
Take the roll of tape to be erased and place it on either side of the tape recorder on a box or tape boxes so that the magnet will be in line with the tape travel. Thread the tape around the permanent magnet of a speaker (the magnet has to be one that is exposed and smooth) and back to the take up spool. Set the tape recorder to fast forward or fast rewind, as the case may be, and your tape will be erased. This is not recommended for precise applications 'where retained magnetism on tape may lave an undesired d-c bias eject. -Ed.
--------- Using the permanent magnet in a PM speaker to erase tape information.