Bench Lamp Extension
To extend the usefulness of the adjustable lamp over the bench, install on the wall or shelf above the work area an extension arm about 2-feet long and 6-inches wide. A hole through the extension and shelf to accommodate a bolt will permit the entire assembly to swivel from one side to the other and extend the range of the lamp. Large washers with a small amount of lubricant placed on either side and between the board and shelf will enable easy action for a long time. The lamp can be secured to the end of the extension arm in the usual manner.
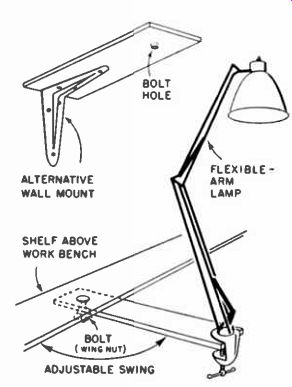
-------- Extension for flexible bench lamp increases the area of coverage
and usefulness.
Broken Screw Threads
I have serviced several small radios and TV boosters, mounted in plastic cases, in nearly all of which one or more mounting screws could not be tightly inserted. The trouble was probably due to the screws being forced in, causing the plastic to break away from the hole.
These mishaps can be prevented by putting a drop of light oil in the hole and on the screw, before insertion of the screw. The latter will now enter without danger of cracking or breaking the plastic while being inserted.
When a new case is used as a replacement, the holes are not threaded. However, if self-tapping screws are used with the oil, no difficulty will be encountered. This method also works very well for starting stud screws in selenium rectifiers.
Ammeter Test Aid
Many technicians use an ammeter to check circuit current before replacing a blown fuse or when troubleshooting in the event of a short.
Also, ammeters are frequently used to monitor the current drawn by a set that has intermittent trouble: especially in the high voltage section.
Meter test leads, although easily connected to the "snap-in" type fuse holders, cannot be connected to the new "twist-lock" fuse holders without first removing the chassis. The meter, however, can he connected without removing the chassis by modifying each "twist-lock" type fuse as shown above.

-------- Modified "twist-lock" fuses, as shown, will enable
the technician to measure current without removing the TV chassis.
Carefully drill a small hole in each end of a `'twist-lock" fuse and insert a short insulated lead into the "ear" end of the drilled hole. Maneuver the lead into the hole at the other end of the fuse and solder it. Then solder a short lead to the end having "ears", being careful that it doesn't short to the lead already installed.
This modified fuse may now be inserted into the set's "twist-lock" fuse holder and the meter leads connected to the extended wires. Since there are a few different type "twist-lock" fuses, it will be necessary to construct modified units to cover all needs.
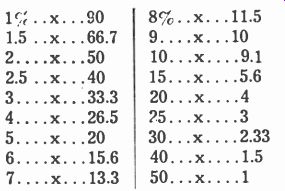
Formula Shy
If you are in a hurry, and have no desire to fuss with the reciprocal of the sums of reciprocals, or the R, X R_ divided by R,-{R_ formula, to determine the size of a shunt resistor; paste this table on your resistor-bin.
------p73b
Example: To parallel a 100 ohm resistor to arrive at £5 ohms, which is 5% less, multiply 100 by 20. This indicates that a 2000 ohm resistor should be used.
For those technicians who want to feel safe and make use of the 2 resistors in parallel, formula here is another form of the R, X R_ divided by R1-R., rule. Let R, equal any resistor larger than the one desired and RD equal to the desired resistance. R. will be equal to the resistor needed to shunt R, in the following formula:
R. = R, X RD / R,-Ro
What Freezing Can Do to Mast
Servicers who install seamed-tube antenna masts should take great care to make sure (1) the bottom of the mast is so positioned that it drains freely, or (2) that the top of the mast is so corked or stoppered that water cannot enter the hollow tube.
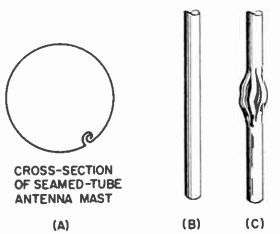
------ CROSS-SECTION OF SEAMED TUBE ANTENNA MAST
If water can get into the hollow tube and stays there, the mast may be destroyed at the base or other weakest point by the expansion force of freezing during cold snaps or prolonged zero weather. The accompanying sketch shows the results when A and B are filled with water changing to ice, with the destructive results shown by C.
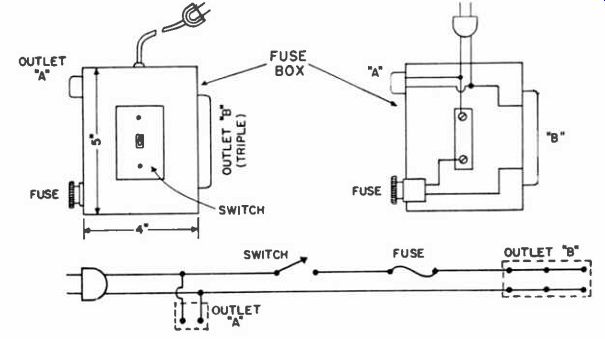
--------- This fuse box on the service bench can save a lot of time when
shorts occur in faulty chassis.
Handy AC for Bench
For years, I've been using this handy set-up for ac power on the bench. The basic unit is a fuse box with outlets to use while I'm repairing radios, TV sets or other appliances. If a short in a chassis that is being serviced blows a fuse, a replacement can easily be made without a separate trip to the main fuse center. Three outlets are provided for appliances under test. The fuse should he no greater than 15-amp size, but less than the rating used at the main box. The switch is also handy for interrupting the circuit. The outlet for the soldering iron, unaffected by the opening of the switch or the fuse, will serve to keep the iron hot at all times and available for use regardless of what is happening to the fused circuit.
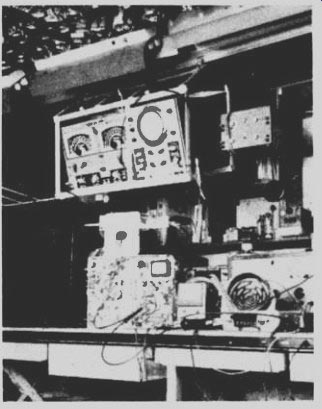
-------- Overhead sliding equipment rack provides more room on the bench,
and speeds servicing.
Sliding Rack for Test Equipment
Special trucks, racks, stands and tables for test equipment have been on the market for some time now. I find they leave much to be desired. The main trouble is that the test leads are usually in the way and when trying to get around one end of the set or the other, one has to be a contortionist to avoid shorts, broken tubes and leads. I have struggled and tried many devices and ideas in an effort to get a decent set-up, which would eliminate moving either the set to be serviced or the test equipment. I designed an equipment carrier which holds my scope, signal generator and electronic switch. The carrier is a cage-like framework made up of 1" angle iron, and some 1" fiat stock. An old bedspring and parts of a large wall-mount antenna bracket set may also be used to build the carrier. After the cage is assembled, it can be mounted on a track installed over the bench. Track and roller kits designed for roll-away doors were used. Since these kits are usually only 6 feet long, two of them were obtained and placed end-to-end.
This permitted the cage to slide over a 12 foot length of the bench. The test equipment was mounted at an angle to facilitate viewing from either a standing or sitting position.
When in use, the test leads drop almost straight down, thus assuring maximum freedom of motion and minimum damage. When the equipment is not in use, the leads can be conveniently hung on a couple of hooks installed at the top of the frame, as shown in the photograph. Total cost of the carrier is approximately $27.00.
Gimmick for Chassis Carry
Sometimes the edges of a heavy TV chassis dig into the hands when the chassis must be carried any great distance. I got around this by making two cushions for my hands.
------ Grips made from an old rubber hose help take the pain out of carrying
a heavy TV chassis.
These s\ ere made by cutting two 5-in. pieces from a rubber garden hose. The units were sliced lengthwise down the middle on one side.
When slipped over the bottom edge of a chassis on either side, they tend to make good soft grips. They take very little room in the service kit and can be slipped off and on in a second.
Pilot Bulb Remover
Two rubber crutch (or cane) tips attached to a dowel stick make a handy tool for removing pilot light bulbs in close, narrow, and otherwise hard-to-reach places. The prepared stick will remove both good bulbs and broken ones. Although the rubber tips come in different sizes, there is no difficulty, when a bulb is brought along, in matching up a pair of tips that will fit snugly enough over the bulb to grip it. The diameter of the dowel stick is chosen so that one of the crutch tips-the one shown at the right in the figure will just fit on it as it would on a crutch or cane. At the other end of the dowel stick, instead of being slipped over the end of the stick, the tip is turned around and screwed on as shown.
In use, the left end of the tool will fit snugly over pilot bulbs to make removal easy. The other end of the tool is just right for removing broken pilot bulbs. The bottom of the crutch tip is shaped just about right for fitting into the broken socket. If the rubber is a little too large, a sharp razor blade can be used to taper it to fit. A slight inward and twisting pressure will soon remove even the most obstinate broken bulb or base. The tool works equally well on bayonet and screw-type pilot lights. I keep such' a stick on my bench at all times.
The rubber tips are available in all novelty or dime stores at about a nickel each. The dowel stick can be purchased at a hardware store.
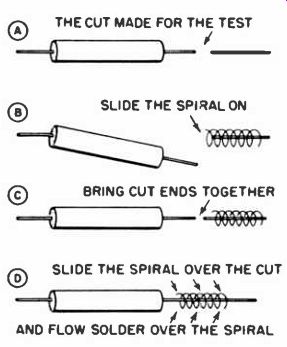
------- After a lead is cut and component tested, slide a tight fitting
tinned wire spiral over both ends, centering spiral ever cut. Crimp spiral
ends and solder.
Splicing Aid
Did you ever want to check a resistor or capacitor but hesitated to disconnect a flock of wires at a tube socket or other tie point because of difficulties in proper resoldering? Here is an easy way to overcome this problem, equally useful in hand-wired or printed circuit sets.
Take a length of #22 bare tinned wire and two sizes of twist drills; one size to equal the thickness of the lead on one-half watt resistors and one size to equal the thickness of the lead on two-watt resistors. I use only two sizes. Wind the wire tightly on the shank of the twist drill, leaving a small space between the windings. Make the spirals three eighths to a half inch long.
Now cut the lead on the resistor or capacitor to be checked, leaving an equal amount of lead on each side of the cut. Make the test you desire and then slide a spiral over one end of the cut, bring the ends together and then slide the spiral back so that it covers the cut, as illustrated above. Crimp both ends of the spiral lightly with long nose pliers.
Flow solder over the spiral and you are back in business in a minimum of time and effort with a neat, secure splice. I make up a few dozen in advance, having plenty on hand when needed.
Line Cord Protection
The line cords on electric drills and other equipment used in the shop often become frayed and damaged from constant use, requiring replacement from time to time. Premature damage and replacement can be avoided by using the twisted plastic cord wrappers of the kind universally sold to be used on telephone cords. Use of these protective wrappers prevents line cords on drills, soldering guns and other equipment from becoming twisted and fouled, thus prolonging their life.
Line Voltage Control
The most useful service-aid I have in my shop is a simple and inexpensive line voltage control. It is quite easily constructed from parts that will be found in any repair shop. The circuit is shown below. With this unit you can either raise or lower the line voltage by six-volts by making the filament transformer output boost or buck the line voltage.
If a portable radio works normally on the high position and it conks-out on the low position, it's probable that the selenium rectifier or the oscillator tube needs replacing.
Used in conjunction with a TV it will save both time and money. In the low position there should be a complete raster with no shadows. If the set passes this test you don't have to worry about a call-back for insufficient width, etc. Operating a TV on the high position is one of the best methods I know of to make an intermittent set act-up. Due to increased voltages throughout the chassis a component on the verge of breakdown will be put under extra stress, often enough to cause its failure.
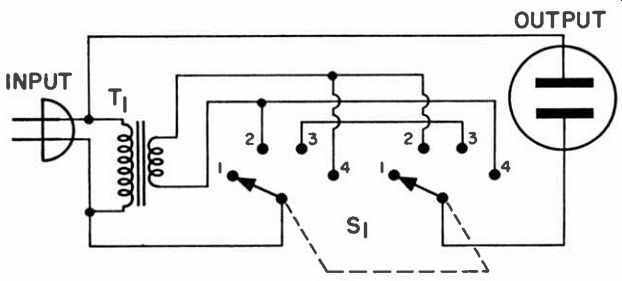
----------- Line voltage is controlled by boost and buck action. Switch
positions are: 111 off; 121-6v; 131 normal line; 141 +6 v. Two main parts are
6-volt filament transformer, rated 3 amps or more, and double-pole 4-position
switch.
Oscillator Drift
The servicing of horizontal drift that appears after the set has been on for an hour or more is often difficult. The trouble is usually caused by some component heating up and changing in value. Putting a heat lamp near the horizontal circuits heats up too many of the components at the same time, I have found, making it more difficult yet to find the defective part.
A short cut to locating the defective component is to place the tip of a hot soldering gun just under each component being tested, while the set is still cold (i.e., immediately after the set has been turned on, after being off for a considerable period.) When the iron is placed under the defective component, the drift symptom will generally make itself evident immediately.
Glass Polishing
Glass rubbed against glass will result in a ground-glass appearance on either or usually both pieces. A spot such as this may occur as a result of contact between the safety glass and the CRT. With reasonable care, these spots can be removed. The basic idea is to polish the glass with a soft cloth and a very mild abrasive. Bon Ami in cake or powdered form, or other similar product, slightly moistened so that it has a paste-like consistency, is applied to the spot and the immediate adjacent area. The glass is then polished by rubbing it with a soft cloth or a pencil eraser. A chamois cloth is also good for this purpose.
Inasmuch as quite a lot of patient elbow grease is required, an electric drill equipped with a cloth buffing wheel will save much labor. When using a power-driven tool on the face of the CRT, extreme caution should be used so that the picture tube will not be struck a sharp blow due to slippage of the drill, etc.
Safety precautions in the form of gloves, goggles and a heavy apron are advisable. Also avoid excessive pressure. It is also advisable to experiment on another piece of glass before attempting the actual polishing. It is possible to make matters worse the first time.
Safety-Glass Removal
Many sets have provision for removing the safety glass from the front for cleaning. There is usually no way to grasp it, and prying with a screw driver may crack or chip the edge.
Removal of the glass is even more of a problem when it is stuck in place. If the glass does not come away easily, perform a thorough examination to make sure that all removable retainers have been removed. If the glass is still stuck in place, then a plumber's helper may be used as a suction .cup to provide a good hold.
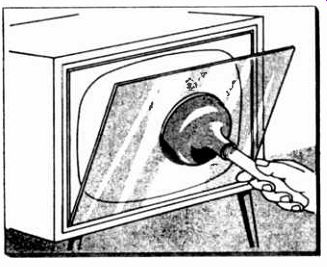
--------- Remove by tilting the top and then lifting.
Most glass is removed by tilting the top out and then lifting up. Exercise care and good judgment if the glass persists in staying put. A wrong move could prose to be costly and dangerous. In extreme cases, it may be better to pull the chassis and remove the CRT. In the field, large suction cups used on car-top carriers, are also suitable.
Glaziers have special types of suction cups equipped with a lever. This makes it unnecessary to apply inward pressure to force out the air and is an added safety factor.
Hook-On-Probes
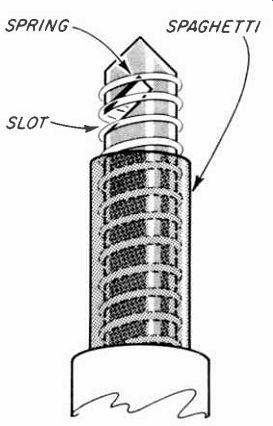
--------- Slot cut at tip end of probe hooks on to test point. Spring
provides a secure connection.
Many times during the course of a day's activities at the bench, the need for a third hand, or even a longer arm, arises when trying to hold a meter probe in place, while trying to watch the scope or picture and manipulating controls all at the same time. When monitoring a circuit for any length of time, it is not feasible to have a man at the set just to hold a probe in place. There are many gadgets and adapters on the market that can be slipped over the probe end to form some kind of clamping arrangement. I have found a convenient way to quickly modify my various instrument probe tips, so that they will latch on to a test point easily and fit into tight spots. Simply saw or file a small diagonal cut near the end of the tip as shown.
The inside upper part of the slot can be beveled to form a knife-like edge to assure good electrical contact.
It is also possible to wrap a piece of small diameter music wire or other spring-like wire over the tip, so as to form a compression spring.
The length of the spring is made to run almost the entire length of the tip. A small piece of spaghetti can be slipped over the tip to minimize accidental shorts. To use the probe, rest the top edge of the spring on the test point with the slot facing the connecting point, press gently and latch into place. To remove press gently and rotate probe.
Tight Alignment Cores
On alignment jobs, the service technician is often confronted with threaded alignment cores which just won't be budged by ordinary insulated (plastic or fiber) alignment tools.
Sometimes the tool is broken when adjustment is attempted.
If it is possible, remove the core with some tool capable of turning it, and sprinkle a little talcum powder on the core. If it is not possible to remove it, try turning it in a few turns. Then put a little talcum powder inside the coil form. The core can now be backed out until it collects a coat of talc on its threads.
This will generally make the core easy to turn with a regular aligning tool.
A word of warning: never use oil or graphite as a substitute for talcum powder in this application. Oil will swell the coil form and may also develop voltage leakage in the coil or associated parts. Graphite will most assuredly develop such leakage. While the measure recommended here is particularly pertinent to cores in I-F coils, it is also useful on other types, including the cores used in auto-radio tuning mechanisms.
Replacement Knob Springs
The springs out of push-on type knobs, like those found in so many radios, are lost easily and often. It is not always easy to procure new knobs that match up with the old ones. In any case, this means that valuable time must be wasted in going to the stock room or the parts supplier; even then, the trip may be fruitless.
Avoid these difficulties by keeping a steel tape on the bench at all times. From this you can, with tin snips, cut out a new spring in a minute, and you can cut it to fit any size knob, as shown in the accompanying figure. These steel tapes, inexpensively available in "dime stores," can save many times their cost by saving time used finding lost springs or going for new ones.
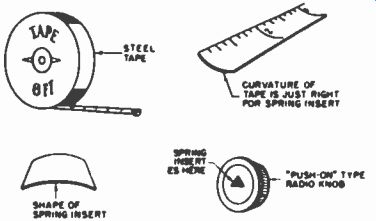
---- Knob springs can be mode up from steel tope
Another valuable use for these home-made steel-tape springs is to tighten push-on knobs which, although retaining the original spring, have become loose on the shaft. To tighten the knob, just put an extra spring insert under the original spring still in the knob. When this is done, the new spring will stay in place securely and hold the knob fast.
Pilot Bulb Removal
Extracting hard-to-reach pilot lamps, particularly those recessed in panels, is easier than it looks. Simply push a short piece of rubber tubing over the bulb. Choose tubing of such a diameter that it makes a snug fit over the bulb. The latter may then be manipulated out of its socket easily.
Anti-Fuse Fumbler
Don't blow your fuse while searching your tube caddy for the correct size circuit protector. Remove the fuses, slide the cover from the box, punch or drill 2 small holes in the bottom, and attach these boxes to the plywood lid, as illustrated. Use small 0.5 inch wood screws. Replace covers and fuses. The fuse size and type can be marked on the top of each box.
This idea can also be used on those tube caddies not equipped with lids over the tube compartment. Often in those boxes that do not have covers the tubes shift from one side to the other, and fall out as the box is opened. A 1/4 inch plywood board can be made to cover these tubes and the fuse boxes fastened to this board. This cover may be friction fitted or hinged -Ed.
----- Fuse rack.
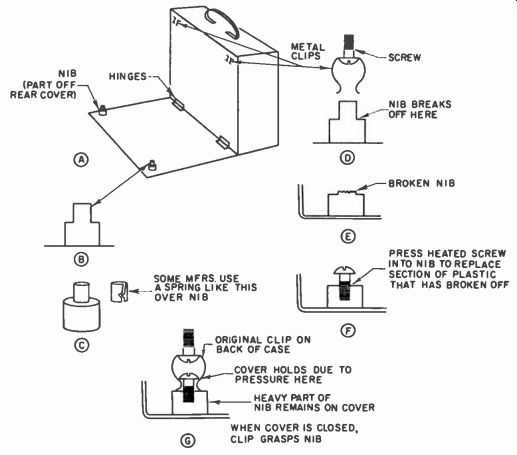
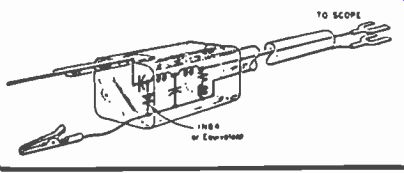
-------- A-Rough sketch showing relative positions of nibs and clips
used at the backs of some portables. B-How the nib looks. C-Another type of
nib. D-Clip slides over nib, normally. E-Appearance of nib when its upper portion
has broken off. F-Screw substitutes for missing nib section. O-Clip fastens
on screw. Drawings shown above are not drawn to scale.
Cover Repair on Portables
The small plastic studs on the rear covers of some portables, which normally snap into the back of the receiver, often break off readily, allowing the cover to flop open. The normal snap-in arrangement is shown in sketch A; sketch E shows part of the cover with the stud broken off. The broken stud may be replaced by heating a round-head screw of the right size (%2 or %a, as required) and pushing it down the required depth into the plastic stud base with a hot soldering iron (see sketch F). This will effect a permanent repair. Having a small wet rag handy to cool off the metal will allow the plastic to set in less than 10 seconds.
Third Hand Again
The often-needed third hand on the service bench in the shop can easily be provided by an ordinary rubber band, if it is used in the right way. Simply wrap the rubber band tightly around the handles of a pair of long-nose pliers. It's surprising how much grip you can get to hold parts together because of the lever action that results, while both hands are free to hold solder and iron, or to manipulate other equipment.
Simple Cabinet Repair
A neat, quick, long-lasting repair of a broken plastic cabinet can be made by using the method shown in the accompanying drawing. All that is needed is a piece of looped rope, two dowel sticks and some household cement. First fill the cracks with cement. Then loop the cabinet with the rope, and twist one of the inserted dowel sticks toward you, the other one away from you. Place the cabinet on a table and let the cement dry for at least 24 hours.
A strong bond is made because considerable pressure is exerted by the twisted rope. This method is more satisfactory than the use of clamps. Wipe away excess cement before it starts to "set" or dry. In this way, no evidence of the crack or of the repair can be seen afterwards.
In putting the cabinet aside to dry, it will be found helpful to place the chassis back in the cabinet. The weight of the chassis will hold the unit down. The twisting action of the sticks in opposite directions will now lock the rope and keep it taut. With this method, I have repaired cabinets broken into as many as four different pieces.
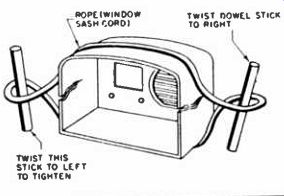
----- Simple 'vise' facilitates cabinet repairs.
------p82
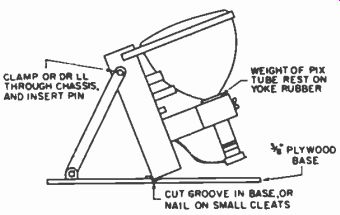
Jig for Large TV Chassis
The illustrated jig, which can he made up from a section of 3/8-in. plywood and a few simple, easily available parts, provides a means for safely handling that bulky TV chassis. Sideward movement of the chassis, with resultant strain on the neck of the picture tube, is avoided; otherwise, the entire set-up can easily be rotated or moved around on the bench. When using this mount, details of which are shown in the accompanying sketch, some care may be necessary to prevent damage to the neck of the picture tube. Since the neck often projects beyond the back of the chassis, the mount must be adjusted so that the base of the CRT does not contact the mounting board.
Convenient Probing Lamp
I find frequent need for using a pen-light in my bench work, but I have discovered that the life span of the tiny pen-light batteries is too short when the light is used fairly steadily. To solve this problem, I have eliminated the battery by running two leads from the pen-light and connecting the leads to a suitable voltage source. (I use the filament connections on a tube tester socket.) This provides a steady source of current without the nuisance of frequent battery replacement.
Handy Capacity Probe
A capacity probe is nothing more than a capacitor in series with a piece of wire, yet it can be of great help to the technician who has to troubleshoot a set in a hurry and without test equipment. Either the signal-injection or signal-tracing procedure can be used. For signal injection, one end of the probe can be attached to a 6.3-volt AC filament line; the other end can go from point-to-point injecting the 60-cycle signal. In the audio circuits hum will be heard; in the video circuits, it will show up as light and dark areas on the CRT; and in the vertical sweep circuits it can open up a completely collapsed raster when the oscillator is not functioning. As a signal tracer, one end of the probe can be connected to the top of the volume control and the sets audio system used as an indicator. Sync pulses and other signals can also be tracked from point-to-point.
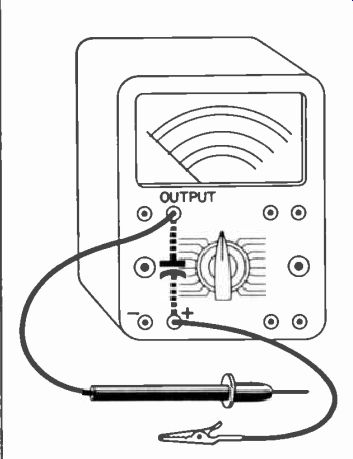
----------- VOM's leads and internal capacitor serve as a handy capacity
probe for troubleshooting.
Most VOM's have a jack marked output. It is used to extend the usefulness of the AC voltage ranges. An internal isolating capacitor in series with this jack prevents d-c voltages from affecting the AC voltage readings. By connecting one lead to the output jack, and the other lead to the hot (sometimes designated as positive) jack, the meter's internal capacitor is placed in series with the two leads. This arrangement can be used as a capacitor probe.
The advantage being that no extra leads or capacitors are required for this setup. Because the meter itself is not in the circuit there is no need to consider voltage range settings. Of course, the capacitor's voltage rating should not be exceeded.
Fastening Ladders
We save a lot of time in our antenna service work by fastening our ladders to the roof of our trucks with two pieces of chain and a tension. spring. This makes a speedy job of putting them on or taking them off without the necessity of tying or untying ropes. If springs of sufficient tension are used, the ladders will be secure on short or long trips and rattling is prevented. Hooks are used at either end of the chain. One connects to a ladder rung, the other to the truck bumper.
A Musical Slant
A handy accessory that we have been using around the shop for the past two years is an ordinary music stand. We use it as a stand for holding circuit diagrams. It helps provide more bench elbow room; it can be adjusted to a comfortable viewing level; and it is light enough to be moved out of the way without difficulty when it is not in use.
--------
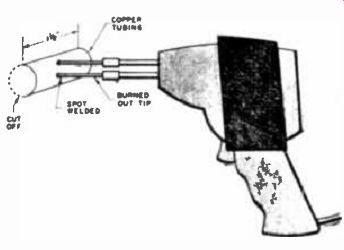
Heat for Intermittents
When heat is applied to a chassis, as with a lamp, to make an intermittent component break down, there is always the danger of damaging other parts. However, there is a way to concentrate heat on individual suspected components.
We took a burned out tip from a soldering gun and spot welded to it a half shell made from a length of 3/4-in. copper tubing. The length of tubing used was 1 1/2 in. The accompanying figure shows the completed job, with the tip replaced in the soldering gun. Different sizes and lengths of tubing can be made up on different tips, as required.
When using this device to concentrate heat on a suspected component, note that even a good part will break down if heat is applied too long.
Only a few seconds are necessary if the component is intermittent to start out with.
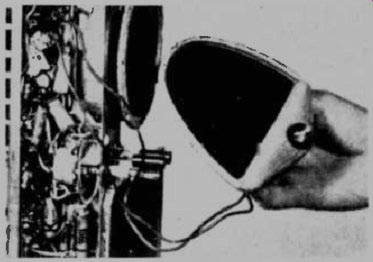
Mirror-Lamp as Service Aid
Certain cars come equipped with a mirror (see photo); similar mirrors can be purchased at supply stores. It is only necessary to equip the mirror socket with a dial lamp of suitable voltage rating, and to clip the lamp's leads to that voltage source, to have a mirror for checking the values of parts. The voltage source may be in the receiver under examination. The mirror alone is convenient in making TV receiver adjustments.
---------
-------------
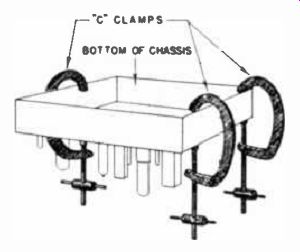
Chassis Supports
Large C clamps make ideal chassis supports. They take up little room, adjust to many sizes of chassis, are inexpensive, and they may often be used where other chassis supports cannot be employed. Much time can be saved by their use, and needless damage avoided.
--------- Easily made shorting bar for jumping fuses.
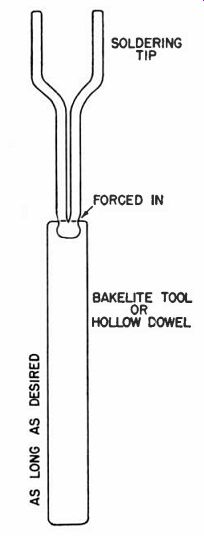
Handy H-V Jumper
When checking the horizontal output and high voltage circuits in a TV set where the fuse has blown, the tool illustrated here makes a handy jumper device for momentary shorting of the fuse-holder terminals. While prolonged jumping of the fuse terminals may cause damage in a defective circuit, it is often advantageous to short out the fuse temporarily to make observations. For example, arcing may thus become evident in one of the tubes or elsewhere in the circuit, which will aid in localizing the defect. With the prods of this tool shorting the fuse holder, the tool can be pulled away quickly at the first sign of trouble.
The shorting bar can be made up easily. The one shown was made from a Type 7300 Weller soldering-gun tip, used for older model Weller guns. Other similar types will serve as well. The tip is forced into the shaft of a hollow alignment tool, as illustrated, or into a hollow dowel stick. A tool of any length may be used, but about 6 to 8 in. is enough to reach almost any fuse location conveniently. The open ends of the soldering tip may then be spaced to fit across any fuse holder.
Work Bench Mobility
Instead of having conventional 8-ft. long work benches in the shop, which are generally fixed in place, we use smaller tables of such a size that three of them side-by-side replace one shop bench. When they are pushed together, we have the equivalent of our old repair table back. However, they allow added flexibility.
Each of the smaller tables is on casters. On the bottom of each is a shelf to hold the cabinet of the TV receiver under repair. If the set has to wait for a replacement part or if it is under prolonged test (as in tracing an intermittent), the table and set are simply pulled away and put aside. Another repair table bearing another repair job is put in the vacant spot.
Another refinement may be added to each table. Atop of each is a plywood panel large enough to hold the set under repair. The plywood top rotates on the regular table top by means of small furniture casters of the flat type. The casters have been countersunk into the table top so that the wheels project upward. The plywood rolls around on these casters, carrying the receiver with it.
This minimizes lifting and twisting of the set.
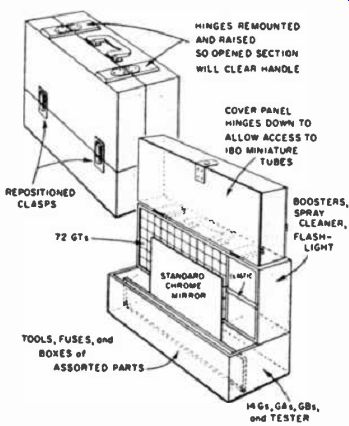
--------- Caddy opens up instead of out when hinges and clasps are moved,
saving floor space
Caddy Conversion
The usual tube caddy may take up too much room when opened. One way to solve this problem is to convert it to open vertically, instead of horizontally. To do this, remove the clasps from the top and the hinges from the smaller side. Mount the hinges on the top, built up by wood strips in order to clear the handle.
Mount the clasps on the side where the hinges have been removed. Add or remove partitions as desired: To prevent the tubes from falling when one is removed, use metal strips between rows. The converted caddy shown takes up no more floor space open than when closed. It is a good idea when using the converted caddy--with its higher center of gravity to place its back against something to prevent it from being knocked over.
Click Probe
A click probe can be quickly assembled, as illustrated, and used to determine a break in the signal path. Connect a 12,000 to 15,000 ohm resistor to the positive side of the battery (may or may not be ground) and touch the free end of the resistor to the transistor terminals, starting with the output stage, and working back. Listen for clicks in the speaker.
The absence of clicks will indicate a break in the signal path. Once the defective stage has been isolated, it becomes a fairly simple matter to find the bad component.
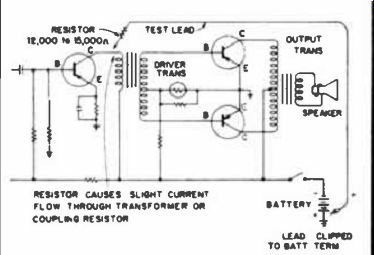
-------- Quickly improvised click probe helps isolate a defective stage
in a transistor radio.
Shock Hazard
When bench servicing a TV chassis where only the CRT remains in the cabinet there is always the danger of shock from the joint of the H.V. extension wire and the short lead from the chassis. I have a 12" length of 1" O.D. polystyrene tubing that slides over this joint and is kept in place with a piece of scotch tape at one end. This does away with any chance of a short or shock. Any type of insulated tubing will do, as long as it will not breakdown under high voltage.
Screw Replacement Trick
Replacing screws in hard-to-reach places on the chassis usually takes a great deal of time and patience.
One way to save on both is simply to scrape a little wax from a paper condenser in the set itself. The wax is pushed into the slot of the screw, and the screwdriver is then inserted in the slot. This fastens the driver and the screw to each other very well, and makes it simple to guide the screw into its proper place without losing it.
A similar trick works just as well on a hex-head screw as it does on slotted-head screws. Put a little wax along the outer edge of the head before slipping it into a spin wrench.
The screw, which is now prevented from dropping out of the wrench, is easily maneuvered into its hole.
Cleaning Aid
A handy gadget for oiling or for cleaning controls and other parts may be obtained free of charge from any doctor. It is an empty, discarded penicillin shot syringe. It comes complete with a needle that can be inserted into very small holes and cracks. Since the plunger has very strong suction, the syringe can easily be filled by inserting the needle into the liquid to be used and drawing the fluid up. Since the syringe is made of plastic, danger of shock during use is avoided.
Auxiliary H-V Supply
If you ever come across an old TV receiver with an r-f high-voltage power supply, taken in trade or procured any other way, don't scrap it altogether. I salvaged such an r-f supply from an old Du Mont taken in trade. It's worth its weight in gold for localizing high-voltage and horizontal-deflection troubles. When horizontal troubles occur, you generally lose the high voltage too. Consequently, you lose the service of the quickest indicator you have, the picture tube itself. Substituting the 10-kv r-f supply for the one in the receiver puts the tube back in business, and gives clues as to where the trouble may lie. With the picture far off sync, for example, horizontal oscillator or afc faults are indicated; inadequate width points to the output or flyback portions; a trapezoidal raster throws suspicion on the yoke; and a vertical-line raster directs attention to the flyback transformer or yoke.
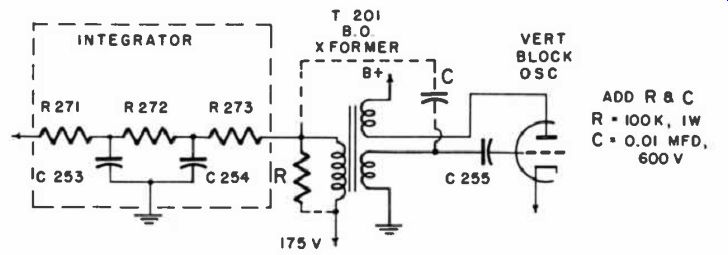
------ f defective, the primary of this blocking-oscillator transformer
need not be replaced.
Safety Glass Removal
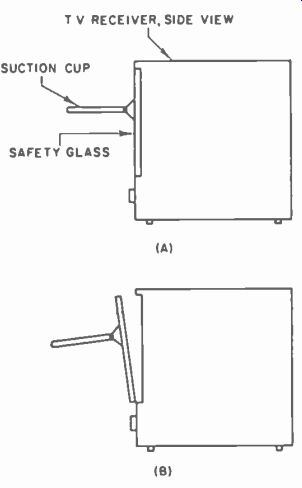
---------- Simple method for removing CRT safety glass.
If you have ever had to take out a safety glass to clean a dirty picture tube, and found to your horror you had chipped or broken the glass with a screw-driver, you will appreciate this time and money saver.
I use a suction-cup dart from a child's toy gun. Simply moisten the rubber (after removing screws which hold the glass) and press the cup onto the top center of the glass (see illustration). Pull outward, at the same time holding the bottom of the glass with your free hand.
Note: This works equally well with safety glasses that swing out from the bottom. On these press the rubber onto the bottom center, and hold the top with the free hand, pulling outward on the suction cup.
Small Parts Storage
It has always been a problem to keep small hardware easily accessible, especially hardware used for antenna installation and service.
This problem can be solved simply with an old apple crate, which can be obtained from any grocer. Cut the sides of the box down to leave a depth of 7 in.; then insert 11 large fruit juice cans (the 1-qt., 14-oz. variety), as shown in the illustration.
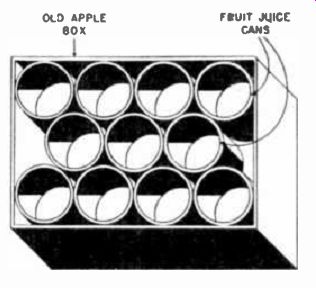
------- Small parts can be stored in cheaply made bin.
The cans will just fit snugly. I constructed two of these bins. For the small amount of time and effort required to make them, I have saved many, many hours of searching for lag screws, antenna lugs, U-bolts, stand-offs, turnbuckles, lightning arresters, tacks, etc. You can also tell at a glance when you are running low on any item.
Dial Stringing Shortcut
To replace hard-to-get-at dial strings, tie the new cable to one broken end of the old string; then pull the other end of the old cable through and out of the assembly.
The new string will thread through, following the old one. This time saver can be used on many sets.
Home-made Grommets
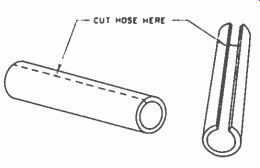
We keep a length of auto windshield-wiper hose in the shop, to bush odd-sized or odd-shaped holes in all sorts of chassis and appliances.
Suitable grommets are readily made to fit any shape of opening by cutting off the proper length of wiper hose, splitting it open (as shown in sketch A), applying cement to the cut edges, and curling the hose into shape (as at B) so that it can be put snugly into place to line the hole.
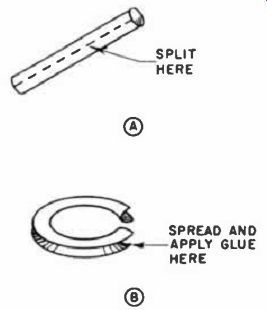
------ Windshield wiper hose is source for grommets.
Extra Duty for H-V Aids
Accessories used in service work on high-voltage circuits can be employed for other unheralded jobs, in many cases. Anti-corona "dope," for example, makes an excellent replacement for the cement used in making speaker cone repairs. In fact, it does a much neater and more thorough job than regular speaker cone cement. Even when used with tissue paper patches, the black corona dope, heavy and undiluted though it is, sets evenly and smoothly.
High-voltage tape also has applications for which it was not originally intended. When wound around the base of a picture tube, it prevents the base from pulling out. It can also be wound around the neck of the picture tube at the point where the flare of the pix-tube bell begins. This protects the yoke windings whenever pix tube removal is necessary. The latter function is very important because, in many sets, the clearance between the neck of the tube and the yoke is very, very small.
Spill Insurance
When using a bottle of cement, soldering acid, contact cleaner or other fluid on the bench, there is always the danger of accidentally spilling the contents in the normal course of service work. An ordinary spool of solder wire provides excellent protection against such a possibility. Simply stand the spool on end beside the bottle being used and twist a turn of the solder around the bottle, as shown in the accompanying sketch.
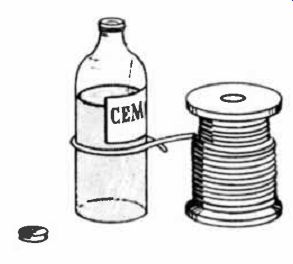
--------- No accidental swilling with this holder.
Hand-Made Springs
Handy springs of various diameters and lengths can be made uniformly and quickly to fit most jobs by winding any type of spring wire along the threads of any standard bolt. Start the winding at the tip of the bolt and work toward the head.
After the desired number of turns is wound on, turn the bolt counterclockwise. Your spring then winds off in finished form. This method is handy for fabricating dial or record-changer springs.
Auxiliary Power Supply
An external power supply can often be used to track down leaks and short circuits in TV and radio B+ supply lines, especially when seleniums and fuses are used and are bound to "pop." Disconnect the B+ lead from the cathode of the rectifier and connect the auxiliary power supply, observing proper polarity. Note, just before connecting the external supply, with the load disconnected, it is possible to plug in the set to check the transformer or selenium rectifier and other primary circuit components. Having ascertained that the trouble exists elsewhere, then proceed. The voltage should be monitored. The safest way to conduct this test without causing undue damage is to connect one lead at a time until an unusual voltage drop occurs. Tracing out the line that is causing this drop, will lead to the defective component.
Since there is no filament voltage supplied, the tubes are not conducting. There are times when excessive voltage drop occurs across a power amplifier tube due to an upset in grid bias, or a shorted tube. Unfortunately this substitute power supply will not help in such a situation. However it is still worthwhile having. It can be constructed from "junk-box" parts. A professional looking piece of equipment, with meters, may be obtained from the test instrument manufacturers.
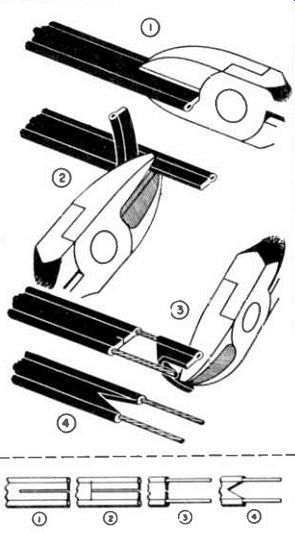
---------- Diagonals used to strip transmission line.
Stripping Flat Transmission Line
All that is needed for a neat and efficient stripping job on flat transmission line, without nicking a few strands of wire, is a pair of side-cutters. Cut the insulation down the center. At the end of the slot thus formed cut .2 right angles, one to the right, and one to the left, as close the wires as possible, without cutting into them. Grasp the tabs, thus formed, with the cutters, one at a time, and peel back towards the open end. Trim to shape.
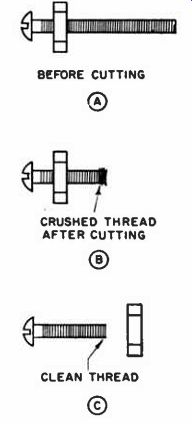
Tip on Cutting Screws
When a hacksaw is used to reduce the length of a screw to the size desired for a particular job, the starting thread left after cutting is frequently so badly jammed that a nut cannot be threaded on. To prevent this, thread a nut of the right size on the screw before cutting, as shown in A. After cutting, when the starting thread has been crushed by the hacksaw blade (see B), the nut is simply threaded off the screw. In coming off, the nut will clean the thread, as shown in C.
----------
3rd Hand for 1-Man Jobs
A third hand for soldering is available in the form of surgical locking forceps. Such a pair of forceps is shaped like a pair of scissors and has the advantage that it may be locked in position. In addition, the use of these forceps in such operations as stringing dial cords, holding springs in position, and in reaching and picking up small objects or wires at the bottom of a crowded chassis, make them invaluable.
These surgical locking forceps should not be difficult to procure.
They can often be found at surplus stores. Old ones can be obtained from a local hospital. While such old ones may no longer be useful for clamping arteries or the other critical requirements of the hospital's operating room, they will still work fine on wires and other components for which the technician will want to use them.
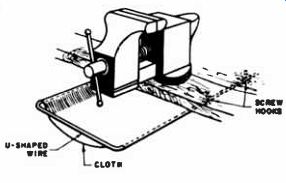
---------- Net under bench vise catches falling parts.
Vise Net Catches Parts
When parts are worked in a vise on the bench, there is often trouble because small parts fall from the vise to the floor of the shop. This can be avoided by the use of a simple cloth net, supported on a wire frame, placed right underneath the vise below the bench top. The frame is made of stiff wire bent into an approximate U shape, as shown in the illustration. The frame slides in and out of screw eyes or hooks, so that the net can be removed when needed. The edges of the cloth may be hemmed to fit over the wire, or held in place with safety pins.
Self-tapping Screw Holes
Whenever making chassis mounts that require the use of sheet-metal (self-tapping) screws, punch the holes instead of drilling them. Drilling leaves a clean hole with a regular surface. However, the uneven surface left around the hole by punching is more desirable. There is more surface for the screw to cut into in making a grip for itself.
Also, the slight hump caused by the punch will pull tighter against the screw.
---------- Probe clips for use in high-frequency tests.
Low-Cap Probe Clips
When testing with crystal probes in high-frequency circuits-about the only place these probes are used--tests should be made with the probe in relatively permanent contact with the circuit element. This is advisable to keep the hand, arm, body, etc. away from the tested circuit. Enough stray variation occurs from the very presence of the probe case and leads without adding any additional variation due to hand capacity.
To accomplish this type of connection for relatively low-frequency circuits, such as in the video amplifier of a TV set for setting 4.5-mc traps and the like, the hot probe tip may have an alligator clip slipped on it as is shown in photo A. If the probe tip does not fit tightly into the end of the clip, crimp the round end of the clip to make a tight fit. For higher frequencies, such as in the I-F system, where even the additional capacity of an alligator clip may present a problem, a small paper clip may be used to make the connection. It is bent into the shape shown in photo B and slipped on the probe tip. The probe can be attached to circuit elements easily with this device.
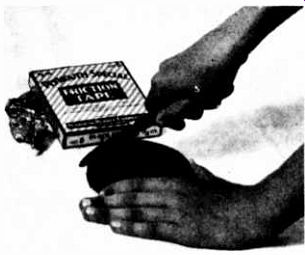
--------- Prevent tape fraying by scoring the roll.
Stop Tape Fraying
Before starting a roll of friction tape, use a knife to draw Criss-crossing lines across both faces of the roll. These shallow scorings will prevent fraying of the tape along the edges, which can be very annoying when pieces are torn off the roll.
Wire Fed Through Wall
Did you ever have to run a flat lead through a hole in a wall in which a round lead was already installed? If you have, you know how difficult and tedious a job it can be. However, with a little ingenuity it becomes a snap. All you have to do is pull the round lead out of the wall by a certain amount. It should be pulled back by at least the width of the wall you wish to go through.
Then, using plastic tape, tape the flat lead tightly parallel to the round lead. If you have made a good bind--not too bulky-the additional lead can be pulled through the wall with the original wire with no trouble at all.
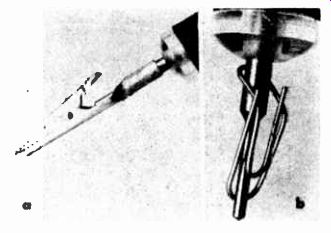
Wire Stripper
Because the tip of a soldering gun heats and cools quickly, it is quite feasible to have several attachments available which can slip on and off easily and which can often be improvised on the spot. Many different shapes and sizes of tips may be fashioned for close work, heat sensitive areas, and components with many terminals, which have to be unsoldered simultaneously.
Here is another gismo to remove that touch insulation on plastic-covered hook-up wire. Cut and bend a piece of copper as shown and slip over the tip of the soldering gun. If the V cut is sharpened a bit it can be used to clean the wire after removing the insulation. Apply to insulation, work around a bit and pull-presto, clean, neat stripped wire-ready to solder.
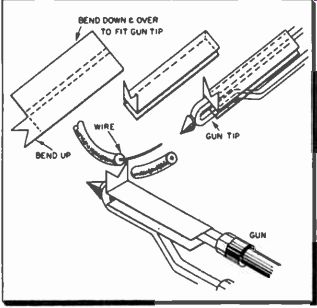
------ Solder gun attachment strips wire neatly.
------- Crystal detector probe from salvaged set.
Salvaged Detector
An excellent crystal detector probe for signal tracing and observing waveforms in the I-F strip of a TV set can be made from a scrapped chassis. Any set having a crystal detector will do. Remove the detector circuit complete with can, coils, resistor, capacitor and crystal diode.
Use a good quality coaxial lead from the can to the scope. The leads from the probe head to the set should he as short as possible to avoid stray pickup. Use proper terminals to fit your scope. An alligator clip should be used on the ground lead and for convenience may also be used on the probe end. The can and probe tip can be mounted on a small board and handled as a unit. You may he able to construct an insulated probe tip right on the can itself.
Installing Nuts and Washers in Inaccessible Places
Cramped fingers and frayed tempers can be avoided when installing nuts, washers, spacers, etc., on bolts in inaccessible places. Slip the nut and washers over a rod, stiff wire, or ice pick, in the proper sequence.
Hold the small parts high on the rod with a finger, and place on the bolt. Allow the parts to slide down the shaft, one at a time, and if necessary dress the rod slightly so that the washer fits on the bolt properly.
When the nut is dropped it can also be aligned in this manner, while another rod or screwdriver is used to turn the nut enough to catch a thread or two. The rods can then be removed, and a spinner wrench can finish the job.
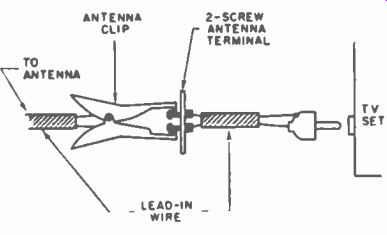
Antenna Link for Bench Use
Here is a time-saving hook-up I made for my TV service department.
Many service shops are using antenna clips at the end of the transmission line coming from the shop's antenna. This is of no use with sets that have an RCA-type female receptacle going to the tuner input. I use the connection link illustrated to provide a convenient means of hooking up the transmission line to the set.
Chassis Blower-Cleaner
An inexpensive garden plant duster may be changed easily to provide a source of air for blowing dust from radio, TV and other chassis. It is only necessary to remove that section of the duster which ordinarily holds some form of insecticide. It may also be necessary to solder up the small hole to which this container section was attached; the full force of the expelled air will now be directed from the front opening.
------ Garden sprayer altered to air-clean chassis.