AMAZON multi-meters discounts AMAZON oscilloscope discounts
A speaker that has good tonal balance in one room may sound too bassy and hard in a second room and either shrill or muffled in a third location. These apparent changes in sound character occur because of different acoustic conditions in the various rooms. A room with a thick carpet, overstuffed furniture and heavy drapes can absorb much more mid and high frequency energy than one with a tile or hardwood floor, large uncovered glass areas and unpadded furniture.
The ideal listening room will have some absorptive surfaces, but if too much area consists of soft surfaces, the ratio of direct to reflected sound will be increased to an unnatural degree. This can make the highs harder to take even though the high frequency tones may be reduced in output level. A hard room increases the apparent mid-range response, bringing voices and some instruments for ward so they dominate the sound. Some of these effects can be countered by judicious use of the mid-range and tweeter controls.
If you are using a full-range single-cone speaker, you can often improve its sound by use of a contour network, such as those described in Section 7. Regardless of the kind of speaker, you can use a sound level meter and a graphic equalizer, as described in Section 9, to correct for bad room acoustics.
There is no way to predict with certainty how any set of speakers will perform in a specific location, but you can put the odds in your favor by systematically considering how you will use your speakers before you choose them. And, after making the choice, there are ways to insure that you get the best possible performance from those speakers.
CHOOSING A SPEAKER
To pick the right speaker you must consider the other components you will use, the kind of music you like, the number of speakers you intend to employ, and the kind of room you will put them in, but not necessarily in that order. To narrow the choice, first decide the size of speaker system that will be appropriate.
Then consider the other characteristics.
SIZE of SPEAKER vs. SIZE of ROOM
The rule on choice of speaker size is to keep things in proper scale. You obviously wouldn't want to try to fill a gymnasium with sound from a pair of mini-speakers. Nor would you try to put a couple of large floor models in a van. But many audio fans make the mistake of choosing a speaker size that is inappropriate for the job it must do. How can you judge the proper size? Fortunately there is a rule of thumb that works well. If the proportions of speaker size to room size look right, they are probably right acoustically. To test your initial ideas, make up a mock speaker by cutting and taping together some pieces of shipping cartons. If the carton appears to be lost among the rest of the furniture, it is probably below optimum size for the room. If it overpowers everything around it, it's probably larger than necessary. But if you can arrange the carton so it fits nicely into your room and with the other furniture, chances are that you've found the right size of speaker for satisfactory bass reproduction without wasting space.
If this method of choosing optimum speaker size seems mystical, it really isn't. It is based on the fact that large rooms require much greater low frequency power output than small rooms. Large speaker systems have larger woofers that can pump out a higher level of bass response without distortion. No quick rule of thumb is 100% infallible, but this one will work in most situations. It can be modified by the kind of music you favor.
MUSICAL TASTES
Almost any size of speaker can reproduce the tonal range and volume of a string quartet or supply easy listening background music, but a rock group or a symphony orchestra played back at high sound levels requires more output power than a small woofer can produce. If you like your music really loud, you probably need a speaker with a woofer that is 10" or 12" in diameter. The tonal range of rock music can be easily handled by a smaller woofer, but not at high sound intensity levels.
USING YOUR SPEAKERS
Even if you choose speakers that are adequate for the job, you can be disappointed in their sound. There are several aspects of the problem of optimum use, but first make sure that your speakers are properly installed. Careless wiring can degrade the sound of any speaker system; even worse, it can damage your receiver. The first rule on installing speakers is to make sure the power is turned off on your receiver or amplifier while you are working with speaker connections.
KIND OF WIRE
Ordinary lamp cord with #18 gauge conductors is a good choice for most speaker systems. If you have long runs, more than 30 feet from receiver to speakers, get a cable with #16 gauge conductors, such as Radio Shack Cat. No. 278-1384.
If you must run a speaker cable under a rug, you can use flat television lead-in wire. Check the gauge of available twin-lead and get the one with the heaviest conductor, or lowest gauge number. Try to avoid long runs with this kind of wire.
TERMINALS
If your receiver has speaker terminals with an adjustable screw to clamp the conductor, it's a good idea to install spade lugs on your speaker cables. Choose a spade lug to match the size of screws on the receiver. If you don't have any spade lugs that fit, you can make a "j" hook at the end of the wire. Strip off about W* of insulation from the end of the wire by cutting the insulation with a knife. If you slant the knife cut, as if you were sharpening a pencil, you will be less likely to cut the wire itself. To prevent a cable break, inspect the bared wire carefully for cut strands. This is especially important for cables inside the speaker enclosure where a failure will require major surgery to repair. Twist the strands together and tin the wire with rosin-core solder. This will prevent any splayed filaments that can short out your receiver. Form the soldered wire into a hook so it will wrap around the terminal screw without extending toward the adjacent terminal. For speaker systems with push-type quick hook-up terminals, prepare the cable the same way but without the hook.
Make sure the terminals are kept free of corrosion or any foreign material that can add resistance and degrade speaker performance.
HOW TO SOLDER
If a connection is to be soldered, use rosin-core solder. Never use acid-core with electronic equipment, and never let anyone use your electronics soldering tool with acid-core solder unless you plan to install a new tip.
Keep your soldering tools clean and tinned. A dirty tip conducts heat poorly, making bad joints. If the tip is dirty, use a piece of sandpaper to remove the metallic oxide; then heat the tip and rub solder over it until it is coated.
To solder a connection, first make a secure mechanical joint by threading the wire through the terminal and bending it tightly against the metal. Heat your iron, or gun, and hold the tip next to the joint. Stick some solder in the junction of the tip and the joint to improve heat conduction from tip to joint. Then apply the solder to the side of the joint opposite from the iron. Hold the iron and solder in position until the solder flows freely through the joint. When you remove the iron, the joint should be smooth and shiny.
In wiring your speakers, don't forget to observe polarity. If you fail to wire a pair of speakers correctly, bass performance and the stereo image will suffer. Or if you don't observe polarity when wiring the crossover network, there will be dips in the response curve. To test your system, refer to the tests in Section 9.
SPEAKER PLACEMENT IN THE ROOM
The most important rule on finding optimum room placement is to experiment. Sometimes even a minor change in position can make a big difference in listening quality.
Try to install the speakers with the drivers, most importantly the tweeters, near ear level. There is usually no problem in doing this with miniature shelf speakers or with large floor models, but with some in-between size speakers you must give more attention to proper placement. When such speakers are set on the floor against a wall, much of the treble is lost, and the bass often becomes too heavy. In such cases you can make a big improvement by putting the speakers on small stands. To find the optimum height, try stacking some large books or other support under the cabinets until the sound is right. Then buy or build a stand that will provide the required elevation. If you build one, make the front ...
Fig. 8-1 . A speaker stand for enclosures of intermediate size raises and
tilts the speaker, giving improved treble distribution.
... edge slightly higher than the rear so the tweeters will be tipped upward. About 5 to 7 degrees is right for most rooms (Fig. 8-1).
Another precaution, make sure that the sound isn't blocked by bulky pieces of furniture. Again it is the treble that is most susceptible to problems of this kind; bass is much less directional.
The best places in your room for a good frequency response may not always be the best choice for the stereo image. As you know, for good stereo, the left and right channel speakers must have distance between them. The correct distance depends on the size of the room and how far you sit from the speakers. A plan of your listening room as seen from above should show the left and right channel speakers making an isosceles triangle with the listeners' chairs. The base of that triangle, the side with the speakers at each end, should not be the longest side. If furniture arrangement dictates a wide base, try angling the speakers inward, to fire at the listeners' chairs.
CABINET ORIENTATION
In the early days of stereo most compact speaker enclosures were made to be installed on tables or shelves with the long dimension horizontal. Today's speaker enclosures almost invariably are seen with the long dimension in the vertical plane (Fig. 8-2). This is not just a matter of fashion, but of good sound. No matter what kind of crossover network is used, there will be some overlap near the crossover frequency where the woofer and tweeter will produce the same frequency band. If there is a horizontal distance between two drivers that are producing the same frequencies, the path length of the sound from each driver to most listeners will be different (Fig. 8-3). This difference in path length causes phase shift which in turn introduces dips and peaks in the response curve.
Purists insist that the finest stereo reproduction can be achieved by keeping the line that passes through the woofer, mid-range and tweeter at a 90° angle to the line which extends from the speaker to the listeners. This is one reason for tilting low floor speakers upward. It follows from this rule that speakers placed near the ceiling should be aimed slightly downward.
PROTECTING YOUR SPEAKERS
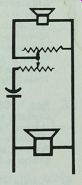
If you are worried about blowing your speakers by driving them too hard, you can insert a fuse in series with each speaker system for protection. The fuse may alter the tonal response slightly by adding resistance. More resistance means a higher Q, or less damping on the woofer at resonance. The best way to decide whether this is good, bad, or irrelevant, is to try it.
To fuse the speakers, install a fuse holder on the back of the enclosure. Wire the fuse holder in series with one of the speaker leads. Table 8-1 shows some practical values for fuses to use with speakers of various power ratings.
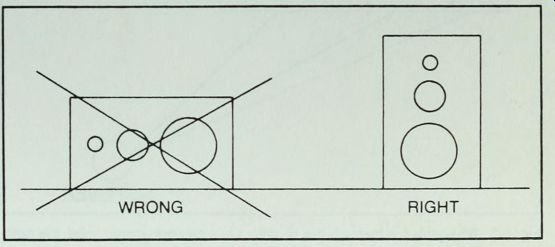
Fig. 8-2. Where possible, cabinet should be oriented so speakers form a vertical
line.
If you have trouble with blown tweeters, the problem may be in your amplifier. Tweeters have more limited power handling ability than other drivers, but in the normal power distribution of music, they cause no trouble. An amplifier that clips when overdriven can destroy your tweeters even if the amplifier has a lower rated power output than the rated power of your speaker system. It does that by adding harmonics at frequencies that are multiples of the fundamental frequency. This adds power to the tweeter circuit at levels that didn't exist in the original signal. To protect your tweeters you can install Radio Shack's new dynamic protectors, Cat. No. 40-301. These protectors prevent damage to tweeters by amplifier spiking with virtually no effect on sound quality.
EXTENSION SPEAKERS
When you connect an extra set of speakers to your receiver and switch in both pairs, the second speakers appear in parallel with the main speakers. Assuming that each speaker is an 8-ohm speaker, the final impedance to the amplifier will be 4 ohms. These figures are only approximate because the impedance of all speakers vary with frequency. A problem arises when more than one 4-ohm speaker or a 4-ohm speaker and an 8-ohm speaker are operated simultaneously in the same channel. Two 4-ohm speakers in parallel give a net impedance of 2 ohms. Or a 4-ohm speaker plus an 8-ohm speaker in parallel gives 2.7 ohms. Any value below about 3 ohms can permit too much current flow in the output stage of a solid state receiver or amplifier.
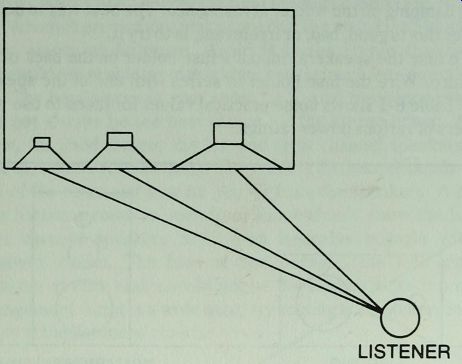
Fig. 8-3. When the line through the speakers in a cabinet is horizontal, the
path length for the sound from each speaker to an off axis listener is different,
causing phase distortion.
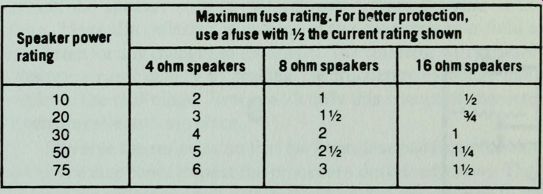
Table 8-1. Suggested Maximum Fuse Sizes for Various Speakers. Speaker power
rating; Maximum fuse rating. For better protection, use a fuse with 1/2 the
current rating shown.
Here is the rule on impedance: if you plan to use more than a single pair of speakers at one time, make sure each speaker has an impedance of at least 8 ohms. If you plan to use only a single pair of stereo speakers, you can forget impedance.
Next: Testing Your Speakers