AMAZON multi-meters discounts AMAZON oscilloscope discounts
Speaker testing, as done by audio engineers, is a complicated business that requires expensive test equipment and even a special kind of fiberglass lined room, called a dead room. The engineers who design speakers use frequency response tests as a guide to monitor their work. For anyone else such tests aren't very useful.
Even if you have no test equipment, a few tests will help you get optimum performance from your speakers.
LISTENING TESTS
The most basic tests you can make, and in some ways the most useful ones, require little more than your two ears. Such tests do require that you identify subtle changes in sound that occur when you install speakers in different ways. Don't be discouraged if you fail to notice such changes at first. A trained ear requires practice.
FM HISS TEST
For this test you need an FM receiver and the speakers you want to test. To educate your ear, prepare a small reflector from a piece of hardboard or smooth particle board that is about 12" x 12" in size. Leave one side smooth, but glue or staple a 2" to 4" thick piece of fiberglass to the other side. Connect a bare speaker to one channel of the receiver, and, if possible, an enclosed speaker of the same model to the other channel. Turn the balance control all the way to the channel with the bare speaker. Disconnect the antenna from the receiver and tune for no signal, so that you get only the hiss that occurs between stations.
Hold the unbaffled speaker near your ear. Place the reflector behind the speaker with its smooth side toward the rear of the cone. Move the reflector in and out of the speaker's rear field as you listen for any changes in the sound. The reflector will probably produce a nasal quality by making the frequency response more peaky in the mid-range. Learn to identify this change of character when the reflector is in place.
Reverse the reflector so that the fiberglass pad faces the rear of the speaker cone. Repeat the procedure described above. Then reverse the reflector again, alternating from the smooth side to the side with the damping material. As you learn to recognize reflective coloration, you will appreciate the need for damping material behind enclosed cones.
Turn the balance control to favor the enclosed speaker, then back to the unbaffled one. If you hear a change in quality between the two speakers, it will be because of box coloration. Use this test to find the best amount and placement of damping material in the enclosure.
Engineers use a test similar to this to judge the degree of coloration in speakers. The only difference is that they use an expensive signal generator, one that produces a wide range of frequencies simultaneously. Such a generator is called a white noise generator and the test, a white noise test.
CRITICAL LISTENING
The only equipment you need here is your speakers, a tape deck or record player, and a receiver. Choose program material that you know; voice recordings are good for judging naturalness. If possible put your speakers outdoors on a quiet day to eliminate the effects of room acoustics. When listening to speakers indoors, even a slight change of position can produce a totally different room effect.
Listen first for a nasal quality, the kind of voice sound you get by holding your nose while speaking or singing. Of course you must discount any nasality that naturally occurs in any singer's voice. If the speaker fails this test, apply the FM hiss test and check the damping material in the box.
Next, adjust the volume control for a low sound level. If the speaker is peaky, you may hear only the peaks, making it sound thin or limited in range. This can be a rigorous test. It can be used indoors to help in adjusting mid-range and tweeter controls.
Don't be too dejected on the basis of a single program source.
Commercial recordings and radio station transmissions vary greatly in audio quality. As you develop a critical listening ability, you will be amazed at the range in quality from such sources. And when a good source comes along, you'll be amazed at the kind of performance your speakers can deliver.
In some ways, this is the most important test you can make with your speakers. Speaker design should be based on a solid technical foundation, but there is an art to getting the best sound from a set of speakers.
TESTS WITH A SOUND LEVEL METER
One of the most helpful pieces of test equipment that you can own is a sound level meter. If you have ever struggled to make frequency response tests with microphones, cables, pre-amps, amplifiers, and voltmeters, you will immediately recognize the great convenience of being able to dispense with all these dangling cables and separate pieces of equipment and, instead, hold it all in the palm of your hand. But even though you can hold a sound level meter in your hand, you can get more reliable data by installing it on a camera tripod. Radio Shack's Realistic Sound Level Meter, Model No. 42-3019 is a perfect example of a piece of test equipment that combines convenient operation with low cost. With it you can test your entire stereo system, including the room as well as the components.
To use the sound level meter, mount it on a tripod and set the tripod a few feet from a speaker enclosure with the microphone end of the meter aimed at a 90° angle to a line between the meter and the speaker (Fig. 9-1). This position allows you to remove your body from the path of the sound where it would either block or reflect sound to the meter. The microphone pick-up pattern is non-directional at all but the highest frequencies.
Adjust the weighing selector to the C position. This produces a nearly uniform response curve from 32 to 8000 Hz. Set the response selector to the slow position. Put a test record on your phonograph. Most test records have an introductory test level tone of 1000 Hz; use this to adjust the range setting of the sound level meter so the meter will respond to the tone but isn't overdriven by it. Ordinarily you would find a suitable range band, say the 80 dB setting, then adjust the volume control on your amplifier or receiver so that the meter reads 0 dB. Make a record of the response level for every tone recorded on the test record, then plot it on a graph.
The next step is to correct any imbalance you find on your graph or data table. Minor variations in response levels can often be corrected by use of the mid-range and tweeter controls. If your data shows a huge peak in bass response, try pulling the speaker cabinet out from the wall a few inches. Or set it up on a pile of books and test again. When you find the optimum position, you can buy or make a permanent stand for it.
You can also use your sound level meter to test the dispersion characteristics of your speakers. Set up the sound level meter at your usual listening position and check to see that you are getting good high frequency coverage there. Note that you must make allowance for the normal reduced sensitivity of the microphone in the sound level meter to high frequency sound from the 90° angle at which you will use it. A polar graph in the booklet that comes with the meter shows that the response is down about 5 dB for 8000 Hz at 90°, and about 7.5 dB for 15,000 Hz at 90°.
If you have a compact speaker that sits on the floor, you may find that a speaker stand will improve dispersion, especially if the stand allows for a slightly angled tilt. The sound level meter will help you get the correct angle.
FREQUENCY CORRECTION WITH AN EQUALIZER
For an easy way to correct the frequency imbalances you may have discovered with your sound level meter, get a graphic equalizer. A low -cost model, such as Radio Shack Model No. 31-1988, will correct many of the problems caused by imperfect room acoustics. Or, for a more versatile control over even narrower frequency bands, you can go all out for the 10-band model, Model No. 31-2000.
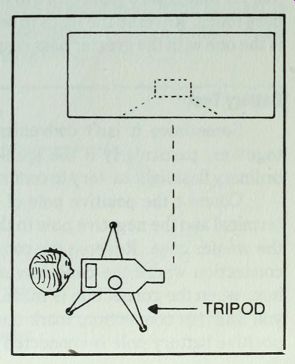
Fig. 9-1 . Test set-up with sound level meter.
Graphic frequency equalizers are the last step in the evolution of tone controls which began with a single knob on old radios that cut the highs. Next, hi-fi amplifiers boasted dual bass and treble controls that permitted boost as well as cut functions. These were not always adequate because tweeters usually have higher efficiency than woofers, and using the amplifier tone control to cut the tweeter puts the upper highs below audibility, so mid-range and tweeter controls were introduced. Now, with graphic equalizers, it is possible to focus on the particular frequency range that is too weak, or too prominent, and correct that band without disturbing the overall tonal balance. This ability not only corrects for room acoustics, but it can make a low-priced speaker sound like a much more expensive model.
POLARITY TESTS
For the reasons mentioned in Section 1, it is essential that your stereo speakers be connected so that they are in phase with each other. In the tests that follow, notice that you must alter the connections on one speaker only. If you switch the leads to both speakers, their polarity with respect to each other is the same as in the first connection.
Listening Test
Place the two speakers close together, face to face. Feed a 100 Hz tone from a test record to them, or select music with heavy bass tones. Reverse the leads to one speaker. The correct hook-up is the one with the greater bass response.
Battery Test
Sometimes it isn't convenient to move the speakers close together, particularly if the speakers are large. You can use an ordinary flashlight battery to confirm the speakers' polarity.
Connect the positive pole of the battery to one speaker box terminal and the negative pole to the other while someone watches the woofer cone. Reverse the connections if necessary to find the connection where the cone moves forward, or outward from the box, when the connection is made, backward when broken. When you find this connection, mark the speaker terminal to which the positive battery pole is connected with a red dot. Do this for each speaker and observe these marks when you connect the speakers to your receiver.
If you can't remove the grille cloth, you can make this test by holding a single sheet of newspaper over the grille cloth in front of the woofer. Watch the movement of the newspaper to determine the direction of woofer cone travel.
As mentioned, you need nothing more than a battery and some wires to make this test, but the speaker damper tester, described later in this Section, provides a more convenient way of hooking up a battery without loose connections that can confuse the results.
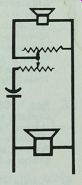
DAMPING TEST
To test your speaker and enclosure combinations for proper damping, you need only a cheap homemade tester. The circuit of the tester is shown in Fig. 9-2 and a list of parts in Table 9-1. This tester can be built in an empty tuna can. The resistor can be any value from V* to V2 ohm. Ideally it should be based on the damping factor of the receiver or amplifier that you will use with the speaker, but the value range given above will work well with modern receivers.
Connect the leads from the tester to your speaker. Flip the switch on and off, listening to the sound of the woofer at each flip. If the damping is inadequate, you will hear a thud or a bong instead of a click. If the sound is a bong on the "make" connection as well as on the "break," the speaker is seriously underdamped. If the sound is a click when you make connection, but a bong on the break, it is slightly underdamped. If it is click on each connection, the speaker is adequately damped, perhaps even overdamped. If the speaker is overdamped, the box may be too large. You can reduce cubic volume by adding bricks or blocks of wood.
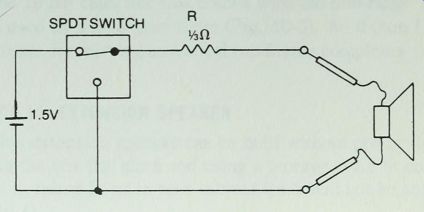
Fig. 9-2. Wiring diagram for clamper tester.
--------------
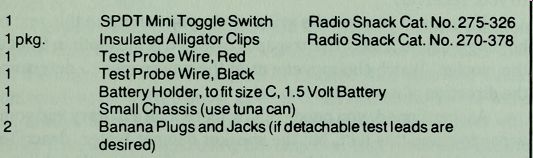
Table 9-1. Parts List for Damper Tester.
Radio Shack Cat. No. 275-326
Radio Shack Cat. No. 270-378
SPDT
Mini Toggle Switch pkg.
Insulated Alligator Clips Test Probe Wire, Red Test Probe Wire, Black Battery Holder, to fit size C, 1.5 Volt Battery Small Chassis (use tuna can)
Banana Plugs and Jacks (if detachable test leads are desired)
--------------------
To add damping, staple a blanket of fiberglass over the back of the speaker frame. Stretch the fiberglass as you staple it, so that it is taut rather than floppy. A thickness of about 1" is usually adequate.
This test is particularly useful for speakers in ported boxes because such systems require heavier damping than closed box speakers to avoid the boom box effect. It is difficult to measure the damping of ported box speakers any other way without expensive test equipment.
Make the final adjustment of damping material by a listening test.
Next: More Projects