SEMI-PRO RECORDING--How to make your own demo tape
by VINCENT FICARA and PETER PONZOL
SEMI-PRO recording, judging from the amount and variety of equipment now available, obviously has enormous interest for today's aspiring musicians and recording engineers. The recording gear, although certainly not cheap, is priced at about the level of high-end home hi-fi equipment. Given the proper equipment and the know-how to operate it, a talented "basement" recordist can produce tapes of master quality-meaning worth cut ting a disc from.
Some months ago I was approached by a friend, Peter Ponzol, for some advice about recording equipment. Peter is a talented jazz musician who has appeared on records with Buzzy Linhart and Todd Rundgren and live with Jose Feliciano, Ira Sullivan, and other well-respected performers. He had recently received a Jazz Performance Grant Fellowship from the National Endowment for the Arts to make a recording of his own works. It occurred to me that here was an opportunity not only to help Peter, but to ac quaint our readers-many of whom are already into semi pro recording to some degree-with some of the latest gear and how it is used.
I recruited (it wasn't difficult!) another friend, Vincent Ficara, to serve as the recording engineer on the project.
Vinnie was ideal for the job: he was an experienced home recordist (he owned a pair of Tandberg open-reel machines long before they were transistorized), had played electric bass in a moderately successful local rock band, and had taken several electronics courses at the RCA Institute. By profession, he is also a computer programmer, a fact that I did not at first think was relevant to the re cording project. But it turned out to be very important, for training in writing computer programs makes it easy to conceptualize the complex signal-flow paths that normally occur when you use a mixer's multipurpose inputs and outputs to full advantage. It was also important that Vinnie had no experience with the type of semi-pro gear he would be using, for I felt that someone who had come to the equipment fresh would be best able to appreciate and write about the problems facing the novice in the field of semi-pro recording.
Throughout the article that follows, the authors assume that the reader already knows basic tape-recording and microphone theory, and they have tried to maintain a balance between providing too much detail about technique and too little. And keep in mind that this is a mere introduction to a large subject; no one article or even a book could provide all the information needed to turn anyone into a Master Recordist overnight. We are grateful to the various manufacturers who loaned equipment and gave generous advice in both planning and execution stages of this project, and we hope that all our efforts provide some insight into the joys, the problems, and the fantastic creative potential semi-pro recording opens up to the ambitious amateur.
-Larry Klein, Technical Director
---
By Vincent Ficara and Peter Ponzol
-------------
THE PROJECT: production of a master tape that would be used to produce a record album.
THE INSTRUMENTATION: five musicians playing drums, acoustic bass, synthesizer (keyboard and percussion), sax, flute, and percussion.
THE SITE: the living room-a little tight, but we would manage.
---------------
Preliminary Planning
We had thought originally that we would do the recording on a four-track tape deck, but we rejected that approach because it would have meant premixing stereo tracks for drums, acoustic bass, and synthesizer, leaving only two tracks for overdubbing reed and percussion instruments. You can, with a little ingenuity, "bounce" tracks around and record, say, nine different tracks on a four-track deck, but with an inevitable loss of sound quality. In a typical four-tracker you might first record three tracks, play them back, mix them as desired, and then rerecord the three tracks combined onto the fourth track. Then you erase the original three tracks, opening up three "new" tracks to record on. But . . . each time you "bounce" a track it is another generation away from the original, and each new generation means some deterioration of the original sound.
All other things being equal, the best results in multitrack recording are achieved when there's a separate track available for each microphone being used. But in the real world of home re cording this is seldom possible: you never seem to have enough tracks no matter how many are available. Al though most amateurs will be working with a four-track deck, an eight-tracker permits recording each track at optimum level and equalization. It also offers the option of adding reverberation and/or other signal processing to any of the recorded tracks individually during the mix-down session rather than earlier. And, finally, it provides complete control of the mix of the individual instruments during the mix-down session. It was for these reasons (as well as the fact that one was avail able) that we chose to use an eight-track deck, but much of what follows is as applicable to four tracks as to eight.
Prior to this project, the closest I had been to eight-track equipment was at the 1976 Audio Engineering Society convention in New York, where I spent a good part of a day at the Teac/Tascam exhibit twisting knobs to my heart's content. It was my first exposure to the Model 80-8 eight-track, 1/2-inch tape deck and the Model 5 mixing board. Fascinated, I gathered all the al lied literature I could get my hands on at the convention and spent the rest of the year digesting it.
When this recording project suddenly developed, I found that a consider able amount of additional research was necessary before I could decide what equipment I would need, especially in the microphone area. So the first thing I did was to get my hands on a number of reference books (see the recommended reading list herewith). Then, armed with this secondhand expertise (and with a few firsthand experts available to ask questions of), I selected the equipment; you'll find it all listed in the box on the previous page.
---------------------
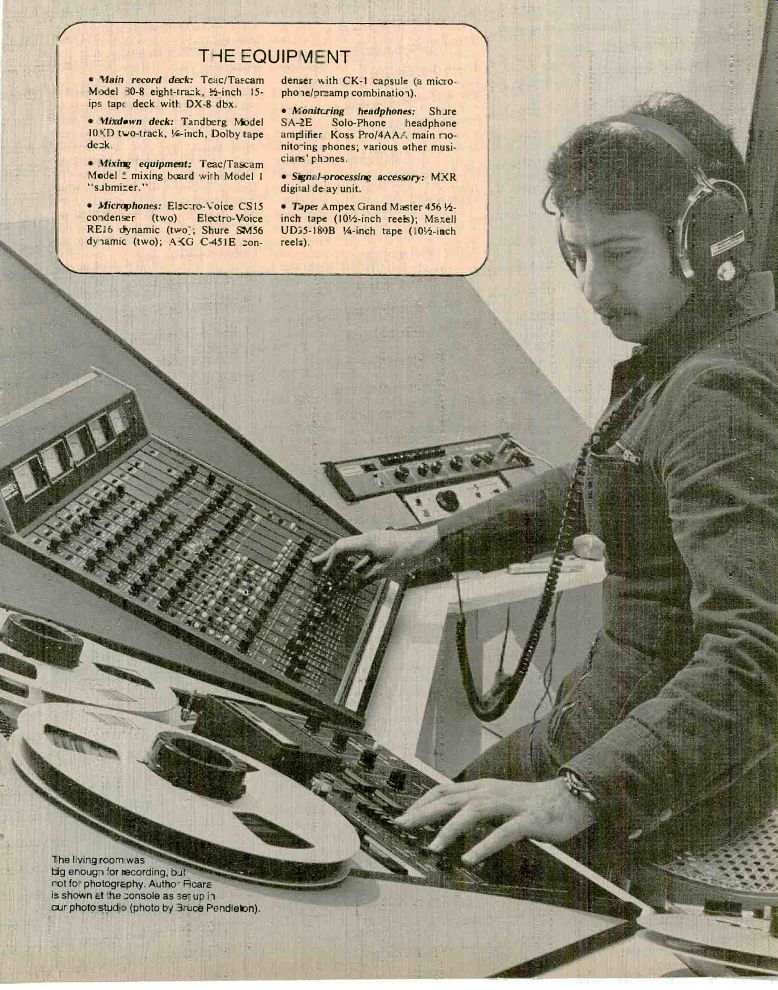
THE EQUIPMENT
Main record deck:
Mixdown deck:
Model mixing board
Microphones: EV CS15 condenser (two) Electro-Voice REI6 dynamic (two Shure SN456 dynamic (two)
Headphones Ampex Grand Master
Maxell
----- (photo by Bruce Pendleton).
--------------------------------
-------------------
The Mixing Board
The mixing console is the heart of the recording session. It provides complete control over the signals that come into the board as well as how the signals will be handled in terms of equalization (EQ), reverberation, or any other signal processing you may have connected to the setup. You can direct any input signal to record on any track.
You can play back previously recorded tracks while recording new tracks (pro viding the tape deck has multitrack synchronizing capabilities). You can combine two or more inputs, mix them together, and direct the combined signals to any track(s) you wish. You have monitoring facilities that enable you to monitor any or all incoming signals in any combination you wish. You have facilities to feed any signal to the musicians' headphones. In fact, there are so many options that it would take a separate article to describe them in detail.
My own interconnections between the Model 5 and Model 1 mixers and the Model 80-8 eight-track deck for these recording sessions were arrived at after a great deal of deliberation.
Considerable thought was required in order to work out the interconnections for maximum convenience and minimum need to plug and unplug audio cables each time I had to do something different. I found it very worthwhile to invest some time in organizing a logical approach to the problem. As a first step, I made up a chart listing all the instruments to be recorded. I then decided which instruments would go on the basic tracks and which would be over dubbed. I also worked out and listed the microphones, the console inputs, and the track assignments I would use for the specific instruments.
Microphone Setup When track assignments were decided upon, I was ready to set up the microphones. I anticipated that the drum set would be the most time-consuming setup, so I did that first. Micro phone inputs 1 to 5 on the console would be used for the five microphones covering the drum set. Input I was fed a signal from the CS15, a cardioid condenser microphone mounted on a "baby" boom positioned approximately one foot above the left cymbal and aimed directly down toward the edge where the sound seemed to be richest.
I chose an electret condenser mike over a dynamic because I believed it would be better able to handle the high-frequency transients produced by the cymbals. But this also meant that I had to be careful to avoid overloading the microphone's built-in electronics with high sound-pressure levels. Once an overload has occurred within the microphone itself, trimming the console's input doesn't help since the arriving signal has already been distorted.
Having considered this possibility, I decided to install a 10-dB attenuator "pad" between the capsule and the electronics of the microphone. Any further gain or attenuation needed in its signal output would be handled at the mixing board. Although the main reason for placing this microphone where I did was to pick up the left cymbal, I also wanted it to provide overall pickup of the left side. I set the basic equalization at the mixer to roll off everything from 200 Hz on down.
Mixer input 2 was fed a signal from the RE16 dynamic cardioid microphone located several inches above and off to the side of the floor tom-tom's head. The cardioid microphone takes its name from the heart-shaped pattern of its directional (polar) response. It is designed to respond best to sound reaching it head-on and to reject sounds coming in from the sides and rear. However, because of the nature of sound, it is difficult for any micro phone to reject off-axis low frequencies, and some lows do get through unaccompanied by the rejected highs.
The result is referred to as "off-axis" coloration. The RE16 was chosen be cause it suffers from this problem less than most and has a good overall frequency response.
Obviously, experimentation with mike aiming and placement will also help avoid off-axis coloration and the muddy-sounding tracks it can produce.
In any case, you can assume that there will always be some leakage of the sound of one instrument into another instrument's microphone, and there are certain steps you can take to minimize it. In the case of the floor tom, I rolled off everything above 10,000 Hz-the tom has no significant output up there anyway-so that high-frequency room noise and leakage from the cymbals would be cut back.
The kick drum was next. I used an SM56 dynamic cardioid microphone.
The SM56 has good bass and good overall response. I packed the kick drum, one head of which was removed, with a blanket pressed against the skin to provide more of a "thud" quality, and I aimed the SM56 off-center where it picked up the sound quality I wanted.
The signal from this microphone was fed to input 3. I set the mixer to filter frequencies above 5,000 Hz to help minimize leakage from the rest of the drum set. I placed another RE16 equi distant from the hi-hat cymbal and the snare drum, filtering everything below 200 Hz to minimize leakage from the kick drum. The microphone was connected to input 4. For the overhead-right cymbal I used another CS15, with the same EQ setting as the overhead-left cymbal, connected to input 5.
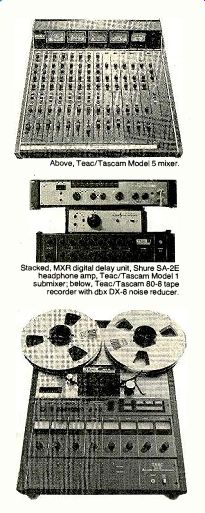
--------------- Above, Teac/Tascam Model 5 mixer. Stacked, MXR digital delay unit, Shure SA-2E headphone amp, Teac/Tascam Model 1 sub-mixer; below, Teac/Tascam 80-8 tape recorder with dbx DX-8 noise reducer.
It is not always necessary to use this many microphones in order to capture a good drum sound, of course. Two cardioid microphones directed 90 degrees apart and aimed at the drum set from several feet away can produce a very good sonic image. However, this method requires a favorable acoustic environment; otherwise, the mikes will pick up too much room-reflected sound, which will dilute the "tight" drum quality that is wanted. Close miking would, for the most part, pick up only the direct, tautly damped sound.
Fixing the Phase
My decision to use five microphones created difficulties that required several hours to resolve. The major problem was controlling phase cancellation.
Consider the fact that there are many sound waves emanating from the different components of the drum set.
These sound waves reach the differently located microphones at different times, thus creating random phase electrical audio signals. When such signals are mixed, some frequencies will add and be boosted, while others will cancel and be reduced. Close miking of the instruments helps considerably in avoiding this, because sound reaching a distant microphone from other instruments will have a lower sound-pressure level and will therefore have less effect on the mixed signal. One technique for guarding against phase cancellation employs what is known as the 3-to-1 rule: whatever the distance one micro phone is from an instrument, no other microphone should be closer than three times that distance. For example, if you place a microphone I foot from the cymbal, you should not place another microphone within a 3-foot radius of it.
Frequency cancellations will not be heard when monitoring tracks individually. Each component of the drum set may sound good until the mix-down, when you suddenly find that the whole is unfortunately less than the sum of its parts. In order to avoid such surprises, it is a good idea to listen to the drum tracks mixed down into mono before taping them. Any problems can be detected at that point and adjustments can be made in your microphone placements and EQ.
It took me several hours of trial and error before I got the drum tracks to sound right.
The Model 5 mixing board has extensive monitoring facilities that enable the operator to mix and monitor the in coming signals in various ways without affecting signals going out to the tape deck. These include separate panning and volume controls, plus the solo but tons that allow the operator to monitor one or more inputs to the exclusion of all others.
Signal Assignments
At this point I had five mikes picking up the drum set and connected to mixer inputs 1 to 5. It was necessary to mix the five inputs down to a stereo pair that would be recorded on two of the eight tracks. The Model 5 has four "summing" busses that are used when it is necessary to combine two or more signals. For the drums I used output busses 1 and 2, which were destined to represent the left and right channels of the stereo drum mix. I panned the left--overhead (input 1) and the tom-tom (in put 2) toward the left channel, and I directed the kick-drum signal (input 3) equally to both left and right channels, thus placing it in the center of the stereo image. The right-overhead (in put 5) and the hi-hat/snare (input 4) were directed toward the right channel.
Output buss 1, left channel, was connected to tape-track 2. Buss 2, right channel, was connected to tape-track
4. I purposely separated the two tracks in order to minimize crosstalk between the left and right channels and maintain the best separation possible.
After I had established the proper re cording levels, I moved on to set up the keyboard synthesizer; this wasn't going to be miked, but instead would be fed directly into the mixer via its high impedance unbalanced output. I connected the synthesizer's output to a direct box whose purpose is to match the output characteristics of the synthesizer to the input of the console. The synthesizer's electronics were a little noisy, so I rolled off the high end just enough to cut out some of the hiss without affecting the quality of the signal. I established a good recording level and assigned the synthesizer (input 8) to tape-track 5.
Next to be dealt with was the bass guitar. It had a pickup on it which enabled me, using another direct box, to feed it directly to console input 7 and also to the input of its bass amp. I set up the bass amp in another room and placed an SM56 microphone to pick up the signal slightly off the center of its I5-inch speaker. (The bass amp was set up in the other room to avoid acoustic leakage from the drums onto the bass track and vice versa.) The SM56 micro phone was connected to mixer input 6.
--------
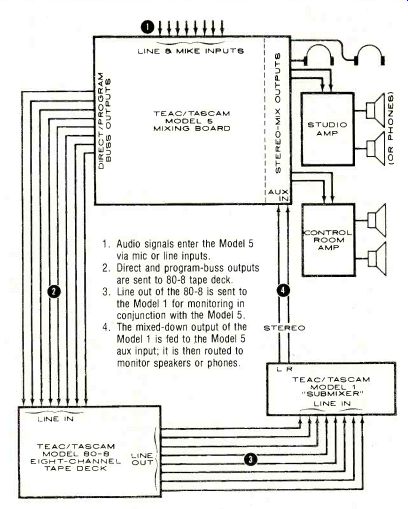
1. Audio signals enter the Model 5 via mic or line inputs.
2. Direct and program-buss outputs are sent to 80-8 tape deck.
3. Line out of the 80-8 is sent to the Model 1 for monitoring in conjunction with the Model 5.
4. The mixed-down output of the Model 1 is fed to the Model 5 aux input; it is then routed to monitor speakers or phones.
---------------------
SEMI-PRO...
"A psychological danger is posed by the mixing board. You may feel you have to use everything at all times just to be sure you're getting your money's worth."
I used both a direct-box pickup and a microphone pickup because the direct signal into the mixer was too "clean" and lacked the special tonal characteristics of the bass amplifier and its associated speaker.
Using output buss 3, I mixed the two inputs so as to combine the best qualities of both pickups, filtering every thing above 10,000 Hz for both inputs.
It was vital that both the direct and the miked signals be in phase here; otherwise, the low frequencies would can cel. This is similar to the earlier problem with the drums, except that with the bass amp it is a matter of electrical rather than acoustical phase. Most amps have a phase-reversal switch for checking out potential problems. The combined signal assigned to output buss 3 was directed to tape-track 3, giving us a premix of the drums on tracks 2 and 4 and the bass guitar on track 3.
The Basic Tracks
We were finally set to record the basic tracks. Each musician had to wear headphones in order to hear what the others were doing. I used the line-level studio feed of the Model 5 to drive a Shure stereo headphone amp which has two headphone feeds. For the third musician I used the built-in headphone amp from the model 5. Since the musicians would have no trouble hearing the drums (they're loud!), it was not necessary to give them a drum mix in their headphones. The three musicians were fed the same mix of bass guitar and synthesizer. If it were necessary, the Model 5 could have delivered different mixes. We played around with the level and balance controls of the headphone feeds until everyone was satisfied. Like most amateurs, I didn't have a soundproof control room to monitor from, so I also used a pair of headphones for monitoring. It was important that my phones be able to tell me exactly what was going onto the tape while being able at the same time to sustain high sound-pressure levels and maintain good acoustic isolation from room sounds. The musicians' headphones weren't as critical in these respects.
While the group was warming up, I established the levels for both the Mod el 5 mixing board and the Model 80-8 tape deck. The Teac/Tascam 80-8 came already biased and set up for Ampex Grand Master 456 tape, so that's what we used. The machine could, of course, be readjusted for any type of tape, but the Ampex tape is recommended by Tascam, and rebiasing is a fairly involved process, something not to be attempted without adequate equipment and know-how.
It became necessary at this time to make some minor adjustments in level and equalization, for when you hear all the musicians playing together, the interaction of the various tracks can sound different than when heard individually. That's why it is imperative that all the tracks be monitored in approximately the same stereo mix as the final mixdown. However, each track should be recorded with optimum level and equalization, since once the musicians have gone home, you have to work with what you've got and there's only so much you can fix in the mix, especially with the premixed tracks.
A psychological danger is posed by the mixing board with its profusion of knobs and switches. You may feel that you have to use every one at all times just to be sure you're getting your money's worth. But be careful: it is very easy to misuse the equalization facilities. Experiment with different subtle equalization settings to achieve the results you want. On the other hand, despite its imposing appearance, I found the Teac 80-8 tape deck very simple to operate. You depress the function-select button for those tracks you wish to record, and the dbx noise-reduction unit (optional) will automatically switch to the encode mode. The LED's blink for those tracks that are in the record-ready mode. Simply press the forward and record buttons of the tape transport and you are recording.
You can, of course, "punch in" if you find it necessary to rerecord over only a portion of a track. Punching in switches a track from the play to the record mode while the tape is running.
For example, say you've recorded a good track, except that at one point a musician came in a little late or played a wrong note. Rather than rerecording the entire track, you can have the musician monitor and play along with his previously recorded version-and at the appropriate moment, between notes or during a natural pause, you punch in. When you reach the next natural pause you simply "punch out." If the timing and the levels are right, the "correction" will not be heard as such in playback.
---------------
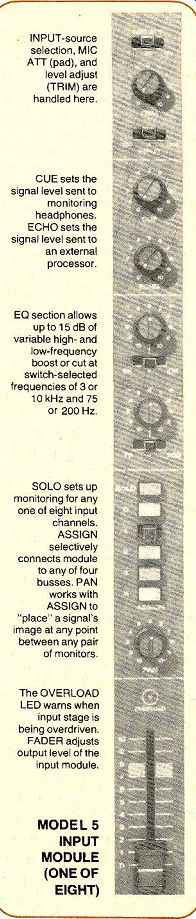
INPUT-source selection, MIC ATT (pad), and level adjust (TRIM) are handled here.
CUE sets the signal level sent to monitoring headphones.
ECHO sets the signal level sent to an external processor.
EQ section allows up to 15 dB of variable high- and low-frequency boost or cut at switch-selected frequencies of 3 or 10 kHz and 75 or 200 Hz.
SOLO sets up monitoring for any one of eight input channels.
ASSIGN selectively connects module to any of four busses. PAN works with ASSIGN to "place" a signal's image at any point between any pair of monitors.
The OVERLOAD LED warns when input stage is being overdriven.
FADER adjusts output level of the input module.
MODEL 5 INPUT MODULE (ONE OF EIGHT)
--------------------
The Noise Reducer
The DX-8, as the dbx unit available with the Model 80-8 is called, is a wide-band compression-expansion system that provides noise reduction across the full audio band (not just the hiss frequencies) of about 30 dB for each of the eight tracks individually. In addition, the dbx DX-8 system is able to provide a tape recording with a dynamic range greater than 100 dB-important when you're doing live recording.
Not only can you get more signal on the tape, but you can also record at lower levels than normal without hiss, which insures lower distortion and more headroom when required.
Overdubs
Over several weeks of evening sessions we managed to lay down all the basic tracks, and the overdubs were re corded over the next several weeks as the various musicians became avail able. Tracks 1, 6, 7, and 8 were avail able for overdubs. Our first overdub was of a soprano saxophone. I used a C-451E electret condenser microphone with a cardioid-pattern capsule (the C-451E has provisions for interchanging capsules). I set up the mixer to feed a mix of previously recorded tracks to the musician's headphone feed so that he could play along with them. Of course, when a take didn't work out right for some reason we could rewind and start again without affecting the tracks already recorded. I had the C-451E connected to the Model 5's in put 1 while I directed the output to tape-track 7. The track was recorded with very little equalization.
Some of the overdubs involved re cording an alto saxophone and flute, with the musician occasionally changing instruments during the same cut.
Other cuts were overdubbed with a percussion synthesizer that uses a drum-like surface instead of a key board to generate its sounds; the harder you hit it, the higher the pitch. This synthesizer was connected to mixer in put 2 via a direct box. A CS15 was also mounted nearby in order to pick up the various other percussion instruments bells, triangle and a gong-as well as a vacuum-cleaner hose (when swung through the air it creates interesting sounds, particularly when a micro phone is accidentally struck!) and an assortment of various other sound-producing devices. The CS15 was connect ed to console input 3. Inputs 2 and 3 were mixed using output buss 4 and directed to tape-output 1.
Finally, we completed the planned recording. Tracks 6 and 8 were left open in the event we wanted to add something at a later date. Track 6 was eventually used to record some special effects using the flute track and the MXR digital delay. Although the MXR unit is capable of a wide variety of effects, the basic function of the unit is quite straightforward. The input signal is processed through circuitry that de lays it by a selected amount of time. It is then mixed back with the "dry" or un-delayed signal at the output of the delay. The effect produced will depend upon the amount of delay time chosen.
The basic effects that can be obtained by using appropriate portions of the wide delay range provided by the MXR unit include discrete echoes, vocal doubling, and hard reverberation. In addition to those basic effects, the MXR contains circuitry that permits such unique effects as flanging (mixing an erratically delayed version of the main signal with the main signal itself), pitch alterations (vibrato, pitch bending), frequency modulation, and infinite (non-deteriorating) signal repetition.
The end result was a tape full of discrete tracks that had to be brought together into a standard two-channel stereo version. It was mix-down time!
Final Mix-down
For the mix-down sessions, all of the eight input modules of the Model 5 were fed by the line outputs of the 80-8 ape deck. The seven recorded tracks were mixed onto program busses 1 and 3, which fed the left and right channels of a Tandberg 10-XD two-track deck biased for Maxell UD35 back-coated ape. The program busses of the Model 5 provide a pair of jacks in parallel for each of its four outputs. This enables a monitoring amplifier and speakers to be connected so that you can listen to the mix being fed to the two-track deck.
Each of the eight modules of the Model 5 can also be switched to send a signal through the MXR unit for processing. In the MXR the processed signals are mixed with the "dry" (un processed) signal and can be selectively returned at various levels to any and all program busses. Aside from some special effects, the MXR was basically used to add reverberation whenever he close-miked instruments lacked "depth." As with equalization, reverberation can be overdone. Unless you're going for some special effect, it's usually best to keep it subtle.
How did it all work out? In a word, superbly! Peter Ponzol has his master tape, and I have realized a long-standing fantasy of serving as a recording engineer. In addition, I had the plea sure of working with some really beautiful equipment. What more could any one ask-except to own it!
--------------
RECOMMENDED READING
THE following five books make up an extremely useful small reference library for the semi-pro recordist. If you are unable to find them at your local bookstore, library, or audio shop, you can order directly from the publisher at the addresses given. Be sure to include applicable state and local sales taxes when ordering by mail.
- Microphones: Design and Application, by Lou Burroughs, 260 pp., illus., $20 hardbound, $12.95 soft-bound (postpaid). Sagamore Publishing Co., 1120 Old Country Road, Plainview, N.Y. 11803.
- Sound Recording, by John Eargle, 327 pp., illus., hardbound, $16.95 (postpaid on prepaid orders). Van Nostrand Reinhold Co., 450 W. 33 St., New York, N.Y. 10001.
- Handbook of Multichannel Recording, by Alton Everest, 322 pp., illus., $10.95 hardbound, $7.95 soft-bound (postpaid on prepaid orders). Tab Books, Blue Ridge Summit, Pa. 17214. (A "best buy.")
- Modern Recording Techniques, by Robert Runstein, 368 pp., illus., soft-bound, $9.95 plus 50c postage. Howard W. Sams 8z Co., Inc., 4300 W. 62 St., Indianapolis, Ind. 46206.
- The Recording Studio Handbook, by John Woram, 496 pp., illus., hard bound. $35 postpaid. Sagamore Publishing Co., 1120 Old Country Road, Plainview, N.Y. 11803.
-------------
Also see:
HOW TO GET INTO THE MUSIC BUSINESS--It's simple: make a demo, get a manager, and keep pushing, RICK MITZ
TAPE TALK--Morse Mozart, CRAIG STARK
Source: Stereo Review (USA magazine)